Features
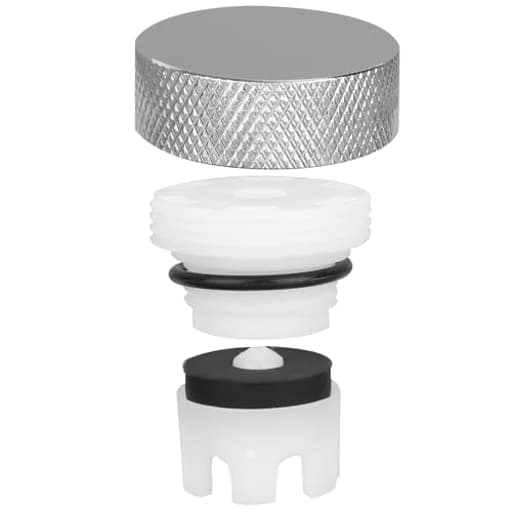
- Product List: The faucet vacuum breaker repair kit includes 1 vacuum breaker cap, 1 plunger and 1 vacuum breaker body for full frost-free sillcock valve maintenance.
- Compatibility: These replacement parts are designed specifically for Eastman faucets (model 45417). Please note that our product is not sponsored or endorsed by, or affiliated with the brands it fits, including Eastman.
- Premium Material: This vacuum breaker repair kit is made of good-quality zinc alloy, rubber and plastic material for long-term performance and durability in outdoor faucet applications.
- Prevents Backflow: This vacuum breaker repair kit ensures safe drinking water by preventing reverse siphoning into your portable water supply, meeting plumbing safety standards.
- Simple Installation: Simple replacement process with intuitive parts design, just detach old breaker and snap in new assembly.
Specifications
| Color | silver, white |
| Size | 0.67 x 1.14 x 0.39 inches |
| Unit Count | 1 |
Related Tools
This vacuum breaker repair kit includes a vacuum breaker cap, plunger, and body for servicing a frost‑free sillcock (outside faucet) anti‑siphon valve. The zinc‑alloy, rubber, and plastic components restore the anti‑siphon function to prevent reverse siphoning into the potable water supply and snap into place for simple installation.
lasuroa Vacuum Breaker Repair Kit for Eastman 45417, Vacuum Breaker Outside Faucet Anti Siphon Valve Repair Kit Frost-Free Sillcock Valve Replacement Parts Review
Why I reached for this repair kit
A dripping vacuum breaker on a frost‑free sillcock isn’t just an annoyance—it compromises the anti‑siphon protection that keeps your potable water safe. I prefer to repair rather than replace when it’s practical, so I picked up this vacuum breaker repair kit to refresh an older Eastman-style frost-free outside faucet. The kit promises a quick swap of the cap, plunger, and body, restoring the anti‑siphon function without replacing the entire faucet. After putting it to work on my own fixtures, here’s how it stacked up.
What’s in the box and first impressions
The kit is simple and complete: a vacuum breaker body, a spring‑loaded plunger with rubber seal, and a new cap. Materials are a mix of zinc alloy (for the cap), rubber (for the seals), and plastic for the internal body and guide. That’s standard for this class of repair part and appropriate for outdoor, seasonal use. The finish is clean, threads are free of burrs, and the plunger cycles smoothly by hand.
There’s no fluff here—no unnecessary adapters or mystery parts—so you’re not paying for extras you won’t use. Instructions are minimal, but the assembly is straightforward if you’ve serviced hose bibb anti‑siphon valves before.
Compatibility and sizing notes
This kit is designed around the Eastman 45417 layout, which is a common frost‑free sillcock design with an ASSE 1019A-style atmospheric vacuum breaker. If your faucet uses a similar removable vacuum breaker module, this will likely drop in.
Before buying, I always measure. Two dimensions matter in particular:
- The male thread outside diameter on the vacuum breaker body that screws into the faucet. On mine, it measured right at about 0.80 inch (roughly 13/16), which matched the original.
- The plunger body diameter (not just the seal). I measured approximately 0.53 inch, again consistent with the factory part.
Because the kit includes a new cap, the cap’s thread diameter is less critical; it mates to the supplied body anyway. If your faucet’s vacuum breaker is permanently crimped or uses a different standard, this isn’t the right part. For anything outside of an ASSE 1019A-style frost‑free sillcock, check your manufacturer’s service diagram first.
Installation: genuinely quick
On my Eastman-style faucet, installation took under ten minutes with a small adjustable wrench and a rag.
Here’s the process I followed:
1. Shut off water to the faucet and open the handle to relieve pressure.
2. Unscrew and remove the old cap. If yours has a tamper-resistant set screw, back that out first.
3. Unthread the old vacuum breaker body from the faucet. A gentle counter‑clockwise turn is all it took on mine. If it’s stubborn, a few drops of penetrating oil and patience help—avoid crushing the housing with pliers.
4. Clean the mating surfaces and the cavity. Flush any grit or mineral scale so the new seal seats properly.
5. Lightly lubricate the plunger seal with a dab of silicone plumber’s grease. This isn’t strictly required but helps ensure smooth operation and a good initial seal.
6. Insert the new body and plunger assembly, then hand‑thread until it seats. Snug it with the wrench—firm, but don’t over‑torque.
7. Thread on the new cap, again snug but not excessive.
8. Restore water, close the faucet, and check for leaks both with and without a hose attached.
Everything snapped into place cleanly. No thread tape was needed on my faucet because the unit seals on an internal seat rather than sealing the external threads, but that varies by design. If your old unit used thread sealant on the body threads, a wrap or two of PTFE tape won’t hurt.
Performance in use
The key job of an atmospheric vacuum breaker is to prevent back-siphonage. Functionally, that means:
- When water is flowing and the hose is pressurized, the plunger lifts, water moves through, and the vent stays closed.
- When flow stops or negative pressure occurs, the plunger drops and air is admitted, breaking any potential siphon.
With this kit, operation was uneventful—in a good way. Flow rate through the faucet felt unchanged, the vent stayed dry during normal use, and there was no dribble from the cap when the hose was pressurized. After shutting off the faucet, the plunger relaxed with a soft click, and I saw the expected momentary release of pressure. That’s exactly what you want to see from a healthy anti‑siphon assembly.
I left a hose timer and sprinkler connected for a week to check for slow leaks. The cap stayed dry, and there was no nighttime weeping that sometimes shows up when the plunger doesn’t seat quite right. If you do observe intermittent drips, it’s usually a sign of debris on the seat, a nicked seal, or overtightening that’s slightly distorted the body—worth rechecking before assuming the part is faulty.
Build quality and durability
Outdoor faucet hardware lives a hard life—UV exposure, freezing temps, and occasional bumps from yard tools. The zinc alloy cap feels adequately robust, and the internal plastic components are on par with OEM parts I’ve serviced. I prefer metal threads where possible, but given the sealing method used here, the plastic body isn’t a concern. The elastomer seal on the plunger is the wear item; with clean water and proper winterization, it should last several seasons.
One tip: if your water has heavy mineral content, keep a nylon brush and a bit of vinegar handy. A quick annual clean when you winterize the faucet will extend the life of the plunger seal and vent.
Troubleshooting tips if you see leaks
- Drip from the vent during flow: Check that the plunger slides freely and that the spring isn’t bound. A tiny amount of silicone grease helps.
- Drip after shutoff: Inspect the seat in the faucet body for grit. Flush and reseat the unit. Confirm the faucet itself is fully closing upstream; a worn stem washer can masquerade as a vacuum breaker leak.
- Constant spray from the cap: The body may be cross‑threaded or not fully seated. Remove, clean threads, and reinstall by hand first to ensure alignment.
If the faucet housing is out-of-round from previous overtightening or corrosion, no repair kit will seal reliably—that’s when a full faucet replacement makes sense.
Value and who it’s for
Buying a whole new frost‑free sillcock is overkill when the only failed component is the vacuum breaker. This kit brings the assembly back to spec at a fraction of the cost and without opening a wall or dealing with solder/Pex connections. It’s ideal for:
- Homeowners with Eastman 45417-style faucets that have started weeping at the cap
- Anyone with an ASSE 1019A frost‑free spigot needing a simple anti‑siphon refresh
- Property managers looking to standardize quick repairs across multiple units
It’s less ideal if your faucet uses a non‑serviceable vacuum breaker or a different standard altogether. Always verify dimensions before you order.
Small gripes
- Minimal documentation: A one‑page diagram with torque guidance and a note on where the seal actually seats would help DIYers avoid overtightening.
- Not universal: It’s targeted, which is good for fitment when you have the right faucet, but it won’t solve every vacuum breaker issue across brands.
- Finish options: Strictly utilitarian. That’s fine for most hose bibbs, but if your fixture is highly visible, you’re limited to the silver/white look.
None of these are dealbreakers for a repair-focused part, but they’re worth noting.
Practical care and safety reminders
- Don’t leave a hose-end sprayer locked closed against the faucet for long periods. That keeps the vacuum breaker pressurized and can shorten seal life.
- Winterize properly. Disconnect hoses before freezing weather, drain the line, and leave the faucet open if your plumbing allows it.
- Test the anti‑siphon function seasonally. With water off, crack the faucet and listen for air admission at the vent—quiet but distinct.
Bottom line
As a straightforward, targeted fix for a leaky or failed anti‑siphon on an Eastman-style frost‑free faucet, this repair kit did exactly what I needed it to do. It installed quickly, sealed up on the first try, and restored proper vacuum break behavior without any noticeable effect on flow or day‑to‑day use. The materials are appropriate for outdoor duty, and the inclusion of all three core components—body, plunger, and cap—simplifies the job.
Recommendation: I recommend this repair kit for anyone with an Eastman 45417-compatible frost‑free sillcock or a similar ASSE 1019A setup who wants a quick, reliable refresh of the vacuum breaker. Measure your existing parts to confirm fit, take a few minutes to clean the mating surfaces before installation, and you should be back in service with a properly protected potable supply at low cost and with minimal fuss.
Project Ideas
Business
Seasonal Sillcock Repair Service
Offer a spring-and-fall service targeting homeowners to inspect and replace frost-free sillcock vacuum breakers. Market a fixed-price tune-up that includes replacement with the Eastman-compatible kit, winterizing checks, and a simple warranty — ideal for neighborhoods, HOAs, and property managers.
Pre-Packaged DIY Repair Kits
Source the vacuum breaker assemblies in bulk and sell branded DIY repair kits (include instructions, lubricant, basic tools, and optional plumber's tape). Create tiered SKUs: single-repair packs, multi-packs for landlords, and 'pro' packs with extra parts. Sell on marketplaces and local hardware stores.
How-To Content & Monetized Tutorials
Produce short, high-quality video tutorials showing diagnosis and quick replacement of frost-free sillcock vacuum breakers. Monetize via YouTube ads, sponsor partnerships with hardware brands, or gated paid courses for DIYers and new tradespeople. Use local SEO to drive leads for on-site services.
Plumber/Subcontractor Supply & Referral Program
Create a B2B program supplying replacement kits to local plumbers, landscapers, and property managers at wholesale rates. Offer volume discounts, branded packaging, and a referral kickback for technicians who recommend your kits to homeowners who then buy direct.
Winter-Ready Maintenance Subscription
Launch a subscription service for homeowners that includes annual visits to inspect outside faucets, replace worn vacuum breakers, and handle winterization. Include priority booking, discounted parts (the kits), and seasonal reminders — a recurring-revenue model that positions you as the go-to local specialist.
Creative
Miniature Steampunk Pendant
Use the zinc-alloy vacuum breaker cap and plunger as the centerpiece for a steampunk-style pendant or keychain. Polish the metal, add a patina or brass paint, mount the rubber/plastic components as textured details, and suspend from a leather cord or chain. Makes a conversation piece that nods to plumbing/engineering aesthetics.
Garden Drip Connector & Micro-Valve
Repurpose the vacuum breaker body as a micro-connector for a small DIY drip irrigation line. The internal plunger can be used as a simple one-way valve in a custom emitter. Ideal for potted plants or tabletop herb gardens where you need a compact anti-backflow element in a homemade watering system.
Educational Demo Kit — Anti-Siphon Principle
Build a hands-on classroom or maker-space demo showing how anti-siphon valves work. Mount the parts to a clear acrylic board, add small tubing and a water reservoir, and let students observe plunger movement and backflow prevention. Include labeled callouts and a short experiment sheet.
Upcycled Wind Chime / Garden Mobile
Drill small holes in the zinc-alloy caps, string several units together with fishing line or recycled chain, and combine with other metal bits to create a wind chime or garden mobile. The mixed textures (metal, rubber, plastic) give an industrial-art look and are weather-resistant.
Tiny Fountain or Water Feature Part
Integrate the vacuum breaker parts into a desktop water feature or tiny fountain as a decorative-but-functional check valve to prevent backflow into the pump. The compact size is ideal for small recirculating systems and gives a subtle mechanical accent.