Features
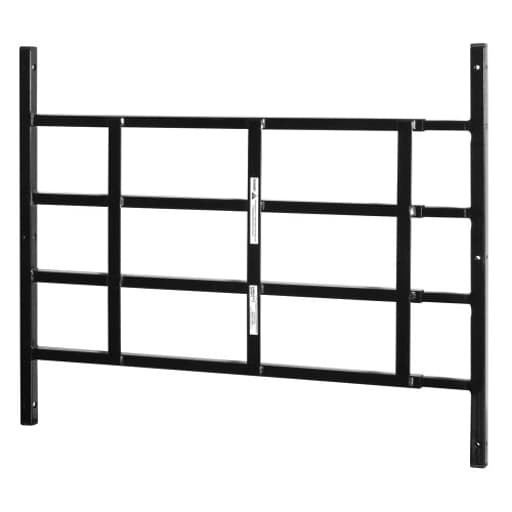
- SECURITY GRATE – Constructed of 0.048 inch thick, black carbon steel square tubing, this fixed window guard assists in preventing children from accidental falls through open windows; it features 3-7/8 inch bar spacing on center
- NON-EGRESS WINDOW BARS – This non-egress fixed guard cannot be opened or quickly removed in case of emergency; for windows requiring emergency access capabilities, please use appropriate hinged version of these window guards
- INSTALLATION – This window security bar features a fully adjustable telescoping width (prior to mounting) from 32-1/2 inch to 54 inch, and it comes complete with one-way, tamper-proof installation screws; designed for interior use only
- MEETS BUILDING CODES – This window grille meets New York City and New Jersey’s housing codes, and it was approved by the New York City Department of Health and Mental Hygiene, HDWG #04-09-2011
- NOTE – Please refer to the line art drawing for all dimensional information and compare with your needs before purchasing
Specifications
| Color | Black |
| Size | 31 in. |
| Unit Count | 1 |
Related Tools
Fixed 4-bar window grill made from 0.048-inch thick black carbon steel square tubing designed to reduce the risk of children falling from open windows. The non-egress guard has 3-7/8-inch bar spacing, includes one-way tamper-proof screws, and features an adjustable telescoping width (32-1/2 to 54 inches) for interior installation. It cannot be opened or quickly removed in an emergency and meets New York City and New Jersey housing codes (NYC Dept. of Health approval HDWG #04-09-2011).
Defender Security Segal S 4767 Carbon Steel Fixed 4-Bar Window Grill for Home Security and Child Safety, 21-1/4 In., Black Black Review
Why I installed this window guard
I added the Defender Security S 4767 fixed window guard to a high-traffic interior window where I wanted two things: a solid child-fall deterrent and a basic barrier that would discourage a quick smash-and-dash. I also didn’t want anything hinged or removable—this window doesn’t serve as an egress path, and I prefer hardware that stays put once it’s installed. After living with it and installing a couple more, I have a good sense of where this guard shines and where you’ll want to plan ahead.
Build and design
This is a fixed, non-egress interior guard built from 0.048-inch black carbon steel square tubing. In hand, it feels more substantial than the numbers suggest. The four horizontal bars are spaced at 3-7/8 inches on center—tight enough to meet the common child-safety threshold and aligned cleanly. The height on my unit is 21-1/4 inches, and the width telescopes from 32-1/2 to 54 inches before mounting, which makes it versatile for a range of casement and double-hung window widths.
The black finish is even and has held up to fingerprints, an occasional bump from moving furniture, and some pet noses without scuffing. Welds are tidy and free of burrs. It’s a simple, workmanlike piece of hardware—more utility than showpiece—and that suits its purpose.
One key detail: this is a non-egress guard. It cannot be opened or quickly removed in an emergency. That’s by design. If you need emergency access, look for the hinged egress version instead.
Installation: straightforward, with one important caveat
The frame arrives as a single assembly with end brackets and one-way, tamper-proof screws in the box. The telescoping mechanism makes it easy to size the guard on the bench: I measured the interior width of the window frame, set the guard to a hair under that dimension so the brackets would seat square, and confirmed the bar alignment by eye before marking holes.
My prep steps:
- Verify the window is not an egress path under local code.
- Find solid framing (jambs or studs) for the brackets; avoid just drywall or trim.
- Pre-drill pilot holes (undersized for the screws) to prevent splitting and reduce driver cam-out.
- Use a level to keep the guard parallel to the sill and align the bar spacing consistently with sight lines.
The time sink—and the thing to plan around—is the fasteners. The included one-way, tamper-proof screws do their job: once they’re in, they are not coming back out cleanly. They’re also easy to mar if your bit or driver wanders. I recommend:
- A dedicated one-way driver bit (or screwdriver) matched to the screw head profile.
- Driving by hand for the final turns, not with an impact, to avoid stripping.
- If you’re mounting into masonry or a steel frame, use appropriate anchors or bolts (not included) sized for the load; the wood screws in the box aren’t a good match for concrete or brick.
On a wood window frame, I had the guard installed in under 15 minutes once everything was marked. On a masonry surround, plan on sourcing anchors and spending extra time drilling and vacuuming dust. Either way, do a dry fit and double-check your egress assumptions before you commit, because removal later will likely require drilling out the screw heads or cutting the guard.
Security and safety in practice
For child fall prevention, the S 4767 is excellent. The bar spacing, fixed design, and tamper-resistant fastening are all aligned with that use case. It meets New York City and New Jersey housing codes for interior window guards, which gives me confidence in the dimensional and general safety requirements it’s meant to satisfy. It also handles pet pressure well; a large dog putting paws or a shoulder into it won’t budge it if you’ve mounted into solid framing.
For security, it acts as a delay and a deterrent rather than a high-security barrier. The carbon steel tubing is strong enough to resist casual prying or a shove, and the tamper-proof screws make quick removal unlikely. That said, it’s still an interior, hollow-tube guard; a determined intruder with tools and time could defeat it. If you need true break-in resistance, you’ll want a heavier exterior-rated grille, laminated glass, and upgraded locking hardware as part of a layered approach.
Daily experience and appearance
Once installed, the guard sits solidly without rattle or flex. It doesn’t interfere with blinds in my setup—though you’ll want to check clearance if you use thick shades. The black finish recedes behind most tinted or screened windows and doesn’t draw attention from the street. Indoors, it reads as purposeful rather than decorative, which is fine by me.
Ventilation and light are essentially unchanged. The horizontal bars are thin enough that your eye quickly ignores them, and the 21-1/4-inch height provides a meaningful coverage band without visually overwhelming the opening.
Sizing and fit notes
The 32-1/2 to 54-inch adjustable width covers a nice range. If your window is wider, you’ll either want a different model or multiple guards placed side by side. For taller openings, you can stack guards vertically, but pay attention to where the overlap lands so you don’t create a climbable ladder for kids. Measure the interior frame carefully, including depth; the brackets need enough flat surface to seat flush. If you’re dealing with out-of-square jambs in an older house, set the telescoping width to split the difference and keep the guard visually centered.
One more nuance: on narrow mullions or thin trim, the screws can end up close to edges. Pre-drilling and stepping up bit sizes helps avoid splitting. On MDF or finger-jointed trim, I’d reinforce into the jamb or stud rather than relying on finish materials.
What I’d change
- Fasteners and tooling: Including a matching driver for the one-way screws would make the first-time experience smoother. The current setup works, but it’s easy to scar the heads without the right bit.
- Anchor options: Wood screws are fine for interior jambs, but a small pack of masonry anchors—or at least clearer guidance by substrate—would save a trip.
- Size variety: A taller option and a longer span would cover more modern window geometries without needing multiples.
None of these are deal-breakers, but they’re worth knowing before you start.
Who it’s for (and who it’s not for)
- A good fit for: parents wanting a compliant child-fall guard, pet owners tired of dogs launching at glass, and anyone who wants a straightforward interior barrier that discourages quick entry on non-egress windows.
- Not a fit for: bedrooms or any window required to provide emergency egress; installations exposed to weather; or situations needing true high-security bars.
If you’re in the “maybe” category—say, you want the safety but aren’t sure about permanently fixed hardware—look at the brand’s hinged egress version instead.
The bottom line
The Defender Security S 4767 fixed window guard is a solid, no-nonsense solution for interior child safety and basic intrusion delay. The steel tubing, sensible bar spacing, and tamper-proof mounting come together in a package that installs cleanly and stays put. It’s not a cure-all for security, and the one-way screws demand careful handling, but once you’ve planned for those realities, it delivers exactly what it promises.
Recommendation: I recommend this guard for non-egress interior windows where child-fall prevention and a stout deterrent are the primary goals. It’s sturdy for its weight, the adjustable width makes fitting straightforward, and it meets NYC/NJ code requirements for this category. Buy the correct driver for the one-way screws, use proper anchors for your substrate, and confirm the window isn’t part of your egress plan before you commit. If you need emergency access or higher security, choose a hinged egress model or a heavier exterior-grade system instead.
Project Ideas
Business
Custom Decorative Grill Service
Offer a service that custom-finishes and decorates standard window guards—powder coating, color-matching, decorative medallions, or bespoke cutouts—so landlords and homeowners get child-safety-compliant guards that fit their interior style. Market to property owners who need the protective function but want better aesthetics.
Childproofing Installation & Inspection
Provide professional supply-and-install services for non-egress window guards in apartments and rental properties, including site measurement, secure mounting with tamper-proof screws, and periodic inspections. Offer packaged pricing for multi-unit buildings and documentation for compliance-minded landlords.
Upcycled Home-Decor Product Line
Source surplus or returned grills, transform them into higher-margin items—shelves, headboards, trellises, wall art—and sell through Etsy, local boutiques, or a direct online store. Emphasize sustainability and sturdy construction in your branding to attract eco-conscious customers.
Staging & Safety Add-On for Realtors
Partner with real estate agents to provide temporary installation or staged decorative grills for showings in urban family markets. Highlight the dual benefit of demonstrating child safety features while enhancing curb appeal with custom finishes.
Maintenance Subscription for Property Managers
Create a recurring service for multi-family property managers that covers routine maintenance: verifying anchor integrity, replacing tamper-proof screws if needed, touch-up painting, and compliance reporting. A subscription model creates steady revenue and reduces liability concerns for building owners.
Creative
Industrial Wall Art Panel
Mount the fixed 4-bar grill flat against a wall and transform it into an industrial art piece: sand and repaint the bars, weave macramé or leather strips through the bars, and hang small framed photos or metal accents. Add a string of LED fairy lights threaded along the bars for evening ambiance.
Floating Shelf Framework
Use the grill as the back support for a floating shelf unit. Secure wooden planks to the bars with metal brackets or heavy-duty zip ties to create staggered shelving for books, plants, or decor. The square tubing gives a sturdy, modern look ideal for loft-style interiors.
Vertical Garden Trellis
Mount the grill vertically on a balcony or interior wall to serve as a trellis. Attach small hanging planters or pouch planters to the bars, train climbing plants or herbs to grow up the structure, and use the black finish as a striking backdrop for greenery.
Minimalist Headboard
Repurpose the grill as a headboard by finishing or repainting it to match the bedroom palette, then mounting it behind the bed at mattress height. Add soft backlighting or hang textiles from the bars to soften the industrial aesthetic while keeping a compact footprint.
Modular Room Divider
Create a folding or linked room divider by joining two or three grills with hinges or leather straps. Cover sections with fabric, moveable panels, or climbing plants to make a flexible privacy screen suitable for studio apartments or open-plan spaces.