Features
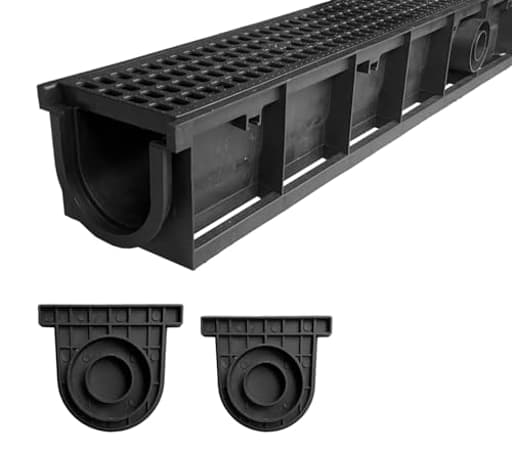
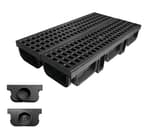
- HIGH QUALITY: 39.37 * 6.1 * 5.51" channel drain with grate is made of high density polyethylene (HDPE) which has higher hardness and tensile strength than ordinary polyethylene. Make sure the trench drain system will not damaged when human pass by. Bottom outlet diameter is 3" & 4-5/16"; Outlet adapter diameter is 1-7/8" & 3-1/8"; Side outlet diameter is 1-5/8" & 2-15/16".
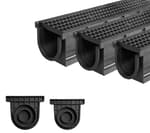
- PERFORATED DESIGN: Our trench drain system for yard adopts perforated design. It ensures fast drainage and prevents leaves and small objects from entering the trench bottom. Moreover, the grate and the trench adopt sliding connection without screws or clasps. Easy to clean.
- DOT DESIGN: The surface of the trench drain grate is designed with dots. Increased friction to prevent you from slipping when you install it next to the swimming pool.
- BACK REINFORCING RIB: The back of the drain channel grate has been reinforced to prevent damage. The base has a stable design to prevent damage caused by uneven force of trench drain. Application for sideway, pool, downspout, yard fence, houseside and garden.
- PACKAGE INCLUDES: What you currently see consists of 2 grates, 1 trench drain and 2 outlet adapters. 39.37 in. total length. You can slide this yard drainage systems directly together for extra length.
Specifications
| Color | Black Trench Drain With Hdpe Grate |
| Size | 1 Pack 39.4Lx6.1Wx5.5H in |
| Unit Count | 1 |
Related Tools

A 39.37 x 6.1 x 5.51 in trench drain channel with HDPE grate designed to collect and convey surface water from yards, pools, sidewalks and patios. The perforated, dot-pattern grate resists slipping and debris entry, the channel has reinforced ribs and a stable base for load distribution, and the kit includes two grates, one channel and two outlet adapters with bottom outlet diameters of 3" and 4-5/16", side outlet diameters of 1-5/8" and 2-15/16", and adapter diameters of 1-7/8" and 3-1/8"; units slide together for extended length.
Natotela Deep Profile HDPE Trench Drain-39.4Lx6.1Wx5.5H in. Channel Drain with Grates,Durable Plastic Yard Drainage System for Outdoor,Yard Fence,Houseside,Pool,Sidewalk,Patio,Backyard,Landscape Review
Why I chose this trench drain
Standing water along my patio pushed me to add a linear drain between the slab and lawn. I wanted something modular, easy to clean, and tough enough for day-to-day foot traffic without the cost and weight of polymer concrete. The Natotela trench drain checked most of those boxes on paper: a deep profile channel, HDPE grates, and a screwless, slide-in design that promised quick maintenance. After installing and using it through a few storms, here’s how it actually performed.
Design and build
This is a 39.37 x 6.1 x 5.51 in channel in high-density polyethylene, paired with HDPE grates. The extra depth is immediately useful—compared to low-profile yard drains, the deeper channel buys you more reservoir capacity and smoother conveyance when you can’t maintain a perfect slope. The underside has reinforcing ribs that stiffen the body, and the base is wide and stable enough that it doesn’t “oil can” when embedded in compacted stone or concrete.
The grates use a perforated pattern with a dotted texture on top. The holes are small enough to keep out most leaves and pebbles but open enough that the surface clears quickly during a downpour. The dot texture is more than cosmetic—it provides notably better traction when the grate is wet, which matters around a pool deck or anywhere you’re stepping directly on the drain.
Notably, the grates slide into the channel without screws. That’s a double win for maintenance (no rusty fasteners, no stripped threads) and installation speed. Fit is snug, and the panels align well across joints. Because they’re tool-less, you can pop them off for a quick clean with a hand trowel or shop vac—no hex keys required.
The kit includes:
- One 39.37 in channel
- Two grates
- Two outlet adapters
- Multiple outlet options molded into the channel: bottom outlet knockouts at 3 in and 4-5/16 in, side outlet options at 1-5/8 in and 2-15/16 in, and adapter diameters of 1-7/8 in and 3-1/8 in
The molded options make the system flexible, though pipe compatibility is where you need to plan ahead (more on that below).
Installation experience
The bulk of the work is digging and prep. With a 5.51 in channel height, I set a trench depth of roughly 8 in to allow:
- 2 in compacted granular base (crushed stone or coarse sand)
- 0.5–1 in for fine leveling
- Channel height
- A touch of cover at the edges
I aimed for about 1% slope (1/8 in per foot). In a short run, the deeper channel helps buffer any minor slope imperfections, but it’s still good practice to get the base flat and aligned.
Joining sections
Although this kit is a single channel, I purchased extra sections to build out a longer run. The channels slide together without glue. The joints locate cleanly, but as with most plastic trench systems, you’ll get the best results if you:
- Ensure solid support under each joint (no voids)
- Run a thin bead of exterior-grade polyurethane sealant or butyl tape at the joint faces for watertightness
- Encapsulate the sides in concrete or mortar if you expect lateral loads or wheel traffic
Dry-fitting first to check grate alignment across joints is worth the extra few minutes.
Outlets and pipe compatibility
This is where most DIYers trip up. The channel offers multiple outlet knockouts and adapters, but the world of drainpipe is messy—Schedule 40, DWV, and SDR-35 (Sewer & Drain) all have different outside diameters. In my installation, I used 3 in SDR-35 for the main run and adapted with a flexible coupling (rubber sleeve with stainless bands) at the bottom outlet. The fit was secure once clamped; solvent welding directly to the HDPE isn’t an option anyway, so mechanical couplings are your friend.
Practical tips:
- If you’re using 3 in Schedule 40 (larger OD than 3 in S&D), plan on a dedicated rubber coupling sized appropriately.
- For 4 in lines, the 4-5/16 in bottom knockout is close to many 4 in drain standards, but check your pipe’s OD and be ready with the right coupling.
- Side outlets require hole saws sized to the molded diameters (1-5/8 in and 2-15/16 in). Score lightly first to avoid chatter, then press through. Deburr to keep gaskets happy.
I capped the upstream end with a simple friction-fit cap and sealant. If you’re terminating at grade, consider an end outlet or transition to buried pipe to keep the inlet clean.
Setting and backfilling
Once aligned, I backfilled the sides with compacted stone to mid-height, brought the channel up to finished grade, checked slope, and then haunched both sides with a 2–3 in collar of sand-cement. In purely lawn or garden applications you can skip the collar and use compacted stone, but a small cement haunch keeps things straight and gives the grates a solid edge to bear against.
Performance in use
We’ve had several heavy rains since the install. Surface water that used to sheet across the patio now breaks toward the grates and disappears. The small perforations don’t choke on maple seeds and fine bark the way slot-style grates sometimes do; if debris accumulates, I lift a panel, scoop out silt, and slide it back in. That tool-less maintenance is the standout feature for me.
Flow-wise, the deep profile matters. Even when the pipe is running full, the channel holds a buffer so the grate area doesn’t instantly pond. That buys you time in cloudbursts and reduces splash-back onto the patio.
Traction around the grates is good. Bare feet and wet flip-flops don’t slide on the dotted surface. I’ve walked and rolled a wheelbarrow over it without drama. I would not place this in a driveway or any location that sees regular automotive traffic unless you fully encase the channel in concrete and upgrade to a rated metal grate. For paths, patios, and pool decks, it’s well-suited.
Durability and weathering
HDPE is resilient and shruggs off impacts and freeze-thaw. I did notice a slight waviness in one grate after it sat in direct sun prior to installation. Once clipped in and edged in, it flattened. If you’re installing in hot weather, keep the grates shaded until they’re in place, or lay them flat on a cool surface. After a few weeks in service, everything remained true.
The channel walls feel stout for residential use. The reinforcing ribs do their job, especially when the sides are supported. Because the grates are screwless, curious hands can lift them; if that’s a concern, a small bead of removable exterior caulk at the ends makes them more resistant without permanently bonding anything.
Maintenance
Maintenance is pleasantly simple:
- Lift a grate panel by hand
- Scoop out silt and organic matter
- Hose the channel from upstream to downstream
- Reseat the grate by sliding it into the side grooves
No corroded screws, no special tools. The perforated surface does collect fine silt over time; a stiff brush takes care of it. I haven’t seen significant staining—black HDPE hides the inevitable scuffs and dirt.
Limitations and quirks
- Pipe fittings: Expect to use flexible couplings. If you want a direct, glue-on connection, this isn’t that system.
- Accessories: The kit doesn’t include end caps or a debris basket; plan to source those if you need them.
- Sun exposure: Keep grates flat and shaded before install to avoid warm-weather waviness.
- Alignment: Like most plastic trench systems, it benefits from side support (stone or concrete haunching) to stay perfectly straight over time.
- Pack length: At 39.37 in per section, you’ll need multiple kits for longer runs. Budget accordingly.
Who it’s for
- Homeowners taming runoff along patios, pool decks, walkways, and fence lines
- Landscapers needing a modular, easy-clean drain with decent capacity and simple maintenance
- Anyone preferring plastic over heavier, more expensive polymer concrete channels for residential applications
Who should look elsewhere:
- Driveway or garage threshold projects with regular vehicle loads
- Installs requiring glue-on fittings and rigid spec pipe interfaces
- Environments with high vandalism risk where screw-down grates are necessary
Tips for a smoother install
- Aim for 1% slope and a uniform base; the deep profile is forgiving but not a cure-all.
- Dry-fit all sections with grates on before you set anything in bedding.
- Use polyurethane sealant at joints for watertight, soil-tight connections.
- Keep a selection of rubber couplings on hand to adapt to your pipe OD.
- Consider a light concrete haunch on both sides for straight lines and better load distribution.
Recommendation
I recommend the Natotela trench drain for residential surface drainage along patios, sidewalks, pool decks, and landscape edges. It earns that recommendation on the strength of its deep channel capacity, genuinely easy maintenance (no fasteners), solid day-to-day durability, and flexible outlet options. You’ll need to be thoughtful about pipe connections—flex couplings are the way to go—and I’d avoid using it where vehicles drive. For the typical backyard drainage problem, though, it’s a practical, cost-effective solution that installs cleanly and stays easy to live with.
Project Ideas
Business
DIY Drainage Kit Brand
Assemble and sell ready-to-install modular drainage kits using these channels: offer lengths, outlet adapter options, end caps, easy-install instructions, and optional connectors for downspouts. Market to homeowners doing patio/pool/driveway upgrades. Low inventory SKU (channel + grate + adapters) and clear how-to videos make it a scalable ecommerce product.
Small Landscaping Service — Surface Water Fixes
Offer targeted residential services installing linear trench drains for common problem spots (pool edges, house sides, patios). Use the HDPE channels for fast installs with minimal concrete. Charge for site assessment, parts, and installation; upsell regular maintenance and seasonal grate cleaning. Quick jobs with high perceived value and recurring maintenance income.
Custom Outdoor Furniture & Planters Line
Design and sell a line of weatherproof outdoor furniture and planters that incorporate the trench channel as a functional element (drainage beds in planters, concealed troughs in bench bases). Position as durable, low-maintenance, modern outdoor decor—sell direct-to-consumer, at markets, or through local garden centers.
Event & Venue Temporary Drainage Rentals
Rent short runs of channels to outdoor event companies and venues that need temporary surface water mitigation (festivals, weddings, outdoor markets). Provide quick-connect lengths and adapters, deliver/install before events, then remove/clean after. High-margin seasonal business with repeat clients.
Home Water-Management Consulting Package
Offer bundled consultations for homeowners focused on stormwater management: inspection, a simple CAD/sketch plan showing where to place linear drains, supply lists (these channels), and installation quotes. Charge for the consultation and take a cut on parts supply or installation referrals—position yourself as the local specialist for drainage solutions.
Creative
Linear Planter With Integrated Drain
Turn the trench channel into a long, slim raised planter. Line the channel with landscape fabric, fill with lightweight potting mix, and plant herbs, succulents, or trailing plants. The perforated grate keeps soil in while allowing overflow to exit the bottom/outlet adapters—perfect for balcony rails or narrow walkways. Use multiple units slid together to create continuous planter beds.
Modern Water Feature / Mini Stream
Use the channel as the trough for a contemporary water feature: mount it slightly recessed in a bed of decorative stone, run a small recirculating pump to create a narrow stream, and hide hoses through the outlet adapter. The dot-pattern grate can be used decoratively or removed to show the water. Great for patios, courtyards or zen gardens.
Hidden LED Path Lighting + Drain
Install the channel flush along a walkway as both a low-profile drainage and wiring conduit. Mount waterproof LED strips beneath the grate (or alongside, protected by foam), run power through the side outlets, and cap ends with decorative end pieces. Provides anti-slip surface, cable protection and discreet night lighting in one.
Overflow Wicking Bed Core
Build a wicking raised bed with the trench channel acting as the internal overflow reservoir and distribution channel. Place the channel at the base, route the outlet to a hidden overflow, and fill above with a wicking medium. The grate prevents soil from entering the reservoir and helps maintain consistent moisture for vegetable and flower beds.
Outdoor Bench With Planter/Storage
Create a bench or low wall where the trench channel is embedded under the seating plank to collect runoff and channel it to a discreet outlet or planter. Alternatively use the channel as a shallow storage trough beneath a bench for pool supplies or tools—covered by the perforated grate for ventilation and drainage.