Features
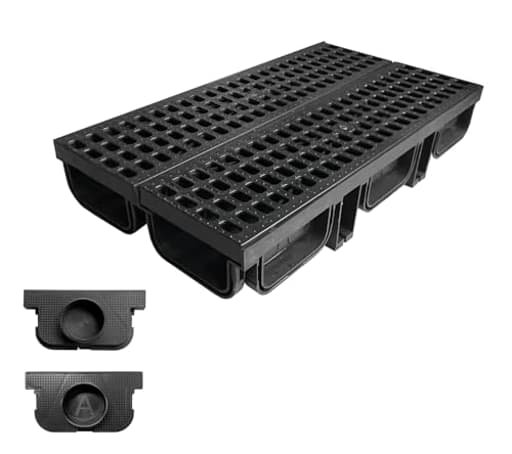
- HIGH QUALITY: 19.7x5.5x3.7in channel drain with grate is made of high density polyethylene (HDPE) which has higher hardness and tensile strength than ordinary polyethylene. Make sure the trench drain system will not damaged when humen pass by. Bottom outlet diameter is 2" & 3"; Outlet adapter diameter is 2".
- FAST DRAINAGE: The trench drain system for yard adopts perforate design. It ensures fast drainage and prevents leaves and small objects from entering the trench bottom. Moreover, the grate and the trench body adopt sliding connection without screws or clasps. Easy moving and cleaning.
- DOT DESIGN: The surface of the trench drain grate is designed with dots. Increased friction to prevent you from slipping when you install it next to the swimming pool.
- BACK REINFORCING RIB: The back of the drainage channel grate has been reinforced to prevent damage. The base has a stable design to prevent damage caused by uneven force of trench drain. Application for sideway, pool, downspout, yard fence, houseside and garden.
- PACKAGE INCLUDES: What you currently see consists of 2 grates, 2 trench drain and 2 outlet adapters. Total length 39.4 in. We didn't put too many outlet adapters to avoid waste. You can purchase additional adapters according to your own needs.
Specifications
| Color | Black Trench Drain With Hdpe Grate |
| Size | 2 Pack 19.7Lx5.5Wx3.7H in |
| Unit Count | 2 |
Related Tools


Two 19.7 x 5.5 x 3.7 in HDPE channel drain sections with grates (total length 39.4 in) and two outlet adapters provide surface water collection for yards, patios, pools and sidewalks. Perforated, sliding grates with a dotted surface offer faster drainage, debris exclusion and increased traction, while reinforced ribs and a stable base reduce deformation; the bottom outlet accommodates 2 in and 3 in connections and the included adapters are 2 in.
Natotela HDPE Channel Drain with Grates-19.7x5.5x3.7 in. Trench Drain System,2 Pack Total Length 39.4 in,Yard Drainage System with 2 Outlet Adapters for Outdoor,Yard Fence,Pool,Sidewalk,Patio Review
Why I reached for this channel drain
The edge of my patio had turned into a shallow river whenever we got a fast inch of rain. Water sheeted across the pavers, collected by the house, and then spilled down a small slope onto a walkway. I wanted something low-profile I could set flush to the surface, with a grate that wouldn’t turn slick by the pool and that I could pull up for cleaning. That led me to the Natotela channel drain—two 19.7-inch sections with HDPE grates and a bottom outlet that accepts 2- or 3-inch connections.
Build and design
The bodies and grates are molded from HDPE, and they feel more substantial than many lightweight “decorative” strips. Each section measures 19.7 x 5.5 x 3.7 inches; linked end to end, the kit provides 39.4 inches of run. The channel walls are ribbed and the base is braced to resist deformation. That matters during backfill when uneven pressure can warp flimsier drains.
A few design choices stood out to me:
- Sliding grates: The grates slot into the channel body without screws or clips. They’re easy to remove for clearing debris, and there are no rust-prone fasteners to fight later.
- Perforated grate pattern: The openings are generous enough to move water quickly but small enough to hold back leaves and mulch. I rarely saw pine needles get through.
- Dotted surface texture: On a wet day by the pool, the added grip is noticeable. It’s not a rubberized tread, but it’s less slick than smooth plastic or powder-coated metal.
- Bottom outlet: The channel includes a knockout for 2- or 3-inch pipe at the bottom. The kit ships with two 2-inch adapters; if you’re plumbing to a 3-inch line, plan to source that coupling separately.
Overall, the plastic is thick and confidence-inspiring. It’s clearly designed for foot traffic and lawn equipment. If you expect frequent vehicle loading, I’d encase the sides in concrete and keep the run well supported—HDPE can take abuse, but installation drives real-world load rating.
Installation experience
There’s no printed manual. The parts are simple enough to puzzle out, but a one-page diagram would save guesswork for first-timers. Here’s how my install went and what I’d recommend.
- Layout: I set a chalk line where the patio edge meets the slope and planned a 1% fall (about 1/8 inch per foot) toward the discharge.
- Trench: I cut a trench roughly 7 inches wide and 5 inches deep to leave room for bedding. A flat spade and a trenching shovel make this manageable.
- Base: I laid 2–3 inches of compacted 3/8-inch angular gravel (not pea gravel). This lets you fine-tune slope and locks the channel in place once backfilled.
- Outlet: I opened the bottom knockout and dry-fit to a 2-inch PVC line using the included adapter. If you need 3-inch, a hole saw and a proper solvent-welded coupling make a clean connection.
- Joints: The two sections slide together. I ran a thin bead of exterior-grade polyurethane sealant at the joint before assembly to prevent weeping under high flow, then wiped squeeze-out.
- Set and backfill: I set the top of the grate 1/16–1/8 inch below finished grade to encourage surface water to find the openings. I backfilled the sides with gravel and tamped lightly, then finished the edges with paver sand and a tight border.
The grates slide out easily for inspection—helpful to confirm you haven’t pinched the outlet or disturbed slope during backfill.
Performance in real weather
On a quick storm that dumped about an inch in under an hour, the channel kept water off the patio and moved it into the drain line without drama. With the 1% fall, there was no standing water in the trough after the rain stopped. Even in longer, steady downpours, the perforated grate handled the flow from a ~10-foot catchment width on pavers.
This is a relatively shallow, low-profile channel. It’s perfect for intercepting sheet flow from hardscape edges and for tying in a downspout splash zone, but it’s not a substitute for a deep trench system if you’re trying to dewater saturated soil over a large area. Think of it as a surface collector feeding a proper discharge path, not an underground storage solution.
Durability and load
Installed over a compacted base and edged snugly by the surrounding pavers and soil, the channel felt solid underfoot. I rolled a fully loaded wheelbarrow over it repeatedly and didn’t see flex that would crack joints or pop the grate. For driveways or spots where a car tire could ride the grate, I’d want either a heavier-duty grate rating or full concrete encasement—HDPE can survive a tire, but longevity under repeated vehicle load depends more on installation support than the polymer itself.
The reinforcement ribs on the backside and the stable base seem to do their part to spread load. I also appreciate the absence of metal screws; in freeze/thaw and chlorinated pool environments, those can be the first failure points.
Maintenance
Routine care is straightforward:
- Slide off the grates and brush or shop-vac leaves and grit a few times a season.
- Flush the channel toward the outlet with a garden hose.
- Check the joint for any gaps if you experience frost heave; a dab of polyurethane sealant fixes most weeps.
- If you’re near a pool, a quick scrub keeps sunscreen film and fine debris from glazing the grate texture.
Because the opening pattern is relatively tight, you’ll catch small stuff—great for keeping your pipe clear, but expect to clean more frequently in heavy leaf-fall.
What could be better
- Instructions: A simple installation guide would help users set slope, choose bedding, and understand outlet options. The parts are intuitive, but best practices matter for drainage products.
- Accessories: The kit includes two 2-inch adapters, but no end caps. Depending on your layout, you may want an end stop or a 90-degree option. Plan to improvise or buy compatible fittings.
- Length per kit: Two short sections are nice for small projects or spot fixes. For longer runs, you’ll be ordering multiple kits. That’s fine, but keep an eye on joint count and seal each one properly.
Tips for best results
- Aim for at least 1% fall toward the outlet. More is okay if your surface allows it.
- Use angular gravel for bedding and side support; avoid round pea gravel that shifts.
- Set the grate just below adjacent surface height so water naturally finds it.
- If you anticipate wheel loads, consider a concrete collar along the sides.
- Seal every joint, even if it feels tight. It’s cheap insurance against weeping.
- Tie into a reliable discharge—dry well, daylight, or a basin with an emitter. A channel is only as effective as its outlet.
Who this is for
- Homeowners who need to intercept surface runoff along patios, pool decks, sidewalks, and at downspout splash zones.
- DIYers who prefer a simple, modular channel they can cut, align, and clean without special tools or rust-prone hardware.
- Anyone prioritizing traction on a wet grate near foot traffic.
Who might look elsewhere: If you need a heavy-duty driveway channel with certified vehicle load ratings, or a deep system to lower groundwater, you’ll want a different class of product.
Bottom line
The Natotela channel drain strikes a smart balance: stout HDPE construction, grates that pull off without fuss, and a bottom outlet that supports common 2- and 3-inch connections. Installation is straightforward if you follow drainage basics, and performance has been reliably “set it and forget it” in my use—no ponding, no clogged pipes, and a grate that stays grippy by the pool.
Recommendation: I recommend this channel drain for intercepting surface water around patios, pools, walkways, and similar light-duty areas. It’s durable for foot traffic, easy to maintain, and thoughtfully designed for DIY installs. Just plan your outlet strategy, add sealant at the joints, and be realistic about loads—encase or upgrade if vehicles will routinely cross it.
Project Ideas
Business
Patio & Pool Drain Retrofit Service
Offer a local installation service that retrofits small patios, pool surrounds and walkways with discreet HDPE trench drains. Service includes site assessment, channel layout, connection to existing drainage or a sump, and finishing (paver or concrete integration). Market to homeowners with standing-water problems; upsell maintenance plans for seasonal cleaning and grate replacements.
Modular Drainage Kits for DIY Landscapers
Package the channel sections with extra outlet adapters, simple connectors, instruction guides, and a few feet of flexible drain pipe to create DIY drainage kits for e-commerce. Include templates for common layouts (patio edge, downspout diversion, planter drains). Sell multiple kit sizes and offer instructional videos or live virtual install support as a premium add-on.
Upcycled Outdoor Furnishings Line
Produce a small run of outdoor furniture and accessories built around the drain units—bench-planters, drink troughs, boot trays—and sell them online or at markets. Emphasize durable HDPE construction, low weight, and built-in drainage. Offer customization (color-grate overlays, branded laser-cut end caps) to target cafes, landscapers, and boutique garden stores.
Seasonal Event Drain Rentals & Setup
Rent panels for temporary events where surface water management is needed (outdoor weddings, festivals, farmers’ markets). Provide rapid-install kits and optional staff to lay and connect the channels into temporary runs that divert runoff away from high-traffic zones. Charge per-panel-per-day plus delivery/installation fees; include liability insurance and quick-clean services between rentals.
Workshops & Paid Content for DIYers
Host in-person or online workshops teaching homeowners how to diagnose drainage issues and install these trench drains, with hands-on demos (cutting, connecting adapters, setting slope). Monetize via ticket sales, selling starter kits at the class, affiliate links to tools, and producing premium video courses. Target community groups, hardware stores, and gardening clubs for recurring classes.
Creative
Linear Planter Bench
Cut the two channel drain sections to desired lengths, line them with landscape fabric, add drainage gravel and potting mix to create long, narrow planters that double as bench seating. Mount the drains on a simple steel or wooden frame so the perforated grates face up for a clean industrial look. Use outlet adapters to connect internal irrigation or to let excess water drain into an irrigation line. Great for balcony herb benches or patio seating with integrated planting.
Modular Raised Garden Borders
Use the HDPE channels as modular edging for raised beds or vegetable plots. Place channels end-to-end to form straight borders; the perforated grate provides aeration at the base and the reinforced ribs keep shape under soil pressure. The outlet adapters can be used to connect a subsurface drainage run to a single runoff point to prevent waterlogging in heavy soil.
Industrial Wall-Mounted Vertical Planter
Mount multiple drain sections vertically on a plank or metal frame to create a tiered wall planter. Slide grates slightly open for planting pockets, fill with lightweight potting mix, and secure. The perforations allow quick drainage; route a small hose to one outlet adapter for automated bottom-watering that drains through the system. Works well for herbs, succulents or decorative foliage.
Outdoor Drink/Utensil Cooling Channel
Turn a channel drain into a stylish beverage or utensil cooler for backyard parties: line it with a waterproof tray, fill with ice, and set bottles or metal serving utensils on the dotted grate so melting water drains away. The reinforced base keeps it rigid when loaded; use two sections end-to-end for longer service tables. Easy to clean thanks to the sliding grate.
Lightweight Storage Shelf with Drain Tray
Create a utility shelf for a garage, greenhouse or mudroom where wet items are stored. Mount channels with grates facing up as shallow trays—store muddy boots, potted plants, or wet tools. The perforated grate helps debris fall through to a removable catch beneath; use the outlet adapters to plumb a small drain line to a floor drain or bucket for continuous use.