Features
- Reduces kerf clearance to the thickness of the blade for improved cut precision
- Intended for 90° cuts
- Compatible with specified table saw models SPT70WT and SPT99
- Replacement for original model SPTA70WT-ZC
- Lightweight (approx. 0.4 lb)
Specifications
| Weight | 0.4 lb |
| Compatible Saws | SPT70WT, SPT99 |
| Replacement Model | SPTA70WT-ZC |
| Sku | 438930 |
| Gtin | 039725074140 |
| Contents | (1) Table Saw Zero Clearance Insert |
Related Tools

Related Articles

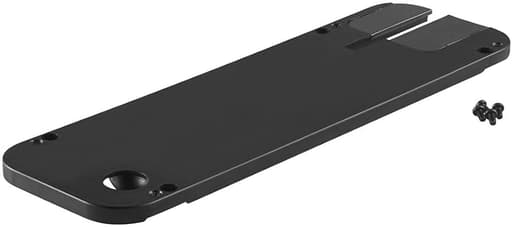
Zero-clearance insert that reduces the kerf opening to approximately the blade thickness to improve cut accuracy for 90° cuts. Designed as a direct replacement part for specific table saw models. Includes one insert.
Skil Table Saw Zero Clearance Insert Review
A simple upgrade that makes a big difference
I’ve never loved the flimsy factory throat plates that ship with most jobsite saws. Even on otherwise solid saws, the stock opening around the blade is wide enough to invite tear-out, swallow skinny offcuts, and let workpieces dip at the edge of a cut. Swapping to a zero-clearance insert is one of those small upgrades that immediately tightens up results. That’s exactly what I found with Skil’s SPT00C zero-clearance insert—referred to here simply as the insert.
What it is and why it matters
The insert narrows the gap around the blade to roughly the blade’s thickness. That closer support is key for cleaner edges on plywood and veneered sheet goods, less splintering in solid hardwoods, and fewer small cutoffs being pulled into the throat opening. This model is designed specifically for 90° cuts and as a direct replacement for the compatible Skil saws. If you cut a lot of plywood, trim splines, or work with fragile face veneers, a good zero-clearance setup is a quiet game-changer.
Fit and setup
On my SPT99, the insert dropped in with a snug, intentional fit. It wasn’t plug-and-play in the sense that I still needed to finesse it: I marked a couple of tight contact points, kissed those spots with 220-grit sandpaper, and chased a few tiny burrs along the underside edges. After that, it sat flush with the table and locked down evenly.
A few setup tips that helped:
- Check the table casting first. Any nibs or paint ridges near the ledge will telegraph as a tight fit. A mill file or a small card scraper cleans those up quickly.
- Color the insert’s perimeter with a marker, drop it in, and see where the ink rubs off. That shows exactly where to trim.
- Ensure the insert sits perfectly flush to the tabletop. High spots lead to chatter; low spots invite workpieces to catch on entry or exit.
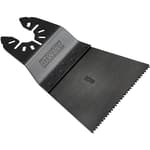
Once seated, I raised the blade through the blank slot at 90°, using a slow, steady crank with the saw running. That first pass creates the zero-clearance kerf for the blade you’re using. It’s good practice to dedicate an insert to each blade profile you care about—one for your thin-kerf combo, another for a fine-tooth plywood blade, and so on.
Importantly, this insert is for 90° cuts only. If you regularly bevel rip, you’ll want a second insert tuned for those angles or to swap back to the factory plate for bevel work.
Build and finish
The insert is light (about 0.4 lb) but noticeably stiffer than the plastic plate that ships with the saw. That rigidity matters: the factory plastic can flex at the back edge when pushing narrow stock or long boards, which is exactly when precision counts most. The insert’s more solid feel kept the work supported with no deflection, especially helpful when trimming thin strips or cutting rabbets with the blade set just proud.
Finish-wise, mine arrived with clean top edges and some machining marks on the underside that I could feel but not see once installed. I deburred those quickly with a fine file. If you’re particular, spending two minutes to break the underside edges and relieve any sharp corners makes it slide in and out like a factory part.
On-saw performance
The difference in cut quality was immediate. With a 40T thin-kerf blade, plywood edges came off the saw with almost no splintering—enough that I skipped blue tape entirely on crosscuts that normally get taped. On melamine shelves, the face chip-out I expect at the last inch of the cut just didn’t appear. Solid hardwoods benefited in the same way; rips on white oak and maple showed cleaner arrises and fewer fibers torn up along the line.
Other gains were subtle but meaningful:
- Narrow offcuts stayed supported. That reduces the puckering feeling as a strip tries to fall into the throat.
- Start/finish transitions felt smoother. Stock didn’t “dip” at the edge of the plate on entry or catch at the back of the cut.
- The saw threw fewer chips out the front. It’s not a dust solution, but closing the blade gap helps avoid the rooster tails of debris that a wide opening encourages.
Accuracy-wise, I saw a small but repeatable improvement when sneaking up on joinery cuts. With the work fully supported at the blade, it’s easier to hit a precise line without the last fibers giving way or a cutoff binding against the opening.
Limitations and gotchas
There are a few caveats to know before you buy:
- 90° only. The insert is intended for square cuts. If you bevel frequently, plan on a second dedicated insert or stick with the stock plate for those operations.
- Compatibility is specific. This insert is built as a direct replacement for Skil’s SPT70WT and SPT99 families, replacing model SPTA70WT-ZC. If your saw isn’t one of those, don’t expect a drop-in fit.
- Tuning may be required. Saw tables vary. Expect to do minor edge fitting or underside deburring so it seats perfectly.
- Blade changes matter. The kerf you create in the insert corresponds to your blade’s thickness and set. Switch to a different kerf or a blade with a different tooth profile and you might want a dedicated insert for best results.
None of these are deal-breakers in a shop that values clean cuts, but they’re worth planning for.
Tips for getting the most out of it
- Make one insert per blade. Label them and store them flat. Swap as you would a blade to keep cut quality consistent.
- Raise the blade slowly on the first pass. Let the teeth cut the slot at full speed; don’t force the crank.
- Keep the riving knife and guard in play. If they need to be removed to create the first kerf, reinstall them immediately after.
- Chamfer the back edge. A tiny break on the outfeed edge of the insert reduces any chance of catching when you push long workpieces through.
- Check flush every few months. Seasonal changes and shop dust can keep an insert slightly proud or shy. A quick wipe of the ledge and a confirm with a straightedge is all it takes.
Specs and compatibility
- Weight: approx. 0.4 lb
- Compatible saws: Skil SPT70WT and SPT99
- Replacement for: SPTA70WT-ZC
- Contents: one insert
- Intended use: 90° cuts, zero-clearance kerf matched to your blade thickness
Value and alternatives
You can make your own zero-clearance plates from MDF or phenolic, and I’ve done that plenty. They work, but they often need periodic flattening, don’t love moisture, and can swell or chip around the slot. The insert here feels more durable and stays flat. Compared with the factory plastic plate, the rigidity and fit pay off immediately in better support at the cut. If your work leans toward cabinetry, casework, or finish carpentry where edge quality matters, the difference is large enough to justify the cost and the few minutes of fitting.
The bottom line
This is a straightforward, effective upgrade that tightens up a Skil jobsite saw’s results with minimal effort. The insert is rigid, fits securely, and meaningfully improves cut quality by supporting the work right at the blade. Expect a bit of setup—maybe some light edge sanding and a quick deburr on the underside—but once tuned, it behaves like a factory part designed for precision work.
Recommendation: I recommend this insert for owners of the SPT70WT or SPT99 who want cleaner edges and more reliable support at the cut line. It’s not a multi-angle solution and it does benefit from a few minutes of fitting, but the gain in accuracy and reduction in tear-out make it a worthy addition to the saw, especially if you work with sheet goods or do finish-oriented projects.
Project Ideas
Business
Thin-Strip Inlay Packs
Use the zero-clearance insert to batch-produce uniform thin strips (e.g., 1/16–1/8 in) in popular species for luthiers, turners, and furniture makers. Package by species and width for online sales. The insert’s support at the kerf lets you deliver chip-free, consistent strips with minimal waste.
Custom Drawer Organizers
Offer made-to-measure hardwood or plywood drawer dividers and utensil trays. The insert yields clean rips and crosscuts on thin stock, so parts fit precisely with crisp edges. Market to homeowners and chefs; sell direct-to-consumer with a simple online order form for dimensions and layout.
Solid Wood Edge Banding
Rip long, thin edge-banding strips from matching hardwood for cabinetmakers and DIYers. The zero-clearance insert reduces tear-out on narrow strips and veneered panels, producing glue-ready banding. Offer standard widths and custom orders by species and length.
Chip-Free Panel Cutting Service
Provide cut-to-size services for melamine, laminate, and veneered plywood using your SPT70WT/SPT99 and the zero-clearance insert for clean edges. Target small shops and contractors who need precise parts without investing in a panel saw. Charge per cut and offer edge labeling/packaging.
Content + Plans for SPT70WT/SPT99 Users
Create tutorials and plans that showcase how a zero-clearance insert improves accuracy and safety for small parts and thin rips. Monetize with an online course, downloadable jigs (thin-rip jig, small-parts sled), and affiliate links to the SPTA70WT-ZC replacement insert and compatible blades.
Creative
Segmented Cutting Board with Hairline Inlays
Use the zero-clearance insert to rip ultra-thin, consistent strips for contrasting inlays in a butcher-block or end-grain board. The tight kerf support keeps fragile inlay strips from chipping and prevents narrow offcuts from dropping into the throat opening. All rips and crosscuts remain at 90°, maximizing precision for glue-ready edges.
Gallery-Quality Picture Frames
Crosscut and miter frame parts from splinter-prone woods or veneered/MDF stock with clean edges and minimal tear-out. The zero-clearance insert supports the fibers right at the blade, giving crisp, chip-free miters that glue up tight and need less sanding. Add spline keys or decorative accents made from thin rips for a premium look.
Veneered Jewelry Box with Bookmatched Lid
Safely rip thin hardwood veneers and liners for a jewelry box, then crosscut parts to final size with clean edges. The insert’s narrow opening reduces blowout on brittle species and keeps tiny parts from being pulled into the blade gap, resulting in precise joinery and a flawless veneer edge on the lid.
Tambour-Style Slat Tray
Create a sleek tray or roll-top pencil box using many narrow slats ripped from hardwood. The zero-clearance insert allows consistent, repeatable thin slats with smooth edges and less sanding. Glue slats to a canvas backing for a flexible tambour effect or arrange as a fixed slat pattern for a modern aesthetic.
Geometric Wall Mosaic
Produce a large set of uniform thin strips in multiple species, then crosscut them into triangles, diamonds, or chevrons. The insert minimizes chip-out on end grain and veneers, enabling tight-fitting patterns for a striking mosaic panel or wall art piece.