Features
- Designed for use with MOUSE sander/polisher
- Polishing pads for removing light oxidation from brass, copper, chrome and fine metals
- Includes multiple grit sandpapers for different sanding needs
- Includes small detail 'fingertip' pads for tight areas
- Foam pads for finishing and applying mild polish
- Recommended to use light force for consistent results
Specifications
| Battery Included | No |
| Charger Included | No |
| Corded Vs Cordless | Cordless |
| Gtin | 00028874745803 |
| Grit | Multi-Grade (includes 180 and 220) |
| Pack No. Of Batteries Required | 1 |
| Product Application | Sanding / Polishing / Oxidation removal |
| Height | 1.3 IN |
| Length | 9.0 IN |
| Width | 8.0 IN |
| Weight | 0.2 LB |
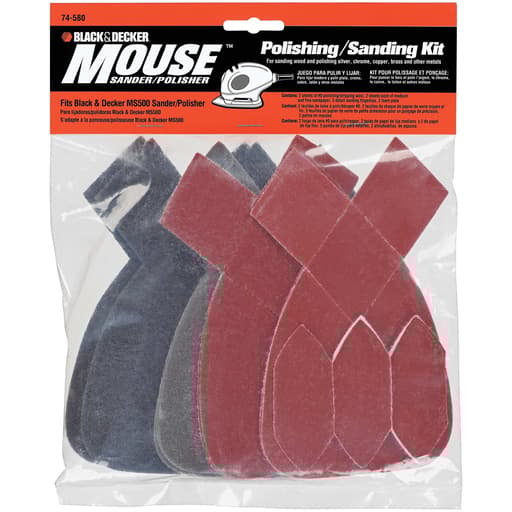
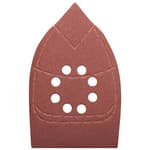
| Includes | ["2 No. 0 Polishing Wool Pads", "2 180-Grit Sandpapers", "2 220-Grit Sandpapers", "5 Detail Fingertips", "2 Foam Pads"] |
Related Tools
Related Articles

Accessory kit intended for use with the MOUSE sander/polisher. Contains sanding and polishing pads for light sanding, polishing between paint coats, and removing light oxidation from brass, copper, chrome and other fine metals. The kit is designed to be used with light tool pressure for uniform results and to avoid surface damage.
Black & Decker MOUSE Sanding/Polishing Kit Review
Why I reached for the Mouse kit
I’m a frequent user of the Black & Decker Mouse, mostly for trim touch-ups, light refinishing, and the odd bit of metal cleanup around the shop. The Mouse kit appealed to me because it bundles exactly the things I tend to need for those jobs: a couple of mid-grit sanding sheets for between-coats work, small “fingertip” pads for tight corners, and a few polishing options for light oxidation on metals. It’s a lightweight set with a focused purpose: quick, controlled, light-duty work.
What’s in the box and how it fits together
The kit includes:
- 2 sheets of 180-grit sandpaper
- 2 sheets of 220-grit sandpaper
- 5 small detail “fingertip” sanding pads
- 2 foam pads for applying mild polishes or finishes
- 2 No. 0 polishing wool pads
Everything is sized for the Mouse platform and its detail accessory. The standard triangular sheets go on like any other Mouse paper, and the fingertip pads pair with the sander’s detail attachment to reach inside corners, V-grooves, and along window muntins. The foam and wool pads are for light polishing tasks: the foam spreads a mild compound evenly, while the No. 0 wool offers a bit more bite to knock back light oxidation.
Setup and first impressions
Installation is straightforward, and the fit is as expected. I had no trouble swapping between the standard pads and the fingertip accessory. The kit keeps the Mouse’s nimble feel intact; nothing adds bulk or throws off balance. It’s worth noting that this is a light-duty kit by design. The grit selection (180 and 220) is aimed at between-coats sanding and scuffing, not aggressive material removal, and the polishing pieces are meant for light oxidation, not deep corrosion.
Performance on wood: between coats and detail edges
For wood finishing tasks, the two grits make sense. I used 180 to flatten dust nibs on a water-based polyurethane coat over finger-jointed trim. It cut quickly enough to level the surface without digging in. Switching to 220 left a clean, uniform scratch that took the next coat nicely. On a set of cabinet door frames, the fingertip pads were especially helpful along inside corners where the triangular pad can’t fully reach without rounding an edge.
A couple of tips from my sessions:
- Keep the pressure light. The Mouse does the work; pressing harder only increases swirl marks and heat.
- Move steadily and avoid lingering at edges. Light finishing grits can still burnish or round over details if you stay in one spot.
- For very delicate finishes or high-gloss work, you’ll likely want to add 320 or 400 grit sheets (not included) for the final pass.
Performance on metals: brass, copper, and chrome
I tried the polishing pads on a tarnished brass door knocker and a lightly hazed chrome faucet. With a mild metal polish on the foam pad, the brass came back to a bright, even sheen in a few minutes. On chrome, I stuck with light pressure and a slower pace to avoid micro-marring; it cleared the haze without leaving visible swirls. The No. 0 polishing wool adds a little more cut if the foam alone isn’t quite enough, but be conservative on delicate plating. It’s easy to cross the line from cleaning to altering the surface if you bear down.
A few metal-specific pointers:
- Test in an inconspicuous spot first. Plated surfaces vary widely in hardness.
- Keep the pad clean and replace it if it picks up grit. Contaminants are what create swirls.
- Avoid steel wool anywhere near oak or other tannin-rich woods; stray fibers can cause black staining.
The fingertip detail pads: small but mighty
The fingertip pads are the sleeper hit in this kit. I used them to clean up inside corners on picture frames and to scuff narrow profiles before paint. Because they concentrate the sanding area, they cut faster than you’d expect, so the “light pressure” rule is critical here. They’re also easy to control one-handed for quick touch-ups, which I appreciate mid-project when I don’t want to break out full-size sheets and sanding blocks.
Durability and feel
As a bundle, the kit delivers competent performance with a few caveats. The abrasives do their job but wear faster than premium papers I keep on hand. If you’re smoothing a couple of coats of paint or clear finish, you’ll be fine; if you’re tackling a longer run of cabinetry or a large piece of furniture, plan on going through the two included sheets fairly quickly. The foam and wool pads hold up to light polishing—exactly their brief—but they’re not meant for heavy compound or sustained pressure.
In short, the kit’s materials are serviceable for their intended, light-touch use. If you demand the longest-lasting abrasives, you’ll want to stock some higher-grade papers alongside this kit.
Where it excels and where it doesn’t
Excels:
- Between-coats sanding on trim, doors, and furniture
- Quick scuff-sanding for adhesion before repainting
- Light oxidation removal on brass, copper, and chrome
- Tight-spot work with the fingertip pads
Falls short:
- Heavy stock removal or leveling (missing coarse grits)
- Final rub-out on high-gloss finishes (missing 320+ grits)
- Deep corrosion or pitting on metal (not the right tool or media)
Usability notes and best practices
- Keep pressure light and the sander moving. This is especially important with the foam and wool pads to avoid smearing polish or creating uneven shine.
- Vacuum or wipe down surfaces between grits and before recoating. Embedded dust will telegraph through your finish.
- On metals, use a mild polish sparingly; let the pad and compound do the work. Too much product loads the pad and reduces cut.
- Label pads for the product you used (polish, compound, finish) and don’t cross-use. Foam pads are easy to contaminate.
- If your project demands a finer scratch pattern, supplement the kit with 320, 400, or even 600 grit sheets compatible with the Mouse.
Value and who it’s for
This kit makes sense if you already own a Mouse and need a compact set that turns it into a light polisher while keeping your finishing workflow simple. The included grits are well chosen for scuffing and nib removal, the fingertip pads expand what the sander can reach, and the polishing pieces are genuinely useful for household metal touch-ups. If you’re a pro refinisher or you’re tackling large pieces regularly, you’ll want deeper inventories of grits and more durable abrasives. For occasional home projects, trim work, and quick revivals of metal fixtures, this hits a nice balance of capability and convenience.
Final recommendation
I recommend the Mouse kit for light-duty finishing and polishing tasks, especially if you value the Mouse’s control and want to extend it to tight spots and basic metal cleanup. It’s a compact, purpose-built set that covers the common needs of between-coats sanding and removing light oxidation. The trade-offs are clear: the abrasive sheets don’t have the lifespan of premium options, and the grit range is limited to mid-grade. Pair it with a few extra sheets in finer grits and you’ll have a versatile, go-to setup for small finishing jobs and quick surface tune-ups around the shop and home.
Project Ideas
Business
Mobile Brightwork Polish Service
Offer on-site light oxidation removal and polishing for boat, motorcycle, and classic car chrome/brass pieces. The wool and foam pads deliver quick, uniform results with light pressure, while fingertip pads reach badges and trim crevices. Price per linear foot or per component.
Restored Hardware Resale
Thrift or salvage vintage brass/copper knobs, hinges, and latches, then restore with the polishing pads and fine sandpapers. Photograph dramatic before/after sets and sell curated sets on Etsy or to renovators. Upsell with included screws cleaned to match.
Cabinet Repaint Prep & Between-Coat Service
Niche service for painters and DIYers: scuff-sand cabinetry, doors, and trim with 180/220-grit for adhesion, and perform between-coat nib-sanding with foam pads for super-smooth finishes. Use fingertips to detail profiles and corners that big sanders skip.
Jewelry and Small Metal Refresh Pop-Up
Set up at markets to lightly polish customers’ brass, copper, and costume jewelry. Use wool pads for oxidation removal and foam pads with mild polish for luster, working with gentle pressure to protect delicate pieces. Offer quick-turn services priced by item.
Rental Turnover Touch-Up
Provide landlords and property managers with fast touch-ups: feather minor paint drips and repairs with 220-grit, smooth between coats on trim and doors, and brighten tarnished metal fixtures. Package as a per-unit refresh add-on to cleaning services.
Creative
Vintage Brass Hardware Revival
Source tarnished brass door knobs, hinges, or drawer pulls and bring them back to life. Use the polishing wool pads to lift oxidation, then the foam pads with a mild metal polish for a mirror finish. Lightly hit stubborn spots with 220-grit and the detail fingertips for crevices. Seal with wax or lacquer and reinstall for a dramatic before/after.
Copper Contrast Art Panels
Create wall art on thin copper sheets: scuff the surface with 220-grit for an even tooth, induce a controlled patina (vinegar/salt fumes), then use the wool pads to selectively polish highlights and lines. Finish with foam pads for soft gradients. Mount to wood and frame for a high-impact mixed-metal piece.
Guitar Fret and Neck Touch-Up
Tape off the fretboard, then use the polishing wool pads to brighten nickel-silver frets and remove minor oxidation. Lightly scuff the back of the neck with 220-grit between finish coats for silky playability. Use fingertip pads for tight spots at the heel and headstock transitions.
Model Car/Bike Chrome Detailing
Prep and polish small chrome and fine metal parts on scale models. Use the fingertip pads to clean tight contours, wool pads to refresh chrome shine, and 220-grit to feather primer on body panels between coats. Finish with foam pads to smooth clear coat nibs for a scale-accurate gloss.
Ornate Frame Refresh
Revive carved wood or mixed-metal picture frames. Use 180/220-grit to scuff flaky finishes and the fingertip pads to get into detailed moldings. Polish any brass/copper accents with the wool pads, then apply gilding wax. Foam pads help blend and smooth the final sheen.