Features
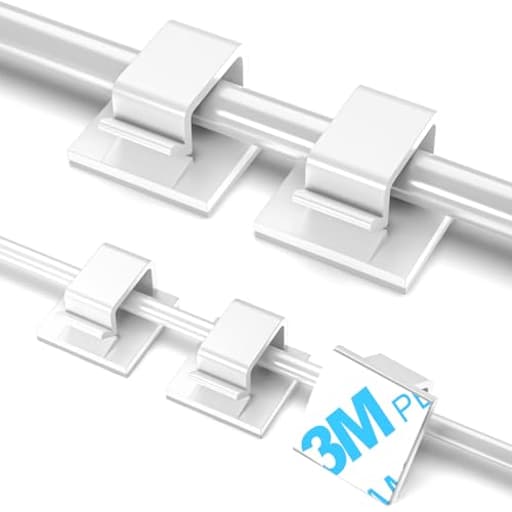
- Assorted Sizes: Package include 50 pcs large cable clips and 50 pcs small cable clips. Made of eco-friendly premium PA66 material, meet your needs for managing wires of different diameters.
- Strong Adhesive: Those cable management clips have a upgraded sticky adhesive that can firmly hold cables, wires, and cords in place, remove without any residues and damage. Work great on plastic, metal, glass, wood surface.
- Size information: Small size wire clips: Base 0.63’’x 0.61’’, Inner Height 0.2’’. Large size cord clips: Base 0.75’’x 0.75’’, Inner Height 0.32’’.
- Wide application: Small size wire organizer clips suitable for: USB cable, phone charger, ethernet cable, cat 6, car dash cam. Large size cord holder clips suitable for: TV coax, extension cord, power cable, HDMI, Audio Cable, LED Strip Lights.
- Note before Use: Make sure to clean the mounting surface with alcohol pads before you use the light clips hooks, stick it on and press firmly for 30 seconds, and use them after 24 hours for maximum adhesion.
Specifications
| Color | White |
| Size | Small&Large |
| Unit Count | 100 |
Related Tools
Set of 100 adhesive cable clips (50 small, 50 large) made of PA66 for routing and securing wires and cords. The clips have an adhesive backing that adheres to plastic, metal, glass and wood and can be removed without leaving residue; the two sizes accommodate small cables (USB, phone charger, Ethernet) and larger cables (HDMI, power cords, coax, LED strips). Recommended surface prep: clean with alcohol, press firmly for 30 seconds and allow 24 hours for maximum adhesion.
TidyHelper 100 PCS Adhesive Cable Clips White (Small & Large), Upgraded Wall Wire Holder for Cord Organizer Cable Management, Outdoor Light Clips Hooks for LED, Car Dash Cam, HDMI, Extension Cord Review
My desk used to be a thicket of cables creeping across the surface and spilling down the back of the leg. After a weekend with the TidyHelper cable clips, the chaos is gone. These little stick-on clips aren’t flashy, but they’re exactly the kind of simple, repeatable hardware that makes a workstation, TV area, or even a porch light run look intentional.
What you get and how they’re built
The kit includes 100 clips: 50 small and 50 large, all in white. The bodies are molded from PA66 (nylon 66), which is a durable, slightly rigid plastic that resists deformation better than the softer polyethylene you often see in cheap clips. They’re compact, low-profile squares with a hinged “snap” arm that closes over your cable to secure it.
Two dimensions matter in practice:
- Small base: 0.63 x 0.61 inches; inner height about 0.2 inches (roughly 5 mm)
- Large base: 0.75 x 0.75 inches; inner height about 0.32 inches (roughly 8 mm)
In real-world terms, the small size is perfect for single USB-A/C, Lightning, or Ethernet runs; the larger size fits HDMI, coax, and most power cords comfortably. I’ve also bundled two or three smaller cables into one clip when I needed to jump a gap across the back of a desk.
Each clip ships with a pre-applied adhesive pad. It’s a thin foam-style tape—stickier than the bargain-bin stuff, not as thick or cushioned as heavy-duty VHB—but more than adequate for light cable routing if you prep the surface properly.
Installation and prep
Like most adhesive hardware, prep makes or breaks the experience. My steps that have consistently worked:
1. Wipe the mounting surface with isopropyl alcohol (not a general cleaner—those often leave residues).
2. Let it dry completely.
3. Place the clip, press hard for about 30 seconds, and then resist the urge to load it immediately.
4. Give it a full 24 hours before clipping in cables.
I tested on semi-gloss painted drywall, lacquered wood, glass, and powder-coated steel. On all of these smooth, clean surfaces, adhesion was solid. On lightly textured paint and a rubberized plastic monitor arm, I saw mixed results; a few clips lifted within a day until I swapped to smoother adjacent areas or doubled up on clips to reduce shear.
One note about layout: you’ll get the best results if you plan a path that minimizes tension. Instead of trying to pull a heavy power cable tight along a vertical drop, add more clips and allow gentle curves. Around corners (wall-to-ceiling transitions or desk underside edges), I space clips closer together to avoid asking one clip to do all the work.
Day-to-day performance
In my office, I routed:
- Monitor power, HDMI, and USB downstream in large clips.
- Keyboard, mouse, and charging leads in small clips along the back edge of the desk.
- A pair of speaker wires tucked against a baseboard using alternating small clips.
With the 24-hour cure time respected, everything stayed put. The small clips will hold one to three light leads with no drama; two if you want it truly tidy. The large clips handled one HDMI plus a standard power cord comfortably, though I wouldn’t use a single clip to support the full weight of a dangling power brick or a thick extension cord hanging vertically—use multiple clips to distribute load.
I also mounted a dash cam wire along a smooth plastic trim inside a car. On that kind of surface, adhesion was excellent, but textured dash vinyl was less reliable—again, surface smoothness and cleanliness matter. For outdoor use, I ran a short string of LED lights along painted wood trim under a covered porch. In mild fall weather, the clips stayed secure. In exposed areas with direct sun or extreme cold, I’d be more cautious; adhesives tend to harden or creep depending on temperature swings.
The latch mechanism is straightforward to open and close for re-routing, which is handy when you replace a cable or need to add one more lead. I did have one instance where I forced a tight cable bend at a corner and the clip separated from its adhesive pad under shear. Spacing two clips at the corner fixed it.
Aesthetics and footprint
The white finish blends well on white walls, desks, and trim; on darker furniture, the clips are visible but still tidy. Because the bases are small—especially on the “small” size—you can tuck them out of sight under a desk lip or behind a TV cabinet and they essentially disappear. If you want completely invisible runs in a high-contrast setup (e.g., black desk, white walls), consider planning your routes to hug edges and shadows.
Removal and reuse
Removal from painted drywall and sealed wood was clean when I twisted gently and pulled slowly. On one older wall, a tiny bit of foam residue stayed behind; it wiped off with adhesive remover. I’d warm the pad slightly with a hair dryer if you’re nervous about delicate paint.
The clips themselves are reusable, but the adhesive pads are not. If you plan to move them, expect to add your own fresh double-sided tape. The PA66 body holds up fine to multiple cycles.
What they’re good for
- Cleaning up a home office without committing to drilling or under-desk trays
- Neatening a TV/console setup where you need flexibility and lots of attachment points
- Low-profile routing of LED light leads, Ethernet, and USB behind furniture
- Car dash cam cable tucks along smooth interior trim
- Temporary or renter-friendly installs where no-residue removal matters
Where they fall short
- Heavy or high-tension runs (thick extension cords, long vertical drops without enough intermediate support)
- Textured, dusty, or porous surfaces (flat paint, bare concrete, rough plastics)
- Sharp corners or transitions if you try to make one clip do the work of three
- Fully exposed outdoor locations with harsh temperature swings or direct, prolonged sun
None of these are surprising limitations, but they’re worth calling out if you’re expecting miracle-level stick.
Practical sizing guidance
- Small clips (0.2-inch inner height): USB-A/C, Lightning, headphone cords, single Cat6, dash cam leads. Two small cables together is ideal; three is doable but gets snug.
- Large clips (0.32-inch inner height): HDMI, coax, thin-to-standard power cables, small bundles of two or three lighter leads. If a cable is fighting the latch, step up to the large or add another clip nearby to reduce tension.
Because the inner “height” is the limiting dimension, flat or flexible cables can fit more easily than round, stiff ones.
Tips that helped
- Dry-fit your route with painter’s tape first. It prevents misplacements and saves adhesive.
- Use more clips than you think you need on vertical runs or corners—6 to 8 inches apart is a good starting point.
- Press not just the center but the edges of the base during installation; full pad contact matters.
- Wait the full 24 hours before loading. It’s the difference between “pretty good” and “rock solid.”
- For darker setups, consider placing clips just under edges and ledges rather than on visible faces.
The bottom line
The TidyHelper cable clips are a practical, budget-friendly way to impose order on everyday cord clutter. The material quality is a notch above the typical throwaway clips, the two included sizes cover most home and office needs, and the adhesive performs well when you respect the basics of surface prep and cure time. They’ll never replace a bolted tray for heavy loads or match premium, thick-foam adhesives on rough surfaces, but that’s not what they’re for. They’re for multiplying neatness quickly, precisely where you need it, without breaking out a drill.
Recommendation: I recommend these for light-to-medium cable management on smooth surfaces, especially in home offices, entertainment centers, and renter scenarios where clean removal matters. If you’re trying to support heavy cords on textured walls or in harsh outdoor conditions, you’ll want a heavier-duty solution, but for everyday routing with a clean finish and a generous quantity in the box, these clips earn a spot in the cable-taming toolkit.
Project Ideas
Business
Cable-Organization Installation Service
Offer a targeted service for small offices, studios, and home offices: on-site cable management using clip kits, labeling, and a simple documentation photo map. Charge per hour or per room; upsell bundled kits the client can keep. Market to co-working spaces, Realtors (staging), and small businesses.
DIY Kits for Sale (Etsy/Amazon)
Assemble and sell themed DIY cable-management kits: 'Home Streaming Setup', 'Gaming Desk Tidy', 'Holiday Light Install'. Include the right mix of small/large clips, alcohol wipes, simple instructions, and decorative covers or labels. Package attractively and sell via Etsy or Amazon with instructional images and short setup videos.
Event & Holiday Lighting Service
Use the clips for temporary installations—wedding uplighting, festival LED strings, holiday home displays. Because clips remove without residue, position them as a low-impact solution for venues. Offer setup, teardown, and optional storage of lights—charge per linear foot or per fixture.
Affiliate Content & Workshops
Create video tutorials and short courses on cable management, DIY lighting, and workspace organization showing before/after transformations using these clips. Monetize with affiliate links to clip packs, LED strips, and tools; run local hands-on workshops for DIYers and small businesses.
B2B Supply Packs for Installers
Package bulk clip kits with labeled counts and surface prep guides for AV installers, electricians, and IT service companies. Offer private-label options and sell on a subscription/reorder schedule. Provide sample packs to salons, car dealerships (dash cam installs), and retail stores that need neat in-store displays.
Creative
LED Backdrop Curtain
Use the large clips to route LED strip or fairy light strings evenly across a lightweight fabric or wall to create a glowing photo backdrop. Space clips at regular intervals, hide power cords with the small clips, and paint or cover clips to match the fabric for a seamless look. Great for weddings, parties, or a photography corner.
Desktop Dock & Charging Station
Create a tidy desktop dock by mounting small clips under a shelf or behind a monitor to hold phone chargers, USB cables, and headphone wires in precise positions. Add a small wooden tray or board for devices on top; label each clip for specific device cables so cables don’t tangle and everything docks to the same spot every time.
Custom Wall Cable Art
Design geometric or word-shaped wall art using visible cables as the medium (neon LED strips, colored extension cords). Use clips to anchor the cable path to drywall or wood and create patterns—grid, wave, or script. The adhesive clips make the installation removable so you can change designs seasonally.
Under-Cabinet Lighting & Spice Rack
Install LED strips under kitchen cabinets and use the large clips to hold the strip and the small clips to secure the low-voltage wires neatly along the cabinet underside and down to the outlet. Combine with a narrow wooden spice rack to make a lit, tidy cooking station—clips keep everything hidden from view.
Portable Event Cable Kit
Build a compact kit (board + assortment of clips pre-mounted) that you can bring to pop-up markets or craft fairs to quickly set up booth lighting and device charging stations. Pre-stick clips on a backing so you can press the kit into place for fast, consistent setups anywhere.