Specifications
| Color | White |
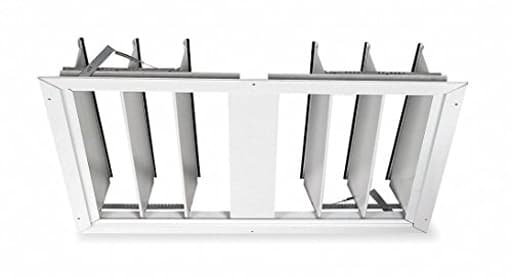
A ceiling truss shutter that provides a closure and air barrier for a 30" whole-house fan installation, requiring a 28-3/4" x 33-7/8" rough opening. It mounts to ceiling trusses, seals the attic when the fan is not in use, and has a white finish for a finished appearance.
Dayton 30" Whole House Fan Economy Ceiling Truss Shutter/Ceiling Shutter, 28-3/4" x 33-7/8" Opening Requi Review
Why I swapped my old whole-house fan shutter
My old whole-house fan shutter had become the weak link in an otherwise reliable ventilation setup. The louvers chattered, the finish had yellowed, and the seal to the attic was poor enough that I could feel drafts on windy nights. I replaced it with the Dayton ceiling shutter for a 30" fan—a simple, white louvered panel designed to mount directly to ceiling trusses and cover a 28-3/4" x 33-7/8" rough opening. It’s not a flashy upgrade, but it’s the kind of part that affects noise, comfort, and energy losses more than you’d expect.
What this shutter is (and isn’t)
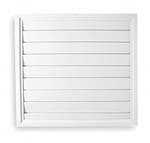
This is a purpose-built ceiling shutter assembly, not a fan. It’s a metal frame with gravity-operated louvers that open under the fan’s suction and close when the fan is off to limit airflow between the living space and attic. The finish is white, clean, and uniform—meant to blend with a painted ceiling. There’s no motor, wiring, or control hardware; you reuse your existing fan and controls. If your whole-house fan is 30" and your rough opening matches the spec, this is intended to be a direct replacement.
Installation: straightforward with a couple of caveats
Swapping shutters is usually more about careful measuring than fancy tools. Here’s how my install went:
- Prep and removal: I cut power to the fan, set up a stable platform, and removed the old shutter and its perimeter trim. That gave me full access to the rough opening and truss faces.
- Verify the opening: The published rough opening is 28-3/4" x 33-7/8". My framing was nominally that size but, after years of paint and minor drywall swell, it was tight. Before lifting the new shutter, I dry-fit the frame and found it would go in with about 1/8" of wiggle front-to-back and a near-snug fit side-to-side. That “snug” fit is great for appearance but leaves no forgiveness for out-of-square framing.
- Hardware: The shutter didn’t come with screws in the box. I used eight #8 x 1-1/4" wood screws with fender washers to spread the load along the mounting flanges. Predrilling the flanges and trusses made for a cleaner, rattle-free install.
- Squaring and sealing: I shimmed lightly to keep the frame square and flush to the ceiling plane, then ran a neat bead of paintable caulk along the drywall-to-flange seam to hide any irregularities and reduce whistling.
- Final alignment: With the fan on low, I watched the louvers open to confirm they weren’t rubbing; a small tweak to one mounting screw eliminated a mild scrape.
Total hands-on time was under an hour, not counting touch-up paint on the caulk.
Tip: Measure your actual opening in multiple spots. If your width is less than 28-3/4" anywhere, plan to shave paint, scrape a bit of drywall, or widen the framing by a hair. Conversely, if your opening is generous, be ready with shims so the frame doesn’t distort when you tighten the screws.
Build and design
The frame and louvers are metal with a smooth white finish that reads as semi-gloss in my lighting. Edges are cleanly formed, and the pivot rods feel solid with minimal side play. The louvers sit flush when closed and overlap enough that, while not airtight, they present a continuous surface with only thin seams between blades.
A couple of design notes I appreciated:
- The mounting flanges are broad enough to cover small chips in drywall and to give you more screw options without getting too close to the edge.
- The louvers are light enough to respond at low fan speed, but they have enough heft to fall closed reliably when the fan is off.
Things that could be better:
- Including a small hardware kit—screws and perhaps thin foam gasketing—would reduce trips to the shop.
- The frame depth is modest, which looks tidy, but it does mean alignment matters. If your ceiling isn’t flat, you’ll see it.
Performance: quieter, cleaner airflow
The immediate upgrade over my old shutter was noise, or rather the lack of it. With the fan running on medium, the typical “tinny” rattle I’d grown used to disappeared. The louvers open smoothly and don’t flutter. Standing in the adjacent room, the background whoosh of airflow dominates rather than mechanical chatter. On high speed, there’s a brief, soft clack when the blades fully lift and settle—normal for this style—but no repeating buzz or resonance.
Airflow feels at least as strong as before. The louvers swing nearly vertical, giving a generous free area. I didn’t measure pressure drop, but the fan’s ability to clear cooking heat in the evening is unchanged, and the time to cool the hallway is the same as with the previous shutter.
Sealing the attic: better but not perfect
No gravity-louver shutter will be airtight, and this one isn’t. However, the fit between blades and the frame is tight enough that I don’t feel cold drafts around the grille anymore. On windy days, the louvers stay put; I haven’t experienced wind-bumping that some older shutters suffered. As a bit of insurance, I added thin, self-adhesive weatherstrip where the top louver meets the frame stop. That took 10 minutes and further reduced any faint whistling on gusty nights.
If you’re aiming for near-zero leakage in winter, consider an insulated cover in the attic during the off-season. For three-season use, this shutter’s sealing is absolutely adequate.
Day-to-day use and upkeep
In daily operation, the shutter is invisible—and that’s what I want. It opens with the fan, closes when off, and doesn’t call attention to itself. Maintenance is minimal: I vacuum dust from the louvers every month or two and wipe with a damp cloth. The finish shrugs off fingerprints and hasn’t chalked. The pivots haven’t needed lubrication; if they ever do, a drop of silicone on each end of the rod would be sufficient.
Fit and tolerance notes
A practical word on dimensions: while the published rough opening is 28-3/4" x 33-7/8", tolerances in framing and finish can move those numbers in the real world. My unit was just within spec, but it was clear that 1/8" of slop can make the difference between a slide-in and a frustrating bind. Before you order, verify both dimensions and check for out-of-square corners. If your opening is right on the edge, be prepared to adjust the opening slightly or to sand paint ridges. The frame’s flange will hide small corrections.
What I liked
- Clean, uniform white finish that blends with the ceiling
- Smooth, quiet louver action with minimal rattle
- Simple, predictable installation on truss faces
- Solid feel to the pivots and frame with no sharp edges
- Better sealing than a typical aged shutter without resorting to springs
What could be improved
- No screws or gasket material included
- Tight tolerances demand an accurate rough opening and careful alignment
- Not an insulated solution; winterizing still benefits from a seasonal cover
Who it’s for
If you have a 30" whole-house fan and your existing shutter is noisy, warped, or drafty, this Dayton shutter is a sensible, direct replacement. It’s also a good option if you’re finishing a new fan install and want a clean, white grille with dependable operation. It’s less ideal if you’re working with a nonstandard opening or are trying to maximize winter insulation at the grille without attic access.
Recommendation
I recommend this shutter. It’s a straightforward, well-finished replacement that installs cleanly, runs quietly, and improves the seal between living space and attic compared to a tired, older unit. Just measure your opening carefully—ideally in multiple places—and have your own mounting screws on hand. With that prep, you’ll end up with a neat, quiet grille that does exactly what it should: disappear into the ceiling and let your whole-house fan do its job.
Project Ideas
Business
Whole-House Fan Shutter Installation Service
Offer a specialized installation service for whole-house fan shutters (new installs and retrofits). Service package includes measuring rough openings to 28-3/4" x 33-7/8" spec, mounting to ceiling trusses, sealing/insulating, and testing the fan closure. Upsell options: trim kits, priming/painting, soft-close hinges, and smart actuators. Target HVAC contractors, homeowners renovating for passive cooling, and eco-conscious clients; price as flat install + materials with tiered options.
Custom Decorative Shutter Upgrades
Develop a line of custom decorative faceplates and trim kits to sell alongside the white shutter: faux-wood overlays, decorative medallions, painted motifs, and acoustic fabric inserts. Produce modular kits sized for the 28-3/4" x 33-7/8" opening that install over the shutter. Market via Etsy/Shopify with before-and-after photos, DIY installation videos, and targeted ads aimed at homeowners renovating mid-century or rustic homes.
Energy-Efficiency Audit + Sealing Bundle
Bundle the shutter with an attic-sealing and insulation audit service. Offer a package: install the shutter, add gasket upgrades and perimeter spray-foam or weatherstripping, and recommend insulation improvements. Provide an estimated annual energy savings report to show ROI. Sell to utility rebate programs, green building projects, and homeowners focused on lowering cooling/heating bills.
Smart-Actuated Shutter Retrofit Kit
Create a retrofit kit that automates opening/closing of the shutter with a small motor, Wi‑Fi controller, and temperature/humidity sensors. Market to smart-home integrators and HVAC companies. Include easy mounting brackets for the shutter, instructions for wiring to existing fan controls, and an app integration guide. Charge a premium for installation and offer a subscription for monitoring or extended warranty.
Contractor Partnership & Referral Program
Develop a B2B program targeting HVAC installers, attic insulation contractors, and general remodelers: supply compliant shutters at dealer pricing, offer training on quick install techniques, and provide marketing collateral that they can give homeowners. Create a referral incentive (discounts, rebates) to encourage partners to recommend your shutters and installation services for whole-house fan projects.
Creative
Decorative Ceiling Medallion Conversion
Turn the shutter into a finished decorative ceiling medallion around the fan opening. Add lightweight molding rings and a faux-painted center (metallic or woodgrain) to hide the utilitarian flange. Use thin MDF trim glued and screwed to the shutter frame, caulk seams, prime and paint to match room decor. Result is a finished, upscale look that preserves the shutter's sealing function while elevating interior aesthetics.
Insulated Hidden Storage Lid
Convert the shutter into an insulated, hinged attic-access lid that doubles as a hidden storage hatch in a bedroom or hallway. Fit a hinged bracket and gas strut for easy opening, line the inside with rigid foam board and reflective foil for R-value, and add soft-close hardware and a recessed handle. This provides weather-tight attic access and a neat storage compartment for seasonal items.
Artwork/Acoustic Ceiling Panel
Remove the factory face and replace it with a stretched acoustic fabric panel or custom-printed canvas. Behind the panel place acoustic batting or foam to dampen attic noise when the fan is off. Paint the frame white or match it to the fabric edge. This turns the shutter into a decorative acoustic panel that improves room acoustics and hides the fan opening.
Integrated Overhead Planter / Light Box
Combine the shutter with a shallow planter or LED light box for a multifunctional ceiling feature. Build a shallow box below the shutter with a removable seeded tray for moss or faux plants, or install diffused LED strips behind a translucent panel to create indirect ceiling lighting. Keep sealing gaskets intact so the attic remains closed when the fan isn't running.