Features
- All-steel construction
- Quickly attaches to fixed-base compact router
- Precise positioning for inlays, dadoes, and similar cuts
- Extends up to 3 in. from edge of material
- Easy slide-and-lock positioning adjustment
Specifications
| Color | Black |
| Material | Steel |
| Product Height (In) | 8 |
| Product Length (In) | 11.9 |
| Product Width (In) | 1 |
| Product Weight (Oz) | 12 |
| Max Extension From Edge | 3 in |
| Compatible Model (Example) | Compact router DWP611 (per listing) |
| Warranty | 3 Year Limited Warranty; 1 Year Free Service; 90 Days Satisfaction Guaranteed |
Related Tools

Related Articles

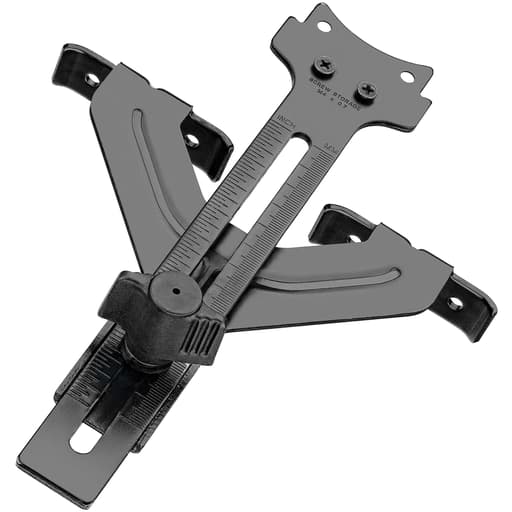
An all-steel edge guide that mounts to a fixed-base compact router. It provides adjustable, slide-and-lock positioning for routing tasks such as inlays and dadoes, and extends up to 3 inches from the material edge.
DeWalt Edge Guide for Fixed Base Compact Router Review
Why an edge guide still earns a place in my kit
A compact router is only as versatile as the way you control it, and an edge guide is one of the simplest ways to add precision without complicating setup. I put DeWalt’s compact edge guide through a handful of shop tasks—routing inlay channels, light dadoes in cabinet carcasses, and trimming rabbets—and it did exactly what I expect from a no-drama accessory: it attached quickly, tracked straight, and held its setting without wandering.
Build and design
The guide is all steel, finished in black, and feels more substantial than its 12-ounce weight suggests. There’s no plastic flex or rickety hardware here. The slide-and-lock mechanism uses smooth rods and a positive clamp that bites down evenly; once I set an offset, I didn’t see it creeping, even with repeated passes. The overall footprint is compact—roughly 12 inches long, 8 inches tall, and about an inch thick—so it rides close to the router without getting in the way of your hands or your sightline.
The fence face is straight and true out of the box. On my bench, a machinist square and a quick check against a jointed board showed no daylight. For delicate surfaces, I like to add a strip of painter’s tape or a thin UHMW tape to the fence face to prevent scuffs; the steel finish is smooth, but the tape adds a little insurance on veneered work or prefinished plywood.
Setup and compatibility
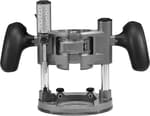
This guide is designed to mount to a fixed-base compact router. I used it with DeWalt’s DWP611 fixed base, and the fit and alignment were straightforward. Attachment is quick—slide the rods through the base, set your offset, and lock it down. If you’re planning to use it on a different compact router, confirm the base’s rod spacing and mounting style; compact routers vary more than full-size routers in how they accept accessories.
There’s no dedicated micro-adjust knob on this guide. Instead, you achieve fine positioning by slightly loosening the clamp, nudging the assembly, and locking it again. With a steel rule or a setup block between the bit and the fence, I could consistently dial within a couple of tenths of a millimeter. For repeat setups, marking the rods with a fine-tip marker at common offsets saves time.
In use: accuracy and control
Most of my cuts were parallel to a straight edge within 2 inches of the workpiece edge—well inside the guide’s maximum of 3 inches. Within that range, the guide tracks beautifully. The steel construction lends a planted feel; the router doesn’t chatter or yaw unless you force it. I like to take a light scoring pass first, then clear to full depth in one or two additional passes. The fence stays tight against the edge, and the slide-and-lock clamp has enough bite that I stopped checking for drift after the first few runs.
At the full 3-inch extension, any compact guide is asking for leverage to become the enemy. This one remains usable at full reach, but I found best results by slowing feed rate and keeping steady, lateral pressure on the fence. On wider offsets, a second hand guiding the fence (with your primary hand on the router) smooths things out. If you routinely cut grooves farther than 3 inches from the edge, a straightedge with a bearing-guided bit, a track-guided system, or a larger edge guide is the better tool.
Dust collection is whatever your router provides; the guide neither helps nor hinders. Visibility around the bit is good—compact bases excel here—and the black finish cuts glare under bright task lighting.
Common tasks and results
Inlays: For decorative stringing and border inlays, the guide’s stability makes it easy to creep up on precise offsets. I had good luck establishing a consistent reveal around a tabletop with a 1/8-inch bit, using the guide to maintain an even distance from the edge all the way around. Corners still require careful stop marks, of course.
Dadoes and grooves: In cabinet sides, a 1/4-inch spiral bit and two passes produced clean, parallel dados for shelves. The guide holds square to the panel edge, and the steel fence rides smoothly without marring melamine or prefinished plywood when taped.
Rabbets: For back-panel rabbets, this setup is quick. Set the offset to your desired shoulder distance and use depth to control rabbet width. The guide keeps the cut straight without needing a table setup.
Edge profiling control: While edge profiling is often freehand, running a piloted bit with the guide on a curved or inconsistent edge helps keep the bearing engaged and the cut consistent.
Capacity and limitations
Three inches of maximum offset covers a lot of furniture and cabinetry work. It won’t reach the center of broad panels, which is expected for a compact accessory. The lack of a built-in micro-adjust means final tweaks are manual; it didn’t slow me down, but if you’re coming from a larger, feature-rich fence, you’ll notice the difference. Because this is for a fixed-base router, plunge operations are limited to what you can safely do by tipping in or drilling starter holes—perfectly manageable for grooves and inlays, but not the same as a true plunge base with stops.
On very narrow workpieces, any compact router gets tippy. The guide helps by adding a second point of contact, but I still suggest an auxiliary base plate to widen the footprint for 1-inch or narrower stock.
Tips for better results
Use a setup block: Place a known-width block (or a caliper set to your desired offset) between the bit and fence, then lock the guide. It’s faster and more repeatable than measuring the gap directly.
Take a light first pass: A shallow scoring pass reduces tear-out and lets you confirm the path before committing.
Support long runs: Clamp a scrap of equal thickness at the far end of your board so the fence doesn’t drop off at the exit.
Mark the rods: Fine lines at commonly used offsets speed future setups and help you spot unintended movement.
Protect the fence face: A strip of painter’s tape or low-friction tape keeps delicate surfaces pristine and improves glide.
Durability and maintenance
The all-steel build inspires confidence. I tossed the guide into a tote with other router accessories, and it came out without dings or bent parts. The finish shrugs off shop grime and pitch; a quick wipe keeps it moving smoothly. Every few months, I put a drop of light oil on the rods to maintain the slide action, then wipe off the excess. There’s not much else to maintain—no plastic knobs to crack, no complex linkages to tune.
Value and warranty
As a dedicated accessory for a compact router, this guide’s value is in how quickly it takes you from measuring to cutting with predictable results. It doesn’t pretend to be a universal, do-everything fence; it’s a straightforward tool that does a few jobs very well. DeWalt’s coverage—3-year limited warranty, 1-year free service, and 90-day satisfaction—adds peace of mind, especially if you’re pairing it with a DWP611 and want matched components that fit properly.
Final recommendation
I recommend this DeWalt edge guide for anyone using a fixed-base compact router who needs reliable, repeatable parallel cuts within a 3-inch reach. It’s sturdy, simple to set, and stays put—exactly what you want in a guide. Woodworkers who need micro-adjust features or wider reach should look at larger systems, but for everyday inlays, dadoes, grooves, and rabbets, this compact steel guide delivers accurate results with minimal fuss.
Project Ideas
Business
Juice-Groove Cutting Boards
Batch-produce cutting boards with perfectly parallel juice grooves 3/4–1 in from the edge. Offer custom sizes, wood species, and monogram engraving. The edge guide speeds setup and ensures consistent spacing across multiples.
On-Site Hinge and Strike Mortising
Provide mobile routing for door and cabinet butt hinges, strike plates, and latch recesses. The edge guide lets you set precise offsets from the door or jamb edge for clean, repeatable mortises without bulky jigs.
Fluted Trim and Furniture Accents
Produce fluted face frames, door stiles, and trim boards (2–6 in wide) with consistent, repeatable flutes. Sell as made-to-order decorative components for cabinetmakers and interior designers seeking classic details.
Custom Closet/Cabinet Dados
Offer carcass dado services for small-batch cabinets, shelves, and organizers. Use the edge guide to cut perfectly parallel shelf and divider dados within 3 in of the panel edge, speeding production for builders without CNC.
Sign and Plaque Border Inlays
Partner with local engravers or trophy shops to add routed border lines or inlay channels 1/4–1 in from plaque edges. The guide provides crisp, uniform margins that elevate awards, house signs, and dedication plaques.
Creative
Inlaid Border Cutting Board
Route a precise 1/4–1/2 in channel 1–2 in from the edge on all sides using the edge guide, then inlay a contrasting wood strip or pour epoxy. Add a second inner pass for a double-line effect and a juice groove inside the border. The slide-and-lock guide keeps the border perfectly parallel on each side.
Floating Box Shelf with Blind Dados
Cut clean, repeatable blind dados 1/2–3/4 in from the edge in the side panels to receive the top and bottom. The edge guide ensures identical reveal on both sides, producing a rigid, seamless shelf that appears to float once mounted.
Fluted Stiles and Table Legs
Add evenly spaced flutes to door stiles, apron faces, or table legs within 3 in of an edge. Use the guide to index each pass for consistent spacing, and stop blocks to create classical start/stop flutes. Great for a matched set of furniture components.
Picture Frames with Accent Rabbets
Cut a clean rabbet on the frame’s back for glass and backing, then add a subtle decorative groove 3/8–3/4 in in from the outer edge on the face. The edge guide keeps the line crisp and parallel around all four sides.
Serving Tray with Finger Grips and Captured Panel
Route shallow finger grips along the tray’s ends 3/4–1 in from the edge for comfortable handling, and cut dados/rabbets to capture the tray bottom. The guide makes mirrored grips and consistent panel reveals easy.