Features
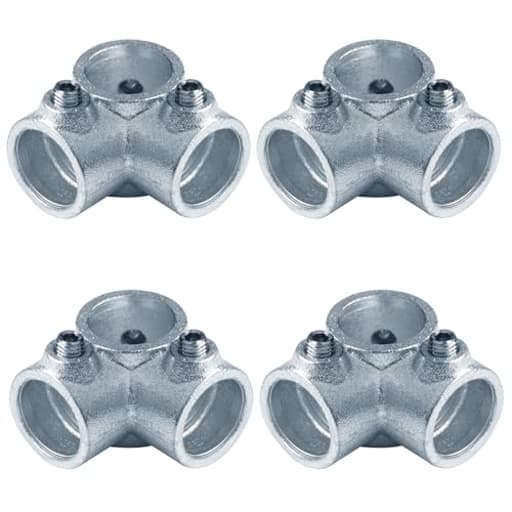
- Three Socket Cross Outlet Tee 1" Dia. (Nominal Pipe Size: 1")
- 1" Nominal Galvanized Pipe Fitting (Fits pipes 1.315" outside diameter)
- Please measure your pipe before purchasing. Contact us if unsure.
- Material: Ductile Cast Iron + Surface Electro-galvanized
- Clamp Wall Thickness: 5 mm
Specifications
| Color | Silver |
| Size | 1 Inch |
| Unit Count | 4 |
Related Tools
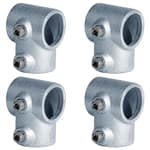
Set of four electro-galvanized ductile cast iron pipe fittings designed to join 1" nominal (1.315" O.D.) pipe in 90° two-socket tee configurations for guard railing or structural tubing. Each fitting has a 5 mm clamp wall thickness and a silver corrosion‑resistant finish; verify pipe outside diameter before installation.
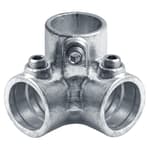
eoere 4 PCS Galvanized Steel Structural Pipe Fitting Fits 1" Nominal Pipe (O.D. 1.315"), 90 Degree Two Socket Tee for Guard Railing Review
Why I tried these tees
I needed a simple way to tie a horizontal rail into a vertical post for a small guard railing and an awning support in the shop yard. Welded joints would have been overkill for something that might need adjusting, and I wanted a modular setup I could assemble with hand tools. That’s where the eoere two‑socket tees came in: a four‑pack of 90‑degree, slip‑on fittings sized for 1-inch nominal pipe (1.315-inch outside diameter).
What you actually get
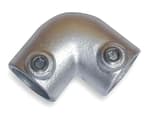
The set includes four ductile cast iron tees with an electro‑galvanized silver finish. Each has two perpendicular sockets and uses set screws to clamp onto pipe rather than requiring welding or drilling. The castings on my set were clean, with a uniform finish and no sharp flashing. The clamp wall thickness measured right around 5 mm on my calipers, consistent across the batch.
A quick note on the listing: some product pages mix terminology and even reference “three-socket” crosses. The parts I received are standard two‑socket, 90-degree tees—and that’s what you should expect for tying a rail into a post or building rectangular frames.
Build quality and finish
Ductile cast iron is a good choice for this kind of fitting. It’s tougher than gray iron and has a little give before it breaks, which is precisely what you want under clamping loads. I put the tees through several installs and removals and didn’t see any cracking, thread pullout, or deforming at the set screw seats.
The electro‑galvanized coating is bright and even, without drips or bare spots. Electro‑galv is thinner than hot‑dip galvanizing, so while it looks nice and resists corrosion, it’s not the same level of protection you’d want for long‑term, harsh marine environments. For indoor use or general outdoor exposure, it’s acceptable. I left one assembly outside through a week of rain followed by sun; the fittings held their finish, though the edges dulled slightly where the hex key contacted the set screw. If you’re installing near the coast or in permanently damp conditions, I’d plan on a clear coat or a cold galvanizing top-up after installation.
Fit and sizing: measure your pipe, not your assumptions
Here’s the most important part: sizing. These are designed for 1-inch nominal pipe, which is not the same as 1-inch outside diameter. Standard 1-inch schedule 40 pipe is 1.315 inches OD. If you’re using EMT conduit or tube, those OD numbers are different, and these tees won’t clamp properly on the smaller sizes.
- I test-fit them on 1-inch schedule 40 black pipe (1.315-inch OD). They slipped on easily.
- The bore on my fittings measured between 1.410 and 1.420 inches ID. That means there’s some clearance—enough to make sliding and positioning easy, but you’ll feel a bit of play before you tighten the set screws.
If you’re used to Kee‑style fittings, that slip fit won’t surprise you. The set screws are what lock everything in place. With two screws tightened firmly, I could eliminate wobble and get rails aligned. The roomy bore does mean you need to be mindful during assembly: snug one screw to hold position, check alignment with a level, then fully tighten.
A practical tip: if you’re chasing ultra‑precise, furniture‑grade alignment, a single wrap of thin aluminum tape on the pipe can take up some slack and make positioning more predictable. It’s not required, but it makes life easier if you’re building something where small gaps will bother you.
Installation experience
Setup is straightforward:
- Cut and deburr your pipe ends. Any burrs make assembly harder and can chew up the fitting’s coating.
- Slide the tee where you want it. These are genuinely easy to position thanks to the slip fit.
- Tighten the set screws alternately until the joint feels solid. I used a T‑handle hex key and snugged them firmly without leaning into it. You don’t need to overdo it—let the cup‑point do the work.
- Check for square and level as you go. With two set screws per tee, small adjustments are quick.
The set screws bit into black steel pipe cleanly and didn’t strip, and the threaded holes in the fittings felt decently tapped—no gritty spots or cross‑threading. I didn’t need threadlocker, but a dab of anti‑seize on the screws is a good idea if you expect to make seasonal adjustments.
Strength and stability in use
For guard rails and light structural framing (workbench racks, a small awning frame, shelving), these tees held up well. Once tightened, I couldn’t twist the joint by hand. Under body weight pushing against the rail, there was no perceptible movement. I wouldn’t use them for anything with life‑safety implications or engineered loads without published ratings—it’s cast iron with a thin zinc layer and set screws, not a rated, bolted connection—but for typical DIY and shop projects, they inspire confidence.
One detail I appreciated is that the sockets have generous depth. That increases the contact area and helps the joint resist rotation. With two set screws preloaded, there wasn’t any creeping after a week outdoors and a couple of intentional bumps.
Corrosion and maintenance
Electro‑galv will protect against everyday rust, but it’s still a thin coating. If you’re cutting pipe, the exposed steel will rust first, not necessarily the fitting. I hit cut ends with a zinc‑rich spray and that kept surface rust at bay. The fittings themselves stayed bright through some showers and sunshine. In salty air, I’d either upgrade to hot‑dip galvanized fittings or plan for periodic touch‑ups. Indoors, these will stay looking new for a long time.
Compatibility tips
- These tees are for 1-inch nominal pipe (1.315-inch OD). They are not for 1-inch OD tubing.
- They will be too loose on 1-inch EMT (about 1.163-inch OD) and too tight for 1-1/4-inch pipe (1.660-inch OD).
- If you’re mixing components, double‑check that your elbows, crosses, and tees are all sized for the same nominal pipe.
It sounds basic, but most misfits I see in the field come from mixing tubing and pipe standards.
Value and alternatives
You can spend more on brand‑name Kee‑style fittings and get hot‑dip galvanizing and sometimes tighter machining. You can also spend less on unbranded pieces with inconsistent threads and sloppy castings. The eoere tees land in a sweet spot for value: clean castings, consistent finish, and functional threads, with the trade‑off of electro‑galv instead of hot‑dip. The four‑pack pricing is compelling for small projects where you need exactly this joint multiple times.
What I liked
- Clean, consistent castings and finish
- Easy assembly and repositioning
- Solid clamping with two set screws per tee
- Honest 1-inch nominal sizing that matches standard pipe
- Good price for a four‑pack
What could be better
- The bore runs on the roomy side, which requires careful alignment during tightening
- Electro‑galvanized finish is thinner than hot‑dip; fine for most uses, not ideal for severe environments
- Product copy could be clearer about “two‑socket tee” versus other fittings to avoid confusion
The bottom line
The eoere two‑socket tees did exactly what I needed: quick, adjustable 90‑degree joints for 1-inch nominal pipe without welding. They’re sturdy, the finish is tidy, and installation is painless. The fit is intentionally loose before tightening, so you need to take a moment to square things up as you lock the screws. If you want a jewelry‑tight slip fit or you’re building for harsh coastal conditions, look at hot‑dip galvanized alternatives. For shop guards, handrails, utility frames, and light outdoor structures, these are a practical, budget‑friendly choice.
Recommendation: I recommend these tees for DIY and light commercial projects using 1-inch nominal pipe where adjustability, decent corrosion resistance, and good value matter more than absolute precision or heavy‑duty environmental protection. Measure your pipe, assemble with care, and they’ll serve you well.
Project Ideas
Business
DIY Kit Bundles
Package the fittings with pre-cut 1" pipe lengths, hardware, and step-by-step instructions to sell as DIY kits (e.g., side table kit, lamp kit, shelf kit). Offer tiered kits (basic parts only, plus finish kit, plus pre-sealed wood top) to capture different price points and reduce customer assembly friction.
Workshops & Classes
Host hands-on workshops teaching customers how to build small projects (shelves, lamps, plant frames) using the fittings and pipe. Charge per seat and upsell kits and finishing services. Partner with makerspaces or home-improvement stores to reach hobbyists and crafters.
Custom Industrial-Chic Furniture Service
Offer bespoke furniture or fixtures for cafes, boutiques, and Airbnb hosts using these fittings for a quick-turn industrial look. Sell design packages (concept, build, install) and maintain a gallery of previous projects to attract interior designers and small business owners seeking durable, modular solutions.
Content & Affiliate Sales
Create video tutorials, short-form social content, and step-by-step blog posts that showcase projects built with these fittings. Monetize via ad revenue, sponsored posts, or affiliate links to the fittings, pipe, and finishing materials. Use high-quality before/after visuals to drive traffic to an online store or Etsy shop.
Market Stall / Pop-up Retail
Sell finished goods and small DIY kits at craft fairs, farmers markets, and pop-up shops targeting the local market. Use live demos to attract customers—show how the fittings assemble quickly—and offer on-site customization (paint color, wood top choices) to increase average sale value.
Creative
Industrial Corner Side Table
Use the four 90° two-socket tees as the four corner junctions to build a small square side table or stool. Join 1" nominal galvanized pipes for the legs and apron, top with a round or square wooden board or metal plate, and tighten clamps for a sturdy, industrial-looking piece. Finish options: stain or clear coat the wood, or spray-paint the pipes for a coordinated look.
Modular Wall Shelf Frame
Create a modular shelving frame by combining the tees with straight pipe lengths to make right-angle shelf supports that mount to a wall. The clamps serve as visible hardware for an industrial aesthetic; add reclaimed wood planks for shelves. Because the fittings are removable, the shelf can be reconfigured into different lengths or stacked units.
Pipe Lamp / Pendant Cluster
Use the tees to route and support electrical cord and light sockets in a multi-bulb pendant or floor lamp design. The 90° fittings make attractive junction points for hanging bulbs at different angles; secure lamp sockets inside cups or with threaded adapters and hide wiring within the pipe where possible. Electro-galvanized finish fits well with Edison bulbs for a vintage-industrial look.
Compact Garden Trellis or Plant Frame
Assemble a low-profile trellis or square plant frame for climbing plants using the tees as corner connectors and pipe for the verticals and horizontals. The galvanized finish resists corrosion outdoors; add zip ties or twine to create cross-lacing for vines. Design it to be freestanding or stakeable into soil for container gardens.
Custom Pet Gate or Playpen Panel
Build a small pet gate or playpen panel by forming a rectangular frame with the tees as corners and adding horizontal pipe rails spaced to keep small pets safe. Attach fabric, wire mesh, or wooden slats between rails depending on the pet. Quick-release clamps and a modular layout let you expand or reconfigure panels into a larger enclosure.