Specifications
| Color | Gray |
| Size | 12 inch x 12 inch |
Related Tools
Pack of 12 self-adhesive gray tin wall tiles, each sheet measuring 12 x 12 inches. Designed for peel-and-stick installation on backsplashes and other vertical surfaces, the metal sheets provide a wipeable, durable surface and the pack covers 12 square feet.
Tool Bench Hardware (Pack of 12) Gray Tin Self-Adhesive Wall Tiles 144 SQ FT Kitchen Backsplash 12 x 12in Sheets Review
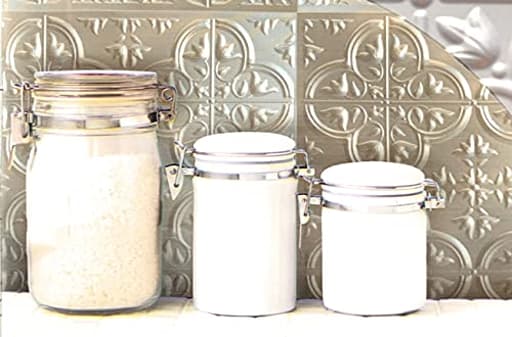
A budget backsplash experiment with peel-and-stick “tin” tiles
I set aside an afternoon to try a quick facelift on a small kitchen backsplash using a pack of gray peel-and-stick tiles. Each sheet is 12 x 12 inches, so a single pack nominally covers 12 square feet—just enough for a test run behind a prep counter and around a single-gang outlet. My goal was simple: a painless, renter-friendly upgrade with a metallic look that I could install with a utility knife and a straight edge.
What arrives and what it really is
Out of the package, the sheets are very lightweight and flexible. Despite the “tin” language in the product labeling, what I handled was not metal. It’s a plastic panel with a metallic film and an embossed pattern meant to mimic pressed tin. The finish is a cool gray with a semi-gloss sheen that reflects under-cabinet lighting.
Two immediate observations:
- The material arrived with a slight curl from being shipped flat but tightly packed. A few hours under books flattened the sheets well enough to install.
- The embossed pattern is fairly shallow. From arm’s length the effect reads as “tin,” but up close it looks like plastic with a foil finish.
Surface prep and layout
Any peel-and-stick tile lives or dies by surface prep. I scrubbed the painted drywall with a degreaser, rinsed, and allowed it to dry. To stack the deck in favor of adhesion, I lightly abraded glossy areas with 220-grit, wiped again, then snapped a level line with a laser. I dry-fit all sheets first to understand pattern repeat; these tiles don’t have a printed overlap guide, so you align by eye.
A note on coverage: although the pack covers 12 square feet on paper, real-world coverage was closer to 10 square feet for me once I accounted for trimming around outlets, inside corners, and pattern alignment.
Cutting and fitting
Cutting these tiles is simple but not foolproof:
- Scissors work, but they can deform the embossed pattern near the cut and leave a slightly wavy edge.
- A sharp utility knife and a metal straightedge produced cleaner, straighter cuts. Scoring twice and bending to snap yielded crisp results.
- For outlet cutouts, I drilled a starter hole and used a knife. Because the material is thin, it’s easy to crack the embossed “beads” if you rush; gentle cuts prevent tear-out.
Edges that meet countertops and cabinets look cleaner if you trim 1/16 inch short and then run a small bead of clear silicone after installation. That helps both appearance and moisture resistance.
Installation and adhesion
Peel, stick, press—at least in theory. The adhesive backing is a full-sheet pressure-sensitive layer, not dots or strips. On cleaned, painted drywall, the initial tack felt modest. I could reposition a sheet within the first minute, which was helpful, but after burnishing with a J-roller, some edges still wanted to float back up, especially where the wall micro-texture telegraphed through.
To get a secure bond, I took these extra steps:
- Heated the wall and the tile lightly with a hair dryer before pressing. Warm adhesive sticks better.
- Used a J-roller with firm pressure to seat the entire sheet, especially edges and corners.
- In a couple of stubborn spots around the outlet plate and one inside corner, I added a few dabs of construction adhesive. That solved the lifting but undercuts the “no-mess” promise.
If you’re installing on eggshell or semi-gloss paint, a bonding primer would likely help. On raw drywall or heavily textured walls, I would not install these without first smoothing and priming.
Look and feel after installation
Under cabinet lights, the gray finish throws nice highlights and does a decent job of disguising small wall imperfections. From across the room, the look is convincing enough for a quick refresh. Up close, the illusion breaks: the pattern embossing is shallow, seams are noticeable, and the plastic sheen gives it away. If you’re after the authenticity of real pressed metal, this won’t scratch that itch.
Seams required some finessing. There’s no overlap lip, and the printed pattern edges aren’t engineered to interlock. Butt joints can leave hairline gaps, which are visible at some angles. Carefully trimming factory edges and working from the most visible area outward helps, but expect to see seams if you look for them.
Durability and maintenance
After a week of normal kitchen use:
- Wipeability is good. Grease and splashes came off with a damp cloth and a drop of dish soap. Avoid abrasive pads; they will mar the metallic film.
- The surface picks up light scuffs if you drag a pot or utensil across it. These don’t always polish out.
- Near a cooktop, the panel above the back-left burner got warmer than the rest, and the corner began to lift slightly after a few days. I wouldn’t install these directly behind or beside a range unless you add a heat shield or keep a healthy distance.
- Around the sink, edges exposed to occasional water didn’t fail, but I sealed them with clear silicone as insurance. Without sealant, I’d expect eventual lifting where water regularly hits the edges.
This is not a tile I’d trust in a shower or anywhere with sustained moisture or heat. For light-duty backsplash areas or craft projects, it’s acceptable.
Tools and tips that made a difference
- Degreaser, microfiber cloths, and time for the wall to fully dry.
- Laser level or long level for a true first course.
- Fresh utility blades and a metal straightedge; skip scissors except for rough cuts.
- J-roller to lock the adhesive.
- Clear silicone for perimeter sealing and to hide micro-gaps at seams.
- Gentle heat from a hair dryer to improve tack during install.
Plan your layout so cut edges fall under cabinet uppers or behind appliances. Start in the most visible corner and work outward to hide seams.
Where these tiles make sense
- Temporary upgrades in rentals or staged homes where speed and removability outrank authenticity.
- Low-traffic utility spaces, craft rooms, or accent panels where you want a metallic hint without investing in real metal.
- Covering cosmetic wall imperfections as a stopgap until a full renovation.
Where they struggle: permanent kitchen backsplashes, high-heat zones, damp areas, and any project where the look and feel of real metal is important.
Value and alternatives
These sit firmly in the budget category. The appeal is the easy install and the metallic look at a low cost. The trade-offs are the plastic feel, visible seams, and inconsistent adhesion. If you can spend a bit more, aluminum composite or thicker PVC/gel backsplash panels tend to look sharper, handle heat and moisture better, and install with cleaner seams. If you specifically want genuine metal, look for stamped aluminum or steel panels with mechanical fasteners or high-temp adhesive.
Pros
- Quick, peel-and-stick installation with basic tools
- Lightweight and easy to cut for outlets and corners
- Wipeable surface for light kitchen use
- Convincing metallic look from a distance under cabinet lighting
Cons
- Material is plastic with a metallic film, not metal
- Adhesive is marginal on painted drywall without extra prep or assistance
- Seams are visible; pattern edges don’t interlock
- Prone to scuffs and edge lifting near heat and moisture
- Real-world coverage is less than the nominal 12 square feet due to trimming
Recommendation
I wouldn’t recommend these tiles for a permanent kitchen backsplash or any area near heat or frequent moisture. The plastic construction, modest adhesive, and visible seams make them a compromise that’s hard to justify for long-term use. If you need a fast, low-commitment facelift for a rental, a photo shoot, or a small, low-traffic accent area, they can do the job with careful prep and a tube of silicone. For most homeowners, though, a slightly higher-tier peel-and-stick product—or genuine metal panels—will deliver a more durable, convincing result and save you from redoing the work later.
Project Ideas
Business
Quick Upgrade Service for Short-Term Rentals
Offer a fast-turnaround peel-and-stick upgrade service targeted at Airbnb and vacation rental owners who need low-cost, high-impact renovations. Package services by room (kitchen backsplash, bathroom backsplash, feature wall) with fixed pricing, rapid installation timelines, and optional design mockups. Emphasize minimal downtime, easy cleaning, and improved guest photos for higher occupancy rates.
Curated DIY Tile Kits
Create and sell curated kits that include pre-measured tile sheets, cut-to-size accent pieces, step-by-step instructions, and finishing trims for specific projects (e.g., 3-ft stove backsplash kit, cabinet front kit). Market kits on Etsy, Shopify, and local craft fairs with how-to videos. Offer tiered kits (basic, premium with trims, add-on paint/patina) to increase average order value.
Refinished Furniture Line
Source inexpensive or vintage furniture, apply tin tile overlays to fronts or tops, and sell finished pieces online or at markets. Position products as durable, hygienic, and stylish—ideal for urban apartments or boutique retail displays. Document the process with before/after photos and list care instructions; consider a customization option (patina, paint accents, hardware upgrades) to charge premium prices.
Hands-On DIY Workshops & Pop-Up Events
Host paid workshops teaching homeowners how to use self-adhesive tin tiles for backsplashes, wall art, and organizers. Offer ticketed classes at makerspaces, hardware stores, or pop-up events and sell starter kits at the door. Workshops build trust, drive material sales, and create repeat customers who hire you for installation or custom work.
Creative
Patchwork Backsplash Mosaic
Create a modern, textured backsplash by cutting the 12x12 tin sheets into strips and squares to form a patchwork or geometric pattern behind a stove or sink. Plan the layout on cardboard first, cut with tin snips, and use a straight edge for clean lines. The self-adhesive backing speeds installation and eliminates grout; finish edges with thin aluminum trim or quarter-round molding for a polished look.
Upcycled Cabinet & Drawer Facades
Give kitchen cabinets, bathroom vanities, or a dresser a metal-clad facelift by adhering trimmed tile panels to drawer fronts and door faces. Remove hardware, measure and trim tiles to size, then press into place and reattach decorative knobs. Seal cut edges with small metal trim or paint to match. This adds a durable, wipeable surface and an industrial-chic look without full replacement.
Triptych Metal Wall Art
Turn three tiles into a statement art piece: cut patterns or shapes from several sheets, mount them to thin plywood panels, and apply a controlled patina or metallic paint accents. Combine textures by embossing or lightly hammering select areas, then hang as a coordinated triptych. Use different finishes (brushed, matte, aged) on each panel for visual depth.
Magnetic Command Center / Organizer
Make a functional magnetic board by covering a plywood panel or cabinet door with the tin tiles to create a magnetic surface for notes, spice jars, and tools. Add magnetic containers, hooks, a chalkboard strip, and labeled zones for mail, keys, and schedules. Mount it in a mudroom, kitchen, or garage for a durable, wipeable family command center.