Features
- Precision Cutting: Achieve clean, sharp edges on shadowline ceiling tiles effortlessly.
- Durable Construction: Built with high-quality materials to withstand the rigors of heavy-duty use.
- Easy to Use: Ergonomic design ensures comfortable handling and precise control, making it suitable for both professionals and beginners.
- Versatile Application: Ideal for a variety of ceiling tile materials, including gypsum, drywall, and more.
- Time-Saving Tool: Increases efficiency on the job site, reducing the time spent on edge finishing tasks.
Specifications
| Color | Silver |
| Unit Count | 1 |
Related Tools

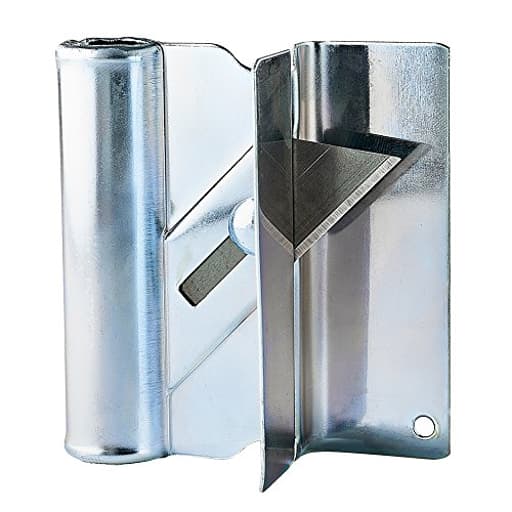
A precision shadowline ceiling tile cutter for producing clean, sharp edges on ceiling tiles, gypsum board and drywall during edge finishing. It has a durable metal construction and an ergonomic handle to improve grip and control. The tool is designed for jobsite use and sold as a single silver unit.
TOOLPRO Professional Shadowline Ceiling Tile Cutter - Precision Ceiling, Drywall and Construction Edge Finishing Tool Review
Why I reached for it
Shadowline reveals on ceiling tiles can make or break a grid install. Freehanding those horizontal cuts with a utility knife is slow, inconsistent, and unforgiving—especially on softer mineral fiber tiles that like to fuzz and tear. I picked up the ToolPro 5110 shadowline cutter to speed up a renovation that included several rooms of suspended ceiling with reveal-edge tiles. I wanted cleaner, repeatable results without building a jig or hauling a router and dust setup into finished spaces.
Build and design
The cutter is a compact, all-metal tool with a simple premise: lock in a razor blade at a fixed projection, register the body against the tile edge, and pull to create a consistent horizontal reveal. It’s solidly made, with a silver finish that stands up to jobsite bumps. The handle shape is better than it looks—there’s enough purchase to keep your pulling hand in line with the cut, and the weight helps the tool track without wobble.
There are no detents or scales on the adjustment, which feels like a miss, but the clamping hardware keeps the blade exactly where you set it. Once dialed in, it stays put through a long run of cuts. The tool uses standard razor-style blades, so sourcing replacements is easy and cheap.
Setup and adjustment
Out of the box, you loosen the clamp, set your blade projection, and re-tighten. Without indexed markings, consistency relies on your own process. Here’s what worked for me:
- Use a sample tile to establish the reveal depth—lock the blade with a hair less projection than you think you need.
- Make a test pass, check the fit on the grid T, then bump the blade out in tiny increments until the reveal drops perfectly.
- Once dialed in, scribe a fine mark on the tool body or use a caliper measurement you can repeat later.
The lack of a depth gauge is the biggest ergonomic compromise. It’s not hard to set, but repeatability between days or between crews requires a quick test cut.
Cutting performance
On standard mineral fiber reveal tiles, the cutter shines. The registration surfaces keep the cut parallel to the tile face, and the blade tracks cleanly along the edge without drifting. I got crisp, uniform reveals across a large batch, and the tiles seated into the grid with that satisfying shadowline that looks like it came straight from the factory.
A few performance notes from real use:
- Blade sharpness is everything. Fresh blades slice; dull ones tear and leave fuzzy edges. I averaged roughly a few dozen clean reveals on mineral fiber before swapping blades, fewer on denser, laminated tiles.
- Multiple light passes beat one heavy cut. Two or three controlled pulls reduce tearing and surface bruising.
- The tool also scores gypsum board well for small reveal details, but for long drywall rabbets I still prefer a router with dust extraction.
On vinyl-faced or foil-laminated tiles, the first pass benefits from a very light scoring pull to keep the laminate from chipping. After that, normal pressure finishes the profile cleanly.
Ergonomics and control
The handle is comfortable enough for a few hours of work. Pulling with the wrist straight and the elbow close to the body keeps the cut smooth—try to avoid high, arcing strokes that can tilt the tool. The footprint is wide enough to resist tipping but nimble in tighter spots near walls and returns.
Because this is a pull-style cutter, it naturally encourages consistent speed and pressure. If the tool begins to chatter or the cut feels grabby, that’s your cue to change the blade or reduce your bite per pass.
Durability and maintenance
The all-metal body holds up well. My unit has lived in a gang box and shows only cosmetic scuffs. The clamping mechanism hasn’t loosened with use, and there’s no play in the blade carrier. Maintenance is minimal:
- Keep the sole and guides free of dust buildup; fine mineral fiber debris can pack in and affect glide.
- Wipe down and lightly wax the contact surfaces to reduce friction.
- Replace blades often; it’s the cheapest way to maintain performance.
One caution: on softer, unfinished tile faces, the bare metal runners can leave faint burnish marks if there’s grit on the surface or if you bear down too hard. It’s not a gouge, but it’s visible under grazing light.
Limitations and quirks
- No depth scale. You’re setting blade projection by eye. This is workable with a good test-cut routine but not as fast as an indexed adjustment would be.
- Potential for surface marking. On sensitive finishes, the metal can burnish the face. UHMW tape or blue painter’s tape on the tool’s contact surfaces fixes this but slightly changes depth, so adjust accordingly.
- Blade fit is intentionally snug. That’s good for accuracy, but a tight carrier means tiny adjustments can feel fiddly until you get a feel for it.
- Not a dust solution. Compared to a router with a rabbeting bit and a vac, this is quieter and cleaner, but debris still falls. In occupied spaces, a drop cloth and frequent cleanup are wise.
Tips for best results
- Bring a bulk pack of quality blades. Swap at the first hint of tearing rather than trying to “get one more cut.”
- Score first on laminated or painted tiles, then complete the reveal with a second pass.
- Keep the tool moving; pausing mid-cut invites a visible step in the reveal.
- Protect sensitive finishes by applying a strip of low-friction tape to the runners; recheck your depth after applying.
- Store the tool with the blade retracted or removed to protect both the blade and the case.
Who it’s for
- Ceiling installers and maintenance teams who regularly modify reveal tiles and need consistent, clean results without a full routing setup.
- Facility pros tackling small rooms and patchwork jobs where portability and quick setup matter.
- DIYers with a single project who want professional-looking reveals without mastering freehand techniques.
If you’re doing high-volume reveal work every day, you’ll move faster with a dedicated router jig and dust extraction. But for most small- to medium-scale jobs, this cutter is a smarter balance of speed, cleanliness, and control.
Value and alternatives
This isn’t the cheapest niche tool, but the time savings are real. On a recent office build-out, I cut and fit more than a hundred tiles in less time than it would’ve taken to freehand and sand the same number—and the consistency was better. Against a utility knife, the cutter wins in accuracy and repeatability. Against a router, it loses on raw speed for long runs but wins on setup time, portability, noise, and working in occupied spaces.
Given the durable construction and the low ongoing cost of blades, the value proposition is strong if you expect to use it beyond a one-off weekend.
Recommendation
I recommend the ToolPro shadowline cutter. It produces clean, repeatable reveals with minimal fuss, it’s built to survive jobsite use, and it meaningfully speeds up tile edge finishing compared to freehand methods. Be ready to bring plenty of sharp blades, take a few minutes to dial in your depth, and add protective tape to the runners if you’re working on sensitive finishes. If your workflow demands indexed adjustments or integrated dust collection, a router-based setup will serve you better. For everyone else, this cutter is a reliable, efficient way to get professional-looking shadowlines without overcomplicating the task.
Project Ideas
Business
Specialty Shadowline Installation Service
Offer a niche contracting service focused on shadowline ceilings and precision edge finishes for high-end residential and commercial clients. Market to architects and interior designers who want clean, modern reveals; use the cutter on-site to demonstrate speed and finish quality.
On-Site Edge-Finishing Subcontractor
Position yourself as a mobile subcontractor who comes to jobsites to trim and finish tiles and boards to exact specifications. Charge per-panel or per-hour, emphasizing faster turnaround and less waste thanks to the cutter’s time-saving, ergonomic design.
Pre-Cut Ceiling Tile Kits for DIYers
Create and sell packaged DIY kits with pre-cut ceiling tiles and installation instructions for common room sizes and styles (floating panels, backlit coves). Use the cutter to produce consistent pieces in small batches and sell through an online shop or local retailers.
Workshops & Certification Courses
Run hands-on training sessions for tradespeople and ambitious DIYers teaching best practices for shadowline cutting, edge finishing, and installation. Offer a paid certification that signals quality workmanship to contractors and designers; include the cutter in course demos.
Rental & Tool-Use Consulting
Create a rental program for the cutter combined with short consulting sessions: renters get the tool plus on-call guidance (measurements, cutting techniques, finishing tips) to complete their project without buying full-time equipment. This lowers entry barriers for small contractors and hobbyists.
Creative
Floating Shadowline Panels
Design and build a set of floating ceiling panels with crisp shadow gaps. Use the cutter to produce consistent, sharp edges on gypsum or drywall panels, then suspend them with hidden hardware and recessed LED strips to create a modern, architectural ceiling that plays with light and shadow.
Geometric Acoustic Tiles
Create decorative, sound-dampening tiles by cutting gypsum or acoustic board into repeating geometric shapes (hexagons, diamonds, chevrons). Finish edges cleanly with the precision cutter, paint or wrap in fabric, and mount as a pattern for home theaters, studios, or trendy office spaces.
Backlit Cove and Niche Systems
Use the cutter to trim panels for precise cove and niche installations that hide LEDs. The tool’s accuracy ensures tight reveals and consistent shadowlines around backlit elements, ideal for creating ambient lighting features in living rooms, retail displays, or hospitality spaces.
Edge-Finished Feature Wall Panels
Produce a series of interlocking wall panels with smooth, professional edges for textured or layered feature walls. Combine different thicknesses and finishes (veneer, paint, plaster) and rely on the cutter for repeatable edge quality so panels sit flush and form crisp reveals.