Features
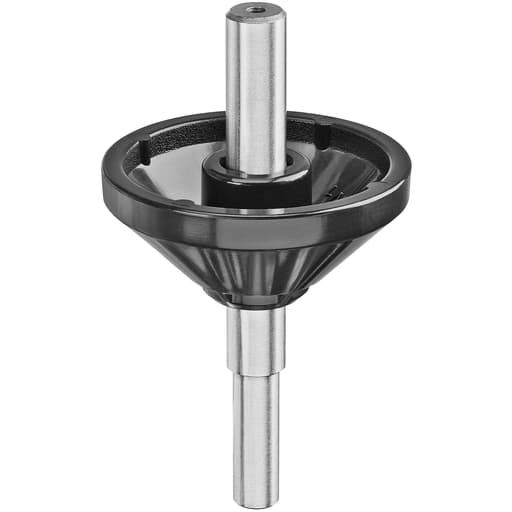
- Steel pin and plastic cone provide centering for sub-bases when changing or adjusting them
- Installs by inserting the pin into the router collet, sliding the cone onto the pin, and tightening the sub-base screws
- Designed for simple operation and quick setup
- Steel pin and durable plastic cone construction
Specifications
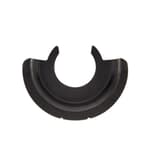
| Accessory Type | Centering Cone |
| For Use With | Fixed-Base Compact Routers |
| Material | Plastic (cone); Steel (pin) |
| Color | Silver |
| Weight | 0.09 lbs |
| Upc | 885911192040 |
| Warranty | 3 Year Limited Warranty; 1 Year Free Service; 90 Days Satisfaction Guaranteed |
Related Tools

Related Articles

Accessory used to center sub-bases on fixed-base compact routers. Install the steel pin in the router collet, place the plastic cone onto the pin, then tighten the sub-base screws to achieve centering.
DeWalt Centering Cone for Fixed-Base Compact Router Review
Why I keep a centering cone in the router drawer
Nothing torpedoes a template job faster than a guide bushing that’s a hair off center. I learned that lesson years ago chasing lopsided mortises and slightly egg-shaped circles. These days, before I touch a pattern, I reach for the DeWalt centering cone. It’s a simple accessory—just a steel pin and a plastic cone—but it solves a surprisingly finicky setup with speed and consistency.
What it does and why it matters
On fixed-base compact routers, the sub-base can shift a little when you loosen the screws to swap plates or add a guide bushing. If that sub-base isn’t centered to the router’s spindle, your bushing won’t track evenly around a template. The result is inconsistent offsets, tapered dados, or parts that don’t fit quite right.
The centering cone’s job is straightforward: it temporarily turns your router into a self-centering jig. You install the steel pin in the collet, slip the cone over the pin, loosen the sub-base screws, and let the cone guide the sub-base into dead center. Tighten the screws, pull the cone and pin, and your bushing alignment should be right on.
Setup and use
My process with the cone is quick:
- Unplug the router. This sounds obvious, but with a steel pin in the collet, there is no “oops” allowed.
- Clean the collet and the base. A quick brush or blast of air keeps debris from shifting the setup.
- Insert the steel pin into the collet and snug it—no need to muscle it.
- Loosen the sub-base screws just enough to let the plate float.
- Drop the plastic cone over the pin and apply light pressure so it sits squarely on the sub-base opening.
- Tighten the sub-base screws in a star pattern while maintaining gentle pressure on the cone.
- Remove the cone and pin, install the bushing and bit, and make a test cut in scrap.
The whole routine takes a couple of minutes, and it’s about as foolproof as it gets. The cone’s shallow taper gives good control, so the plate doesn’t “pop” into place and overshoot.
Accuracy in practice
I judge centering devices on cut results, not by measuring the sub-base. The most telling test I use is routing a circle with a guide bushing and checking for a uniform margin. With the centering cone, my 5/8-inch bushing tracked a template cleanly using a 1/2-inch bit; the offset measured evenly all the way around. On mortise-and-tenon work, the fit improved enough that I stopped doing the little orbital sander touch-up I’d been resorting to.
It’s worth noting what the cone can and can’t do:
- It centers the sub-base to the collet axis as presented. If your collet, pin, or spindle has noticeable runout, you’re centering to that reality.
- It doesn’t fix bearing wear or a dinged collet. If your cuts vary depending on bit orientation, address that first.
I like to double-check by loosening the base and reseating it once more with the cone rotated 180 degrees. If the “center” shifts, you might be chasing a slightly bent pin or debris under the sub-base.
Build quality and materials
The kit is as minimal as it looks: a steel pin and a plastic cone. The pin is straight, hard, and the right diameter for compact routers’ collets. The cone is lightweight plastic, and that’s both a feature and a caveat.
- Plastic is kind to acrylic or phenolic sub-bases; it won’t scratch or bruise them like an aluminum cone can.
- It’s also thin. Mine has held up fine with normal use, but I wouldn’t toss it loose in a drawer full of hex keys and hope for the best. I keep it in a small pouch to avoid nicks.
Overall, the construction matches the task: this isn’t a precision machinist’s tool, but it doesn’t need to be. It’s a centering aid that relies on the router’s own geometry to do the precise work.
Speed and consistency
The biggest win here is repeatability. I swap sub-bases and guide bushings often—for pattern routing, inlay templates, and occasional hinge work. With the cone, I don’t have to eyeball clearances or tap the plate around. The setup is as fast the tenth time as the first, and that consistency shows up in fewer test cuts and less fussing over fit.
I’ve tried shop-made dowel-and-taper solutions. They work in a pinch, but they’re slower and feel like a one-off. This cone is faster to seat, and it doesn’t mar anything.
Compatibility notes
This cone is intended for fixed-base compact routers. In practice, that means 1/4-inch collets and the kind of sub-bases used on trim and palm routers. It’s a clean fit with the compact models in my shop, and it plays nicely with common guide bushings. If you primarily run a larger 1/2-inch-router for table work, look for a centering kit sized for that machine.
Value
Here’s the honest take: it’s a simple tool, and the price feels a touch high for a steel pin and plastic cone. That said, it does a very specific job well, it saves time, and it reduces error—especially if you routinely mount guide bushings. For me, the saved setup time and improved consistency pay for it.
The support policy helps too. DeWalt backs it with a 3-year limited warranty, plus 1 year of free service and a 90-day satisfaction guarantee. For a small accessory, that’s reassuring.
Tips to get the best results
- Clean and inspect. A speck of dust under the sub-base or in the collet can throw things off.
- Tighten in a star pattern. It helps avoid pulling the base off-center as you snug the screws.
- Don’t over-torque the pin. Snug is enough; you don’t need full collet clamp force.
- Test cut in scrap. A quick spiral or circle with your guide bushing reveals any alignment issue.
- Store the cone. Keep it in a sleeve or pouch; avoid dents or warps in the plastic.
- Check for runout. If alignment still seems off, roll the pin on a flat surface to confirm it’s straight and inspect your collet.
Where it shines—and where it doesn’t
- Best for: Pattern routing, inlay templates, hinge routing with bushings, and anyone who changes sub-bases regularly. If you work on a compact router table setup, it’s a quality-of-life upgrade.
- Less critical for: Freehand trimming, edge profiling, or jobs where bushings aren’t involved. If your sub-base rarely comes off, you can live without it.
The bottom line
The DeWalt centering cone is not glamorous, but it’s the kind of small accessory that elevates your results with almost no effort. In my shop, it has become a habit—install pin, seat cone, tighten, and get on with the cut. The materials are utilitarian and the cone feels thin, yet it holds up with normal care and keeps from scuffing bases. Accuracy is as good as the router you put it on, and for guide-bushing work, that’s exactly what you need: cuts that track templates uniformly and fit that’s predictable.
Recommendation: I recommend the centering cone to anyone who uses guide bushings or swaps sub-bases on a compact fixed-base router. It’s quick, consistent, and backed by a solid warranty. If you rarely change bases or never use guide bushings, you can skip it. And if you’re sensitive to paying a premium for a simple tool, you may find better value in a generic kit. But if your goal is fuss-free, repeatable centering with minimal risk of marring your base, this cone earns its spot in the drawer.
Project Ideas
Business
Router Calibration & Tune-Up Service
Offer a mobile or in-shop service to center customers’ compact routers, align sub-bases, check runout, and standardize guide bushing setups. Provide a test-cut card and a bushing/bit offset chart. Sell it as a quick 20-minute service with tiered pricing for multi-router shops and annual maintenance plans.
Pre-Centered Sub-Base Kits
Manufacture and sell acrylic sub-bases that are pre-centered using the cone, with engraved gridlines, common bushing diameters, and optional dust collection ports. Include a matched guide bushing and bit. Market to sign makers, trim carpenters, and hobbyists who want plug-and-play accuracy.
Template Inlay Service (Logos & Bowties)
Provide custom inlay work for furniture makers and contractors—logos in bar tops, bowties on live-edge slabs, and accent borders. Use the centering cone to guarantee that shop-cut inlay pieces perfectly match on-site pockets. Offer quick-turn templates from customer vector files for consistent branding.
Router Jig Rental Bundles
Rent bundles that include a compact router with a centered sub-base, guide bushing set, and specialized jigs (dovetail, hinge mortise, sign letters). Pre-center with the cone before each rental and include laminated setup cards. Great for pros who need occasional precision without owning every jig.
Workshops and Digital Courses
Teach a hands-on class or online course covering guide bushing fundamentals, base centering, and template routing workflows. The centering cone is the core setup tool. Monetize via tuition, downloadable templates, affiliate links to tools, and premium follow-up consults for shop-specific setups.
Creative
Tight-Fit Bowtie Inlays
Design a set of acrylic bowtie/butterfly templates and cut both the inlay keys and their mortises using guide bushings. Use the centering cone to perfectly center the router sub-base to the collet so the bushing is concentric with the bit. This ensures the key and pocket—cut from the same template with different bushing/bit offsets—fit with crisp, even margins and minimal sanding.
Concentric Circle Trays
Make round serving trays or record stands with concentric grooves and clean circular walls by mounting a circle-cutting trammel to the sub-base. Center the base with the cone so the pivot point is precisely aligned to the bit. The result: perfectly round cuts, evenly spaced rings, and snug-fitting bottom inserts or inlay bands.
Template Sign Carving
Create professional signs using letter and logo templates with guide bushings. Centering the router base guarantees the bushing follows templates accurately, preventing uneven letter edges or inconsistent kerning. Combine V-groove and straight bits for depth and outline effects, then finish with paint fill or gilding.
Dovetailed Drawer Bank
Build a matching set of drawers using a dovetail jig that relies on guide bushings. Before cutting, center the sub-base with the cone to eliminate offset errors that cause too-tight or too-loose joints. This reduces test cuts and ensures repeatable, clean dovetails across an entire kitchen or shop cabinet project.
Compass Rose Inlay Medallion
Route a parquetry-style compass rose from contrasting veneers using pattern templates and bushings. Precise centering with the cone keeps every pass concentric, so segments align cleanly and circular borders register without gaps. Finish with a thin pour of clear epoxy for a glassy, durable surface.