
Features
- 2 in × 2 in square carbide head
- 25 carbide‑tipped teeth for aggressive material removal
- Compatible with SDS‑max toolholders
- Heat‑treated steel body for durability
- Hexagon shank shape
- Intended for roughing, texturing and substrate preparation
Specifications
| Head Size | 2 in × 2 in (50 mm × 50 mm) |
| Teeth | 25 carbide‑tipped teeth |
| Shank, Shape | Hexagon |
| Material | Proprietary carbide with heat‑treated steel body |
| Application | Roughing, texturing, and surface preparation of stone, concrete, and asphalt |
| Pack Quantity | 1 |
| Mpn | HS1969 |
| Sku | 70.09470 |
| Listed Price (Site) | $161.29 USD |
Related Tools

Related Articles

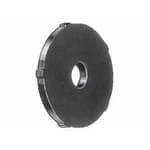
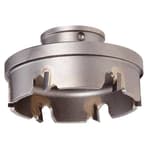
An SDS‑max compatible bushing head intended for surface preparation of stone, concrete and asphalt. It has a 2 in × 2 in square carbide head with multiple carbide‑tipped teeth mounted on a heat‑treated steel body.
Bosch SDS-Max Hammer Steel Bushing Head Review
Why I reached for this bushing head
Sometimes a grinder is too smooth, a chisel is too precise, and a scabbler is too blunt. For those in-between jobs—texture for slip resistance, removing laitance before an overlay, or putting an aged finish on stone—I’ve been leaning on Bosch’s SDS‑max bushing head. It’s a compact, 2 in × 2 in square head studded with 25 carbide-tipped teeth, meant to be driven by an SDS‑max hammer in hammer-only mode. In practice, it’s a capable middle-ground solution that’s faster than hand chisels but more controlled than plate-style bush hammers or walk-behind scabblers.
Before going further, a critical clarification: this is the head only. You’ll need the compatible SDS‑max bushing toolholder/adapter to run it in a rotary hammer. Once you have the right holder sorted, the system works exactly as you’d expect—solid impact blows, no rotation, and a uniform pitted finish across concrete, stone, and even asphalt patches.
Setup and compatibility
The head mates to a hex-section holder that installs into an SDS‑max chuck. If you already own an SDS‑max rotary hammer with a rotation-stop (hammer-only) mode, you’re halfway there. Make sure the holder you source matches the head’s hex interface and retention method; Bosch’s own holder is the cleanest route. Installation was straightforward: slide the head onto the holder, secure it per the holder’s instructions, lock it into the hammer, and you’re ready to go.
A few quick setup notes from the bench:
- Use a hammer in the 10–15 ft‑lb impact energy range for best balance of control and removal rate. Smaller hammers still work but progress slows; higher-energy demolition hammers can be overkill and increase the risk of chipping edges.
- Run hammer-only. Rotation does not help here and will scuff the pattern.
- A dust extractor or wet method is worth the trouble. Bush hammering throws off fines that you don’t want to breathe.
Performance on concrete, stone, and asphalt
On broom-finished concrete slabs, the 25-tooth layout creates a consistent, medium-aggressive peen pattern that’s ideal for priming surfaces before patching or overlay. I used it to remove laitance and open up a garage slab before applying a bonded repair mortar. The head’s 2×2 inch footprint makes it easy to keep the tool flat and avoid gouges. Overlapping passes with a light hand gave me an evenly textured, clean surface that bonded well after vacuuming.
On hard stone (granite and dense basalt step treads), the head produces a clean, stippled finish that reads as a “bushed” texture rather than a crushed one. It’s not as fast as a large plate-style bush hammer on a grinder, but I prefer the control—especially on edges and corners where a wheel can skate. On softer stones like limestone and some sandstones, I dialed back the BPM and let the tool’s weight do the work to avoid bruising. The square head helps here; if you keep it flat, the impact is distributed and you’re less likely to pop fragments off edges.
Asphalt is a different animal. The head breaks the surface binder quickly, so short, light taps work better than sustained pounding. I’ve used it to square up cold joints and lightly key patches prior to an infrared blend. It’s not a replacement for a plate compactor or a milling head, but for touch-ups it holds its own.
One caution across all materials: avoid striking rebar or embedded metal. The carbide teeth will chip if you repeatedly hammer steel. If you suspect reinforcing close to the surface, scan first or work shallow.
Texture quality and removal rate
This particular tooth count hits a sweet spot. With 25 points distributed across a 2-inch square, the head is aggressive enough to remove surface paste and small high spots, but not so sparse that it leaves deep divots. If you need a very heavy scarification profile for thick epoxy or polymer overlays, you’ll likely want a different head geometry or a scabbler. For most cementitious overlays, waterproofing primers, or tile thinset removal prep, the texture profile is right on the money.
In terms of speed, I was covering roughly 15–25 square feet per hour to a uniform profile on 3,500 PSI concrete with a mid-size SDS‑max hammer. That number varies widely with material hardness and the desired finish, but it gives you a baseline.
Control, ergonomics, and technique
The biggest advantage of this bushing head over plates and grinders is control. You can work right up to risers, corners, and transitions without burning an edge or leaving wheel tracks. That said, technique matters:
- Keep the head flat. Tilting concentrates force on a few teeth and leaves scallops or chips corners.
- Overlap passes by about a third. That evens out the stipple and avoids striping.
- Don’t lean into the hammer. Let the tool’s mass and blows do the work. Excess pressure just amplifies vibration.
- Feather the edges. On visible stonework, step off the pressure near margins to avoid a hard boundary line in the texture.
Vibration is noticeable—as with any impact tool—and hearing protection is mandatory. Anti-vibration gloves help, and a hammer with an AVS handle makes longer sessions manageable. With proper technique, I found the fatigue level reasonable for an hour or two of continuous use.
Durability and wear
The head uses carbide-tipped teeth with a heat-treated steel body. After several jobs on medium-hard concrete and a couple of granite dressings, tooth wear was even and minimal. The square format distributes impact well, and the heat-treated body showed no deformation or mushrooming around the mounting area. As with all bush heads, avoid overheating (don’t dry hammer in one spot indefinitely) and keep impacts on mineral material. There isn’t much to “maintain” beyond periodic inspection; once the carbide is rounded off, you replace the head. Resharpening the teeth isn’t practical.
Value and cost of ownership
At a listed price of $161.29 for the head alone, this sits in the middle of the pro-accessory range. The catch is the separate SDS‑max holder you’ll need if you don’t already own one. If you do, the economics are straightforward—carbide teeth last well when used correctly, and the consistent texture reduces rework. If you’re starting from zero, budget for the holder and consider how often you’ll need bush hammer texture versus other prep methods. For a remodeling or masonry crew that regularly preps patches, textures stone, or needs slip resistance on entries and landings, the cost is easy to justify. For a one-off project, renting a full assembly might make more sense.
Where it shines—and where it doesn’t
Best uses:
- Removing laitance and opening concrete for bonded repairs and overlays
- Creating a uniform, non-slip texture on exterior treads and landings
- Dressing and aging natural stone with controlled, even stippling
- Touch-up work near edges, corners, and transitions where larger machines struggle
Less ideal:
- Large-area removal where a scabbler or grinder-mounted bush hammer is faster
- Heavy coating removal requiring deep, aggressive profiles
- Situations with unknown embedded metal close to the surface
Practical tips
- Mark your work area into quadrants and move methodically; it helps maintain an even texture.
- If you’re prepping for a bonding primer, finish with a vacuum and an alkaline wash or manufacturer-recommended cleaner; the peened surface holds dust.
- Wetting the concrete very lightly can reduce dust, but don’t saturate—standing water cushions impacts and smears the pattern.
- Keep a spare head on hand if a job is schedule-critical. Carbide is tough, but a surprise encounter with steel can chip teeth and slow you down.
Recommendation
I recommend this bushing head for tradespeople and serious DIYers who already run SDS‑max hammers and need a controllable, repeatable texture for surface prep or stone finishing. It delivers a consistent profile, holds up well under professional use, and excels in spots where grinders or scabblers are too clumsy. Just be aware it ships as the head only and plan for the proper SDS‑max holder. If your work involves regular concrete prep, stair tread texturing, or stone dressing, it’s a reliable, cost-effective addition to the kit. If you’re tackling a single large slab removal or heavy coating demolition, look to a different tool class; otherwise, this head earns its place.
Project Ideas
Business
Anti-Slip Step and Ramp Upgrades
Offer a mobile service to add traction to existing concrete steps, ramps, and pool decks by bush-hammering wear strips or full treads. Ideal for property managers and facilities seeking safer surfaces without overlays or coatings.
Decorative Concrete Finishes for Architects
Provide custom bush-hammered textures for architectural concrete: exposed-aggregate bands, accent panels, and feature walls. Package finish samples (light, medium, heavy) and work as a specialty subcontractor on new builds and renovations.
Stone Repair and Texture Blending
Restore chipped or patched stone by lightly bush-hammering to unify sheen and texture. Blend new patches into existing façades, copings, and stair treads for heritage buildings and high-end residences.
Surface Prep for Overlays and Coatings
Partner with flooring and waterproofing contractors to mechanically roughen concrete substrates, removing laitance and opening the surface for microtoppings, epoxy, and urethane systems. Fast, dust-managed prep with consistent profile.
Custom Signage and Branding Panels
Produce outdoor signage by masking logos on concrete panels or stone slabs and bush-hammering the background for a high-contrast, durable, vandal-resistant finish. Offer turnkey design, fabrication, and installation.
Creative
Exposed-Aggregate Garden Stepping Stones
Cast concrete pavers with decorative aggregate, then use the 2 in × 2 in carbide bushing head to uniformly remove the cement cream and reveal pebbles in patterns (rings, waves, or gradients). Alternate smooth bands with bush-hammered textures for a custom, grip-friendly path.
Bas-Relief Concrete Wall Mural
Create a landscape or abstract mural on a poured concrete or block wall by masking key shapes, then bush-hammering the background to different depths. The 25 carbide-tipped teeth produce tonal variation and a stone-like finish that highlights the untextured masked areas.
Bush-Hammered Stone Bench
Carve a simple slab bench from granite or limestone and use the bushing head to texture the seating surface and legs, leaving chamfered edges and select accents polished. The contrast between smooth edges and rugged top adds tactile interest and slip resistance.
House Number or Name Plaque
Pour a concrete or use a limestone blank. Mask the numerals/letters, bush-hammer the field to create a uniform stipple, then remove the mask so the characters stand proud and smooth. Finish with a washed reveal or pigment for high contrast.
Geometric Garden Monolith
Fabricate a tall concrete or stone column with alternating facets. Use the SDS‑max bushing head to texture selected faces and bands, creating a rhythm of rough and smooth planes that catches light differently throughout the day.