Features
- Multigrind carbide head with multiple cutting edges for improved cutting in hard tile materials
- Carbide tip designed to center the bit and reduce walking
- Carbide construction for increased wear resistance
- Cylindrical shank compatible with three-jaw drill chucks
- Three-flat shank on larger bits (3/8" and above) for improved grip
- Intended for drilling at low speeds without impact; not recommended for porcelain tiles
- Compatible with rotary and impact drills/drivers; can be used in hammer drills with impact disabled
Specifications
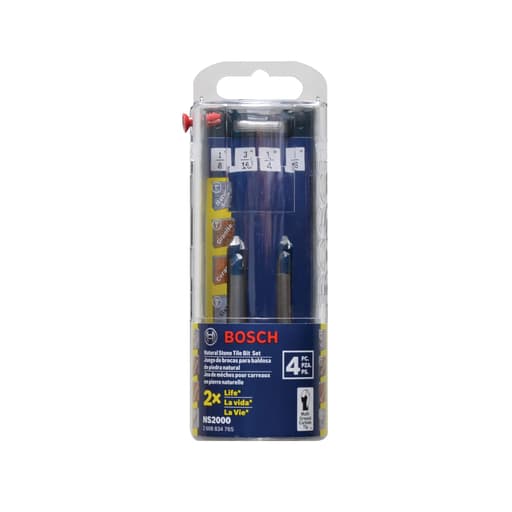
| Bit Sizes | 1/8" (3.18 mm), 3/16" (4.76 mm), 1/4" (6.35 mm), 5/16" (7.94 mm) |
| Total Length | 2 in (50.8 mm) |
| Working Length | 1.5 in (38.1 mm) |
| Pack Quantity | 4 |
| Tip Material | Carbide |
| Intended Materials | Natural stone tile, slate, granite, and similar hard tile materials (not recommended for porcelain) |
| Shank | Cylindrical shank (compatible with three-jaw chucks); three-flat shank on 3/8" (9.53 mm) bits and above for improved grip |
| Use Recommendations | Drill at low speeds without impact; compatible with rotary and impact drills/drivers; may be used in hammer drills if impact function is disabled |
Related Tools
Related Articles

Set of four carbide-tipped drill bits intended for drilling natural stone tile, slate, granite and similar hard tile materials. The bits have multigrind heads with multiple cutting edges and a carbide tip to improve cutting performance and wear resistance. They are intended for drilling at low speeds without impact and are not recommended for porcelain tiles. Shank types allow use in standard three-jaw drill chucks; larger bits include a three-flat shank for improved grip.
Bosch Natural Stone Tile Set Review
A stone tile bit set that rewards good technique
My first hole with these stone tile bits told me most of what I needed to know. I was anchoring a grab bar through slate tile over cement backerboard—nothing exotic, but still a material that punishes the wrong bit or sloppy technique. With the drill set slow, the hammer function off, and a little water on the work, the bit started cleanly, tracked true, and made it through with minimal chipping. From there I put the set through ceramic wall tile and a harder granite tile, moving through the sizes included to get a feel for speed, control, and longevity. The short version: these bits will do the job on natural stone and hard tile—if you use them the way they’re designed to be used.
What’s in the box
This kit includes four carbide-tipped, multigrind bits in 1/8, 3/16, 1/4, and 5/16 inch. All are short: about 2 inches overall with roughly 1.5 inches of working length. Each has a smooth cylindrical shank sized for a standard three-jaw chuck. Bosch uses three-flat shanks on some larger individual bits (3/8 inch and up), but none of those sizes are in this set. If you need 3/8 inch or larger anchors, you’ll be stepping up to a separate bit.
The intended use is clear: natural stone tile, slate, granite, and similar hard tile materials—without impact. These aren’t porcelain bits, and if your project is full-body porcelain or ultra-hard glazed porcelain, look to diamond tools.
Design details that matter in the cut
The head is a multigrind carbide design with multiple cutting edges. Compared to the classic spear-point “glass and tile” profile, this geometry bites into stone more confidently and resists skating. I generally start on masking tape out of habit, but with light pressure and a slow RPM the bits found center predictably, even on a slightly wavy slate surface. The short length actually helps here; less stick-out means less chatter and better control against brittle, chip-prone faces.
Carbide is the right call for this work, but it’s a double-edged sword: it stays sharp when kept cool and fed, and it dulls quickly if overheated. These bits reward a patient, pulsed approach and punish high heat.
The technique that worked best
A few habits made the difference between clean holes and cooked edges:
- Keep the hammer function off. These are for rotary drilling only.
- Run slow. I stayed in the 300–600 RPM range for 1/4 and 5/16 inch, a touch higher for 1/8 and 3/16 inch.
- Use light pressure. Let the cutting edges do the work.
- Peck drill. 10–20 second cuts, lift to clear dust and cool, repeat.
- Add water. A spray bottle or damp sponge at the hole keeps slurry moving and temperatures down.
- Step up in size. A 1/8 inch pilot followed by your final size reduces heat and side loading.
- Stabilize the start. Masking tape or a guide block helps, especially on glossy glazes.
I also tried a faster pass on softer ceramic tile. High RPM will produce chips quickly in glaze, but the margin for error shrinks: heat builds fast, and once you glaze the carbide you’re done. For consistency, the low-speed approach was safer and more repeatable across materials.
If you’re using an impact driver, make sure you’re in drill mode and use a proper three-jaw chuck adapter; these shanks aren’t hex.
Performance across materials
Ceramic wall tile over drywall (1/4 inch anchor): Using a pilot, I was through the glaze and tile in a couple of minutes per hole with negligible chipping around the exit. The 1/4 inch bit stayed sharp across a small batch of holes. On ceramic, it’s tempting to go faster; resisting that temptation kept the bit cutting clean.
Slate tile over cement board (5/16 inch anchor): Slate drills nicer than it looks because of its cleavage planes—but those planes also make it chip if you rush. The 5/16 bit advanced steadily with a pecking rhythm and water, taking about 5–7 minutes per hole. Starts were controlled and tracking was straight.
Granite tile (5/16 inch anchor): This is the upper end of what I’d call reasonable for this style of bit. It will go, but it’s slow. Expect 10–15 minutes per hole with disciplined cooling. The cutting edges stayed intact as long as I didn’t lean on the drill.
In each case, stepping up from a 1/8 inch pilot reduced stress on the larger bits and yielded cleaner holes.
Durability and hole count
With good technique, I was able to get roughly 8–12 clean holes out of a mid-size bit on mixed ceramic and stone before I noticed a drop in cutting speed. The 1/8 inch pilot is the most vulnerable; it’s doing the first break and is easy to overheat or snap if you side load it. Treat it gently and let it clear dust often. If a bit slows, cool it, lighten the feed, and peck more frequently; if it has glazed, it won’t recover.
Abuse, understandably, shortens life dramatically. Run these hot and dry at high RPM and you’ll ruin an edge in a single hole. The carbide and grind will not forgive careless speed and pressure.
Practical limitations
Not for porcelain. If your tile is porcelain—especially full-body porcelain—reach for diamond electroplated or sintered bits/cores. These carbide bits aren’t the right match.
Shallow working length. With only about 1.5 inches of flute, deep passes through stacked materials or thick thresholds are out. For standard anchors through tile and backerboard, the length is fine.
Size range. Topping out at 5/16 inch covers many anchors, but not all. If you need 3/8 inch hardware, budget for an additional bit.
Requires patience. These are not fast. If you need to punch dozens of holes in hard stone on a deadline, a water-fed diamond solution is more efficient.
Compared with common alternatives
Spear-point glass/tile bits: Those start easily on glaze but struggle in true stone. These multigrind carbide bits cut stone more confidently and stay on line better. If you only drill soft, cheap ceramic, spear points are fine; for slate and granite tile, I prefer this set.
Diamond cores and tile drills: Diamonds are the right answer for porcelain and any high-volume work. They also produce the cleanest holes in brittle glazes. The tradeoff is cost, water management, and often a guide jig. For occasional anchors in natural stone, the carbide set is simpler and more economical.
Tips to get clean holes and longer bit life
- Use a template or a scrap of plywood with a predrilled guide hole to prevent skating.
- Start with a shallow angle to scratch a seat, then bring the drill upright.
- Keep a spray bottle or wet sponge handy; a small dam of plumber’s putty holds water at the hole on horizontal surfaces.
- Vacuum slurry as you go to maintain visibility and reduce mess.
- Tape the exit side if accessible to limit breakout.
Who it’s for
This set fits DIYers and tradespeople who occasionally anchor into natural stone or mixed hard tile and want predictable starts, straight tracking, and acceptable hole counts without going full diamond. If your workload skews heavily toward porcelain or you drill dozens of holes a week in hard granite, step up to diamond and plan for water management. If you only see soft ceramic now and then, a single spear-point or a budget diamond bit may be all you need.
Recommendation
I recommend this stone tile bit set for occasional to moderate drilling in natural stone tile, slate, granite tile, and typical ceramic—provided you use low speeds, light pressure, and routine cooling with the hammer function off. The multigrind carbide heads start clean, track well, and produce tidy holes when stepped through sizes. The short, controlled format is a plus on brittle surfaces, and the sizes cover common anchor hardware.
I would not recommend it if you’re working on porcelain or you need deeper or larger holes than the kit supports; in those cases, diamond tooling or larger dedicated bits are the right choice. Used within its lane, though, this set is a reliable, cost-effective solution that rewards careful technique with clean results and respectable bit life.
Project Ideas
Business
Mobile Stone-Tile Accessory Installations
Offer a service to add towel bars, hooks, and shower accessories onto existing natural stone tile walls without cracks. Use low-speed, non-impact drilling to create precise anchor holes. Package pricing per hole plus hardware and sealing.
Custom House Number and Name Plaques
Produce slate or granite address plaques with drilled mounting holes and stand-offs. Provide font/size options, engraving/paint fill, and hardware kits. Sell locally and online; the clean, centered holes from the carbide-tipped bits improve finish quality.
Trade Partner Drilling Service
Contract with plumbers, electricians, and cabinet installers who need accurate holes in stone tile for fixtures, escutcheons, and conduits. Offer rapid response, per-hole rates, and dust/water management. Emphasize non-impact drilling to protect finished surfaces.
DIY Kits: Slate Coasters/Trivets With Hardware
Sell kits including pre-cut slate, a template, finishing pads, food-safe sealant, cord or handles, and clear instructions on low-speed drilling. Upsell a starter bit set. Market to gift-makers and workshop hosts.
Workshops: Drill and Design in Stone
Host paid classes teaching safe drilling in natural stone tile (not porcelain), cooling techniques, and project builds (coasters, plaques, wind chimes). Partner with maker spaces and garden centers; sell finished pieces and bits onsite.
Creative
Slate Wall Art With Hidden Mounts
Design mosaic panels from slate or natural stone tiles and drill clean mounting holes with the 1/4-in bit at low speed. Use wall anchors and stand-offs so the art floats off the wall. The carbide tip helps prevent walking; use painter’s tape and a water spritz to keep the bit cool and reduce chipping.
Stone Coasters and Trivets With Strap Handles
Cut slate squares for coasters or larger granite tiles for trivets, then drill paired 3/16-in holes to thread leather or paracord handles. The multigrind head gives controlled starts for symmetrical holes. Add rubber feet on the underside to protect tables.
Garden Markers From Slate
Make long-lasting plant labels using slate offcuts. Drill a 1/8-in hole for stainless wire or a 1/4-in hole for a small stake mount. Hand-letter with paint pen or engrave lightly, then seal. The low-speed, no-impact drilling preserves the slate edges.
Stone Wind Chimes
Cut slim slate pieces, drill top/bottom 3/16-in holes, and string with fishing line and metal spacers. Vary sizes for different tones. Use slow, steady pressure and water to avoid overheating; the carbide tip minimizes walking on the hard surface.
Soap Dishes and Mini Planters With Drainage
Make simple stone soap dishes or succulent trays by drilling a grid of 1/8-in drainage holes. The 1.5-in working length is ample for typical tile thickness. Chamfer lightly with sandpaper to soften edges after drilling.