
Features
- Gorilla Wall Repair Kit contains all of the tools you need to complete strong, durable repairs on walls, ceilings and both small and large holes.
- Kit Includes: 8 Ounce Tub of Spackling + Primer, 4" Self-Adhesive Patch, 3" Putty Knife, Sanding Block
- Spackling & Primer in One: Paints like Drywall
- Fast Drying: Paintable in 15 Minutes*
- Lightweight, No Sag Formula
Specifications
| Color | White |
| Size | 8 Fl Oz (Pack of 1) |
| Unit Count | 1 |
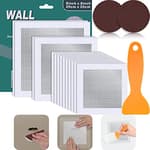
A wall repair kit containing an 8 fl oz tub of spackling + primer, a 4-inch self-adhesive patch, a 3-inch putty knife, and a sanding block for repairing holes and damaged areas in walls and ceilings. The spackling and primer combination fills and primes repairs, is paintable in about 15 minutes, and has a lightweight, non-sag formula that sands and finishes similarly to drywall.
GORILLA Wall Repair Kit Featuring Gorilla Heavy Duty Wall Repair Spackling + Primer White Review
I keep a small drawer of “oops” tools, and the Gorilla Wall Repair Kit earned a spot in it after a few weekend projects. It’s a straightforward, all-in-one bundle built around a lightweight spackling-and-primer compound that aims to get you from hole to paint faster than a traditional multi-step patch. After using it on everything from nail pops and picture-hanger holes to a fist-sized ding in drywall, here’s how it actually performs.
What’s in the box
- 8 fl oz tub of spackling + primer (white)
- 4-inch self-adhesive patch
- 3-inch putty knife
- Small 220-grit sanding block
It’s a true starter kit. If you don’t own any drywall tools, you can open the box and get to work.
First impressions and setup
The spackle has a lightweight, airy feel and a bright white color. It spreads differently than heavy joint compound—more like a whipped paste. That’s a positive for overhead and quick touch-ups, because it doesn’t sag. The tub arrived sealed tightly; I gave it a quick stir before use, which I’d recommend every time you open it. If it ever feels a touch stiff, a few drops of clean water and a thorough mix brings it back to a workable consistency—go slowly here, because a little water goes a long way with lightweight fillers.
The included putty knife is compact and flexible. It’s fine for filling small holes and tight spots, but it’s not wide enough to feather larger patches seamlessly. For anything bigger than a couple of inches, I reached for a 6-inch metal knife to blend edges. The sanding block is convenient but small and fairly fine at 220 grit; on bigger patches or heavier buildup, I had better results starting with 120 grit and finishing with the included block.
Small repairs: where it shines
For screw holes, nail pops, and corner dings, this kit is excellent. The spackle doesn’t slump, so you can fill small recesses in a single, modest application. With thin coats, it skins quickly and is genuinely paintable in about 15 minutes in mild conditions. The built-in primer does its job: I saw less flashing (that dull halo you sometimes get) compared with generic spackle under flat and eggshell paint. On little fixes, I could fill, sand lightly, and touch up paint the same afternoon with convincing results.
A tip that pays off: apply less material than you think you need. It’s easier to add a second thin coat than to sand down a ridge later.
Larger repair using the patch
I tested the 4-inch self-adhesive patch on a doorknob hole a bit under 3 inches across. Application is simple: center it over the hole and press firmly. The mesh grabs well, and the aluminum backing keeps things flat. From there, plan on two or three thin coats of spackle:
- Skim to embed the mesh and cover the patch.
- Feather wider around the edges.
- Optional third pass to refine the blend.
On the first coat, avoid pushing too hard, which can pull material through the mesh. Let each pass dry thoroughly; thin layers were ready to recoat in 20–30 minutes in my shop, though humidity and temperature can stretch that window. After the second coat and a careful sand, the patch disappeared under paint. Structurally, it’s solid for typical household knocks; this is the kind of fix that holds up behind a door or along a hallway.
Sanding and finish quality
This is the step where most DIY wall repairs win or lose. The compound sands easily, but because it’s so lightweight, it’s also easy to overbuild and then spend extra time leveling. The included 220-grit block puts a nice polish on thin coats, but it clogs quickly if you’ve been heavy-handed. My best results came from:
- Using a wider knife to apply feathered, thin coats.
- Starting with 120 grit (or a fresh 150) for leveling.
- Finishing with the included 220 block for a smooth paint-ready surface.
Wear eye protection and a dust mask while sanding. The dust is fine and gets airborne quickly. If you have a vacuum sanding attachment, this is a good time to use it.
Dry time and paint
For shallow fills, “paintable in 15 minutes” is pretty realistic. Deeper spots or larger patches may need 30–60 minutes between coats, and I prefer to give a final sanded surface at least an hour before paint if the room is cool or humid. The big upside is the built-in primer: touch-up paint adhered well, and I didn’t see noticeable dull spots, even under angled light. That said, glossy paints can still telegraph minor imperfections, so invest the extra five minutes in final sanding.
Durability and long-term behavior
Lightweight spackles sometimes shrink or crack as they cure. I didn’t see meaningful shrinkage on small fills, and the patched door hole has stayed flush months later. On an overhead ceiling repair, the no-sag formula made life easier; no drips, and the patch stayed flat. It’s still best practice to layer thinly on anything deeper than about 1/4 inch to prevent future settling.
Where it excels
- Quick, same-day touch-ups and medium-size patches
- Overhead or vertical surfaces where sag is a problem
- Users without existing drywall tools who want an all-in-one solution
- Reducing flashing under paint thanks to the primer in the mix
Where it falls short
- The 3-inch knife is limiting; a wider metal knife gives cleaner, faster feathering on larger areas.
- The included sanding block is fine for final passes, but it’s not aggressive enough for leveling thicker spots.
- The 8 oz tub goes fast if you’re tackling multiple large patches; buy extra material if you have more than one big repair.
- As with most lightweight spackles, overworking the surface can create ridges or pilling. Light, confident strokes work best.
Tips for best results
- Stir before each use; if stiff, add a few drops of water and mix thoroughly.
- Apply thin coats and feather wide. Resist the urge to “perfect” a wet surface.
- Let each layer dry completely; if it still feels cool to the touch, wait longer.
- Sand in stages: level with 120–150, finish with 220.
- Wipe down dust before painting; a slightly damp microfiber cloth works well.
- For storage, press plastic wrap directly onto the surface of the compound before sealing the lid to keep it from drying out.
Value and scope
As a kit, it’s priced sensibly for what you get: enough compound for a handful of typical household fixes, a dependable patch for a single mid-size hole, and basic tools that will get a beginner through the job. If you already own knives and sanding gear, you might opt for a larger tub of spackle alone, but the convenience factor here is real—especially if you don’t want to make multiple store trips.
The bottom line
The Gorilla Wall Repair Kit does what it promises: it gets common drywall repairs done quickly, cleanly, and with minimal fuss. The lightweight compound is genuinely non-sag, the primer additive cuts a step for most touch-ups, and the included patch creates a sturdy repair for door-handle holes and the like. You’ll likely outgrow the 3-inch knife and want a coarser sanding option for bigger patches, but those are easy upgrades.
Recommendation: I recommend this kit for homeowners and renters who want a reliable, same-day solution for small to medium drywall fixes without hunting down separate tools. It’s especially useful if you’re new to patching and need a forgiving compound that sands easily and paints well. For frequent or larger-scale repairs, plan on supplementing the kit with a wider metal knife, additional sandpaper, and possibly an extra tub of compound.
Project Ideas
Business
Fast-turn small-repair service for landlords and hosts
Offer a premium quick-repair service targeting landlords, property managers and Airbnb hosts: patch holes, sand, prime and touch up paint between tenants or guests. Emphasize the kit's paintable-in-15-minutes feature for rapid turnover and charge per-repair or by flat-rate packages.
Pop-up DIY repair and art workshops
Run short hands-on classes teaching basic wall repairs and creative textured-art projects using the all-in-one kit. Charge per attendee and sell take-home kits; partner with community centers, cafes, or maker spaces for recurring events.
Branded mini repair kits for resale
Create a white-label or value-add version of the kit bundled with branded instructions, color-matching stickers, and a small QR-linked how-to video. Sell on Etsy, Amazon, or local hardware stores aimed at renters and DIY beginners.
Content and affiliate marketing for DIY audiences
Produce short time-lapse repairs, before/after reels, and step-by-step tutorials using the kit and monetize via ads, sponsored posts, or affiliate links. Offer downloadable checklists and sell branded kits directly to followers.
Staging and cosmetic-prep for real estate agents
Offer a niche service to real estate agents and stagers: fast cosmetic fixes and subtle textured accents to boost curb and interior appeal before listings or open houses. Package services by property size and offer subscription contracts for agencies with frequent turnovers.
Creative
Mini low-relief wall sculptures
Use the spackling as a sculpting medium on small wooden panels or canvases to build low-relief patterns and motifs. The self-adhesive patch gives a stable base for larger textured pieces, the putty knife sculpts detail, and the sanding block refines the surface before painting — make sets for gallery walls or gift-ready pieces.
Custom textured tiles for gallery walls
Create lightweight textured tiles by applying layers of spackling to MDF or thin plywood cut to uniform sizes; sand and paint each tile for a coordinated multi-panel installation. Mix in stencils or found objects to press patterns while the spackling is wet for repeatable designs.
Upcycled frame and hardware makeovers
Restore or restyle picture frames, mirror frames, and switch plates by filling chips and adding decorative raised details with spackling. After quick sanding and a coat of paint, you get bespoke vintage or modern frames without carving or complex tools.
Decorative accent switch plates & outlet covers
Turn plain switch plates into tactile accents by layering spackling to form geometric or floral reliefs, sanding for smoothness, then painting or gluing metallic leaf. Small, fast projects that sell well at craft fairs and boutiques.
Miniature scenery and diorama backdrops
Use the spackling to sculpt tiny walls, rock faces, and architectural details for dollhouses, model railroads, and tabletop gaming terrain. The quick-dry formula lets you build, sand and paint multiple layers in a single session.