Features
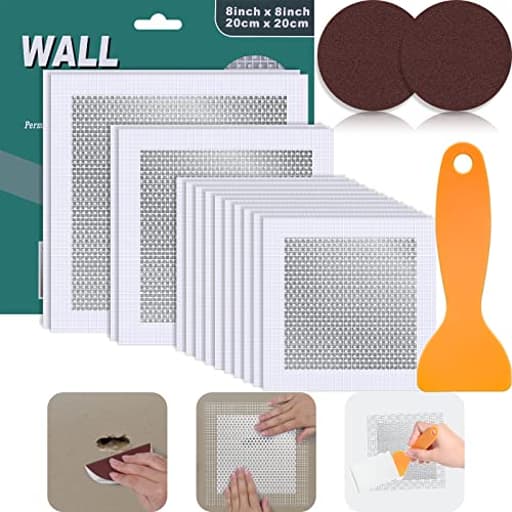
- Meet Your Various Wall Repair Needs -- Our kit contains 14 PCS Aluminum Mesh patches, including two 10-inch patches, two 8-inch patches and ten 4-inch patches. To help you repair your walls more effectively, we also offer you 1 pack large size scraper, and 2 pieces 240 grit sandpaper. This Aluminum Drywall Repair Kit can almost satisfy the desired size you need
- High-Quality -- Our drywall repair patch is made of quality aluminum, lightweight, and high strength, otherwise, its high-density fiber for strong adhesion, which makes it not easy to fall off, creates a smooth and beautiful surface like the original wall.
- Widely Applied Use -- The drywall patch repair kit is not only suitable for repairing Wall-Stains, Wall-Peeling, Wall-Scraping, Wall-Hole. But also can apply for any places, as home kitchen, office building, factory, etc.
- Easy to Use -- Use sandpaper to sand the broken surface to ensure the surface is dry and clean. Then tear off the backing, and apply the wall repair patch onto the hole or broken surface. At last, apply the plaster with a scraper and sand the repaired area.
- Used for A Long Time Without Damage -- Our wall patch cover for eclipse patch wall repair is made of aluminum sheet and fiberglass mesh material with high strength, which is insulated, corrosion-resistant, moisture-proof and durable for long time use. These wall patch repair kits are suitable for repairing most damaged wall surfaces and will stay for a long time.
Specifications
| Color | 14 Pack Drywall Patch Kit |
| Size | Large |
| Unit Count | 14 |
A drywall repair kit containing 14 self-adhesive aluminum mesh patches (two 10-inch, two 8-inch, ten 4-inch), plus a large scraper and two 240-grit sandpapers, for repairing holes, scrapes, peeling and stains in drywall. The patches combine aluminum sheet and fiberglass mesh for structural support and adhesion, are corrosion- and moisture-resistant, and are applied by sanding the area, removing the backing, pressing the patch over the damage, covering with joint compound and sanding smooth.
Mckanti Ranekie 14 Pack Drywall Repairs Patch, 4/6/8 Inch Drywall Repair Kit with Extended Self-Adhesive Mesh,Large Hole Patch Repair for Drywall,Heavy Duty Dry Wall Hole Repair Patch Review
Why I Reached for This Kit
A rogue door handle put a grapefruit-sized crater in my hallway drywall, and a couple of smaller outlets and cable reroutes left fist-sized gaps elsewhere. I didn’t want to cut back to studs or fuss with backer boards, so I tried the Ranekie drywall patch kit to see if the aluminum-and-mesh approach could deliver a clean, durable repair without turning the job into a weekend project.
What You Get and First Impressions
The kit is straightforward: 14 self-adhesive aluminum mesh patches (ten 4-inch, two 8-inch, two 10-inch), a flexible scraper, and two sheets of 240-grit sandpaper. There’s no joint compound in the box—you’ll need your own lightweight spackle or drywall mud.
Build quality is better than I expected for a bulk pack. The aluminum sheet is thin enough to conform slightly but stiff enough to bridge larger holes without oil-canning. The fiberglass mesh is bonded evenly, and the adhesive has enough tack to grab clean drywall paper immediately. The backing peels off in one piece, which sounds minor but matters when you’re on a ladder and don’t want to fight the liner.
A quick note on sizing: the 4-inch patches are the workhorses for small to medium dings. The 8- and 10-inch sizes are genuinely useful for larger cutouts—think old thermostat openings, wall-mounted hardware removal, or accidental impacts.
Setup and Application
My prep routine with these patches is consistent:
- Square up the hole and trim any loose paper or crumbling gypsum.
- Lightly bevel the edge of the opening so you don’t have a raised lip.
- Vacuum the dust and wipe with a dry cloth; the adhesive sticks far better to clean, intact paper facing.
- Dry-fit the patch to confirm you’ve got at least an inch of overlap on all sides.
Once the backing is off, I center the aluminum over the void and press the mesh perimeter down from the middle outward to avoid bubbles. On inside corners, I trim the patch so the aluminum stops short of the corner and only the mesh wraps around; otherwise you’ll fight a ridge.
Compound choice affects your experience more than the patch: fast-setting “hot mud” works if you want to finish in a single day, while premixed lightweight compound is more forgiving and sands easier. My first coat is primarily to embed the mesh and fill the hole to flush; I push mud through the mesh so it keys into the aluminum and the surrounding drywall. After that sets, I do one or two wider coats to feather the transition. Final sanding with the included 240-grit sheets leaves it paint-ready. On textured walls, I spot-texture after the second coat, then do a light skim to blend.
Performance and Finish Quality
Across a dozen patches ranging from a 1.5-inch dent to a 7-inch irregular opening, adhesion and rigidity were consistent. The aluminum core does exactly what you want: it bridges the cavity and resists flex so you don’t get hairline cracks later. Because the mesh is open and the aluminum is perforated, compound interlocks rather than just sitting on top. Once cured, the repair feels solid under knuckle taps.
Feathering is the make-or-break detail. These patches aren’t paper-thin; if you simply skim the mesh once and sand aggressively, you’ll telegraph the perimeter. Taking an extra pass with a wider knife (10–12 inches if you have one) makes the edge disappear. With proper feathering and priming, my repairs were indistinguishable from the surrounding wall under normal light.
On ceilings, the adhesive had no trouble holding while I worked overhead. I’ve had patches sag with cheaper mesh-only products; the aluminum core here prevents that, especially on anything above 4 inches.
Durability Over Time
I like to revisit repairs after a season to see if movement or humidity reveals flaws. The larger patches over door-slam zones are still stable—no ridging, no micro-cracks. In a bathroom with occasional high humidity, the aluminum and mesh show no corrosion or staining telegraphed through the paint. The manufacturer calls out corrosion and moisture resistance, and while I wouldn’t use this inside a shower niche or anywhere meant for tile backer board, it’s holding up well in typical residential conditions.
Where It Shines
- Speed: For holes too large for simple spackle but not worth cutting back to studs, these patches are fast. I was able to prep, patch, and get two coats on in a single afternoon using setting compound.
- Versatility: The assortment of sizes means you’re not stacking tiny patches on a larger opening. Having 8- and 10-inch options reduces the number of coats needed to bury the perimeter.
- Strength: The aluminum backing eliminates the “soft spot” feel you can get with tape-and-mud-only fixes. It’s especially reassuring behind towel bars or high-traffic areas.
- Clean workflow: No sawdust from cutting new drywall inserts, no fiddling with wood backers. It’s a dust-minimized workflow aside from the sanding.
Tradeoffs and Limitations
- Feathering required: The mesh perimeter is thin but not invisible. Expect at least two, often three, coats for truly invisible transitions on flat, well-lit walls.
- Included tools are basic: The scraper works, but a wider taping knife speeds up feathering. The 240-grit sandpaper is ideal for final passes; I still prefer to knock down the high spots with 150-180 grit first.
- Not ideal for tiny holes: Nail pops and pinholes are faster with plain spackle. Save these patches for holes roughly the size of a quarter and up.
- Corners and complex shapes: Flat fields are easy; inside corners and uneven cutouts may require trimming the aluminum and rounding corners to avoid ridges. A sharp pair of snips helps.
- Bring your own compound and primer: This kit is patches, mesh, scraper, sandpaper. Plan to supply joint compound and a good primer to prevent flashing through paint.
Tips for Best Results
- Cut away all loose paper and gypsum so the adhesive meets a solid surface.
- Round the patch corners slightly with snips to reduce ridge potential.
- If you’re in a rush, use a setting-type compound for the first coat, then switch to lightweight for the skim coat. It sands easier and saves your shoulders.
- Feather wide. A 10–12 inch finishing knife on the final coat makes the patch perimeter disappear.
- Prime before paint. A stain-blocking or PVA primer evens porosity and prevents flashing.
- For textured walls, texture after your first fill coat and before the final skim, then touch up texture as needed before paint.
Value and Use Cases
Buying individual aluminum patches at a big-box store adds up quickly. The 14-pack is an economical way to cover everything from doorknob holes to old cable plate cutouts, with plenty left over for future surprises. If you manage rentals, prep houses for sale, or just have an active household where the walls lead a rugged life, this kit earns its shelf space. Pros might still default to traditional techniques on showcase jobs, but even then, having these on hand for quick turnarounds is genuinely useful.
The Bottom Line
The Ranekie drywall patch kit is a reliable, efficient solution for medium to large drywall repairs. The aluminum-and-mesh design provides a sturdy base, the adhesive sticks well to properly prepped surfaces, and the size assortment covers most common scenarios without fuss. You still need to bring basic finishing skills—thin coats, wide feathering, proper priming—to get a truly invisible repair, but the kit removes the fussy carpentry and speeds up the entire process.
Recommendation: I recommend this kit for DIYers and pros who want a fast, clean way to repair holes without opening walls or installing backers. It’s strong, the size mix is practical, and the workflow is simple. Just plan on using your own compound, a wider finishing knife for the last coat, and a primer to finish the job right.
Project Ideas
Business
Quick-Turn Rental Property Repair Service
Offer a fast drywall patch-and-paint service aimed at landlords, Airbnb hosts, and property managers. Use kits like this to make small-hole repairs and touch-ups between tenants. Position it as 'same-day patch & paint' with transparent pricing per hole/room. Upsell painting, priming, and bulk monthly maintenance contracts. Start solo with basic tools and scale by training subcontractors.
DIY Repair Kits & Instructional Bundles
Create branded, customer-friendly drywall repair kits combining the patches with pre-measured joint compound, a plastic spreader, a sanding block, and step-by-step instructions or a QR code linking to a how-to video. Sell on Etsy, Amazon, or at local hardware stores. Market to homeowners and Airbnb hosts; include value packs for real estate agents and property managers.
Pop-up 'Patch & Refresh' Service for Open Houses
Target real estate agents staging homes: offer a pop-up service that quickly fixes visible wall blemishes and does light touch-up painting right before showings and open houses. Promote flat-rate packages (e.g., up to X holes + Y sq ft painting). Partnerships with staging companies and agents yield repeat business and referrals.
Upcycled Home Decor Product Line
Use the patches as the core material for an industrial-themed decor line (frames, small wall sculptures, decorative trays, and magnetic-style memo boards using clips). Manufacture small batches, photograph attractively, and sell via Etsy, Shopify, or local craft fairs. Emphasize durability, recycled-material aesthetics, and offer customization (finishes, sizes).
Workshops and Online Courses
Run local workshops teaching basic drywall repair and creative uses of repair materials (art, frames, small furniture accents). Create companion online courses or short how-to videos monetized via platforms (YouTube ads, Patreon, or paywalled videos). Offer corporate team-building sessions (group crafts) or partner with makerspaces for recurring classes.
Creative
Textured Industrial Wall Art
Use multiple aluminum mesh patches as a rigid base to build relief wall panels. Adhere patches to a thin plywood backing, skim with joint compound to create raised textures and patterns (stencils, score-marks, or poured textures), sand smooth with the included sandpaper, then finish with metallic paints, patinas, or clear epoxy. The patch's aluminum edge gives a crisp industrial frame and the fiberglass mesh takes compound well, producing durable, gallery-ready pieces.
Mixed-Media Frames and Mirrors
Turn the patches into decorative frames and borders. Cut and shape patches to form metal trim around mirrors or artwork, layer small sections for stepped, geometric frames, then seal and paint (or leave raw for an oxidized look). The self-adhesive backing simplifies mounting to wood, MDF, or existing frames — great for creating a cohesive industrial collection to sell or gift.
Small Sculptural Armatures
Use the stiff aluminum + mesh patches as armature panels for small sculptures or reliefs. Bend, layer, and rivet (or glue) pieces to build angular forms, then cover with lightweight clay, plaster, or paper-mache. The corrosion-resistant aluminum provides long-lasting internal structure for tabletop sculptures or wall reliefs.
Wearable/Decorative Metal Accents
Cut the patches into shapes (pendants, cuff inlays, brooch backs) and texture them with hammering, engraving, or compound overlays. Seal edges and back them with leather or resin for comfortable wear. These make quick, low-cost components for an industrial jewelry line or accessory embellishments for bags and belts.
Custom Organizer Panels
Create slim utility panels for entryways, workshops, or studios by mounting patches to a board and adding hooks, clips, and small shelves. The rigid metal surface accepts adhesive hooks and screws (when backed properly), and the lightweight patches keep the panels thin and easy to hang. Finish with paint and labels to make stylish, functional organizers.