Features
- Fits 3/4'' thick panels/edges. Tappered, even 1/4'' legs ensure strong fit without the need for adhesive or glue.
- Can be used on metal, fiberglass, wood and plastic to cover sharp or rough edges.
- Produced from a flexible PVC material that can be bent to fit most curvatures
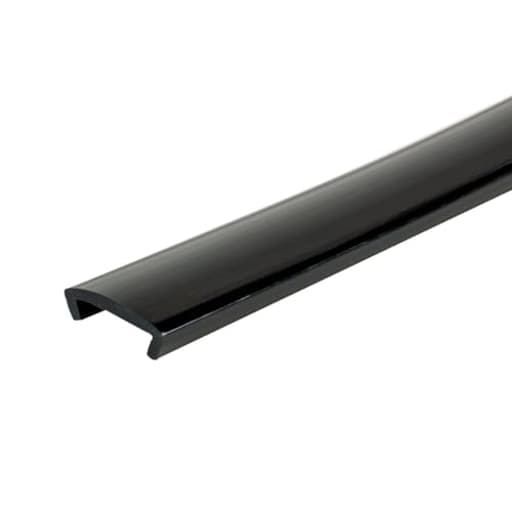
- High Gloss Black; 25 Foot Coil for small projects
- Saves time and money on installation, eliminating the need to debur or remove sharp edges and paint
Specifications
| Color | Black |
| Size | 25 Feet |
| Unit Count | 1 |
Related Tools
Flexible PVC U-channel molding designed to fit 3/4-inch thick panels and edges; tapered 1/4-inch legs provide a secure fit without adhesive. Supplied as a 25-foot coil in high-gloss black, it bends to conform to curves and is used on metal, fiberglass, wood and plastic to cover sharp or rough edges, reducing the need to deburr or repaint.
OUTWATER Plastics 3/4'' Flexible PVC U Channel Moulding | High-Gloss Black Furniture Edging | 25 Foot Coil Review
A simple way to clean up rough edges
Edge protection doesn’t need to be complicated. I tried this PVC U‑channel trim on a handful of projects—shop shelving, a plywood platform in a camper, and a small steel bracket—and it delivered a neat, durable edge with minimal fuss. It’s a flexible, high‑gloss black channel supplied in a 25‑foot coil, designed to slip over 3/4‑inch panels. The promise is a tight friction fit from its tapered legs, no glue required. In practice, that’s partly true, with a few important caveats.
What it is and how it’s built
The trim is a flexible PVC U‑channel with even 1/4‑inch legs. The material is supple enough to follow gentle curves and forgiving around slight inconsistencies in panel edges. The gloss finish looks “finished”—think appliance black rather than matte shop trim—and it wipes clean easily. Being PVC, it won’t chip like a rigid extrusion, and it’s kinder to bare hands than a raw plywood or sheet‑metal edge.
The 25‑foot coil is a sensible size for small jobs (a couple of shelves, a rack, or an island top), and it stores well. Expect a bit of coil memory out of the package; it relaxes quickly with a warm room, sunlight, or a brief pass from a heat gun.
Installation: what worked, what didn’t
On my first pass, I ran the trim onto a shop shelf made from “3/4‑inch” birch plywood that actually measured 23/32 inch (about 0.719 inch). The channel gripped firmly right away. No adhesive, no drama—just thumb pressure and an occasional tap with a rubber mallet along a wood block to seat it fully. Straight runs stayed put and corners mitered cleanly at 45 degrees on a fine‑tooth miter saw.
Things got trickier with a true 0.75‑inch maple shelf. The fit was very tight. Even warmed with a heat gun on low and nudged on with a mallet, I was only able to get partial engagement before my fingers protested. You can coax it on with persistence, but the outcome is surface‑dependent. On a slick, painted surface, the channel wants to spring off before it’s fully seated; on raw or lightly sanded wood, it’s more cooperative. For the maple shelf, I ended up easing the edges with a couple of passes of 120‑grit to break the arris and used contact cement to lock it down. After that, it held perfectly.
On a 3/4‑inch plywood bike‑rack base in a camper, it worked as intended—but again, that plywood measured shy of a true 0.75. I warmed the trim, started at one end, and pressed it on while supporting the opposite side with a sacrificial block. For inside curves I made small relief notches on the inner leg every inch or so; outside curves were easy, the material wants to stretch on the outside naturally.
Fit and compatibility
The simplified takeaway: “3/4‑inch” in trim land is often calibrated to common sheet‑good reality (23/32), not a precise 0.750. If your stock is a true three‑quarter thickness—common with planed hardwood shelves, butcher‑block, or some MDF—expect a struggle. If your material is 23/32, you’re in the sweet spot. For anything slightly undersized or with rounded corners, the trim clamps down tightly without gaps.
Material compatibility is broad. It grabbed onto raw plywood, painted MDF, and even a powder‑coated steel flange after scuffing the paint with 220‑grit and using a bead of adhesive. On fiberglass, the fit was secure, but I still tacked the ends with CA glue to prevent creep.
Holding power and durability
Friction alone was enough for straight, level shelves in a climate‑controlled room. On vertical runs, surfaces exposed to temperature swings (like a camper), or anywhere hands will constantly tug at the edge, I recommend adhesive insurance. A thin coat of contact cement, 3M 80/90 for plastics, or a small bead of a flexible adhesive like Shoe Goo works well. Cyanoacrylate (CA) with activator is handy for tacking corners and ends; it bonds fast but can leave a white bloom on gloss black if you’re heavy‑handed.
Once installed, the trim shrugs off bumps and protects edges. The gloss finish hides light scuffs well; deeper marks can be softened with a bit of heat. It’s PVC, so avoid aggressive solvents. Mild soap and water or a bit of isopropyl on a cloth has been enough to keep it clean in my testing.
Aesthetics and finishing
The black high‑gloss look dresses up utility projects, especially against light wood tones or white melamine. Corners can be mitered cleanly—use a sharp fine‑tooth blade and slow feed to avoid melting. Outside corners are easiest; for inside corners, relieve the inner leg or plan a butt joint where it won’t be seen. If you need a dead‑straight, furniture‑grade appearance, pre‑straighten the coil by laying it flat in a warm space; that helps the legs seat evenly and prevents subtle waviness along long runs.
One practical note: the 1/4‑inch legs add visible thickness to both faces. Make sure doors and drawers still clear, and that the added width won’t interfere with hardware, wall reveals, or appliance gaps.
Tips that made a difference
- Measure your material, don’t trust the “3/4‑inch” label. If it’s closer to 0.750 than 0.719, plan on heat and/or adhesive—or consider lightly easing the edges.
- Warm the trim. A heat gun on low or a dip in hot water makes installation faster and easier, especially around curves.
- Seat with a rubber mallet and a wood block. Thumb pressure alone can be painful on long runs; a block spreads force without marring the gloss.
- Glue strategically. Even if the run holds by friction, wick in a touch of adhesive at the ends and at corners to prevent creep.
- Cut clean. A fine‑tooth miter saw yields crisp joints; for on‑site trims, a sharp utility knife and a miter box work in a pinch.
- Plan for curves. Outside curves are easy; for inside curves, notch the inner leg or accept a slight pucker.
Where it falls short
- Tight tolerances. On true 3/4‑inch stock, the fit can be too tight to be practical without modification or glue.
- No instructions. A small install guide—heat recommendations, adhesive options, and corner techniques—would save users trial and error.
- Gloss shows everything during install. Dust and fingerprints are more visible on black gloss; keep a microfiber handy and clean as you go.
Who it’s for
- DIYers dressing up shop furniture, shelves, and utility carts.
- Van/camper builders looking to protect edges on plywood modules.
- Anyone covering sharp edges on sheet metal or fiberglass without machining.
Who should look elsewhere:
- Cabinetmakers needing a guaranteed slip‑fit on true 0.750‑inch hardwood shelves unless you’re willing to ease edges or use adhesive.
- Projects that demand matte or color‑matched finishes; this comes only in high‑gloss black.
Bottom line
I appreciate what this U‑channel trim does: it’s a quick, tidy way to add protection and a finished look to otherwise raw edges. On most sheet goods that measure a hair under 3/4‑inch, it presses on and stays put. On full‑thickness material, the tolerance is unforgiving and you’ll either need heat and persistence or a bit of adhesive to make it work. The gloss finish looks sharp, it conforms to gentle curves, and it stands up to day‑to‑day abuse.
Recommendation: I recommend this trim with a clear warning to measure your material first. If your panels are 23/32 or you’re comfortable using light adhesive and heat to assist installation on true 3/4‑inch stock, you’ll get a durable, professional‑looking edge for a reasonable effort. If you require a guaranteed no‑glue, slip‑on fit for full‑thickness hardwood shelves, consider a larger channel or a different edging system.
Project Ideas
Business
Edge-Trim Finishing Service
Offer a local service for cabinetmakers, boat owners, and van converters to install 3/4" U-channel trim on doors, shelving and cabinetry. Market as a fast, cost-effective finishing option that eliminates messy adhesives and repainting.
Pre-Cut & Pre-Mitered Kits
Sell online or wholesale kits: precisely cut lengths, pre-mitered corners, and a small pack of installation tools/clips tailored to common panel sizes. Saves customers time and removes the need for cutting equipment—appeals to DIYers and small shops.
Retail Display & POS Manufacturing
Design and produce small-run retail fixtures and point-of-sale displays using the flexible U-channel for protective and decorative edges. Offer custom lengths and panel systems for boutiques, pop-ups, and trade shows seeking durable, high-contrast fixtures.
Van/Boat Interior Retrofit Packages
Create retrofit packages for vanlifers and boat owners: labeled panels, U-channel trim, and a how-to guide to upgrade cabinetry and shelving quickly. Package includes pre-measured lengths for common van builds to speed installation and promote clean, safe edges.
Workshops and DIY Kits
Run hands-on classes or sell DIY project kits (e.g., shelf kit, frame kit) that teach installers how to use the U-channel. Classes generate revenue and help build a local audience for supplies and custom finishing services.
Creative
Sleek Floating Shelf Edge
Cap 3/4" plywood shelf blanks with the high-gloss black U-channel for a clean, modern look. The channel slips on without adhesive, hides raw edges, and can be bent slightly to follow gentle curves so you can make straight or gently curved floating shelves that look factory-finished.
Custom Mirror and Art Frames
Create minimalist frames by sliding mirror glass or art panels into lengths of U-channel. Use mitred corners or simple corner clips to build a consistent black border that’s quick to assemble and easy to swap panels in and out for seasonal displays.
Curved Furniture Trim (Tables, Benches)
Take advantage of the channel’s flexibility to finish rounded edges on coffee tables, benches, or media consoles. The glossy black contrast works well with wood or laminate tops and protects the edge from dings while adding a refined look.
LED Accent Edge Trim
Use the U-channel as a tidy mounting edge for low-profile LED tape and wiring along cabinet or shelf edges. The channel hides wiring and creates a crisp black border that helps direct and diffuse accent lighting for dramatic effect.
Interchangeable Sign & Menu Holders
Build tabletop or wall-mounted sign holders where printed panels slide into the channel for quick updates. Ideal for markets, craft fairs, or home command centers—panels are easy to change without tools and the black edge gives a polished finish.