Features
- Genuine OEM
- Multivent grille
- Model - MV-4 81914
- Classic 4-way air diffuser
- Strong, versatile, quiet
- Our patented 73 second diffuser install is the quickest in the trade
Specifications
| Color | White |
| Size | 8x8 4 way |
| Unit Count | 1 |
Related Tools
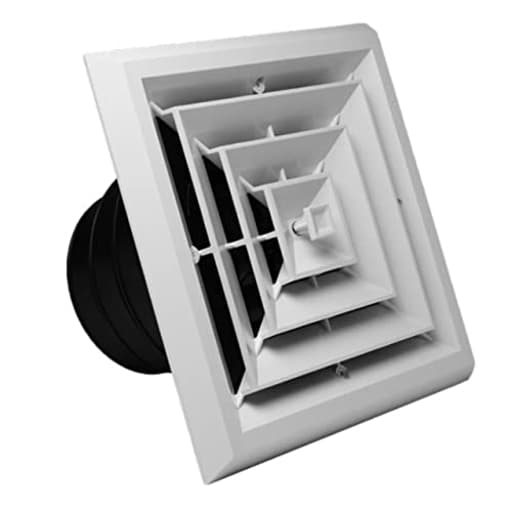
Ceiling-mounted plastic 8x8 four-way air diffuser with an integrated ceiling box that distributes HVAC airflow in four directions. It includes a grille and adjustable damper to regulate airflow and is built for durability and low noise. The unit uses a patented installation mechanism that enables installation in approximately 73 seconds.
Rectorseal TRUaire Grille/Damper 81914 Plastic Ceiling Diffuser With Incorporated Ceiling box, Easy Installation, HVAC, 8X8 4 Way Grille/Damper Review
Why I switched to this diffuser
I replaced a cluster of tired metal registers in a basement remodel with the MV-4 diffuser to see if a modern plastic, all-in-one unit could really save time and look cleaner. I ended up installing several across drywall and suspended ceiling tiles, tying each into existing flex duct. The headline: it’s a thoughtfully designed, four-way diffuser with an integrated box that genuinely streamlines install, looks crisp, and offers precise airflow control. It’s not perfect—packaging and fitment can vary—but it’s a smart option for both pros and capable DIYers.
Design and build
The MV-4 diffuser is a white, 8x8 four-way grille with an integrated ceiling box and damper. The face is clean and low-profile, with a center knob that operates the damper. The grille pattern is classic, and the plastic is a cut above the flimsy stuff you see on bargain diffusers: rigid, uniform, and consistent in gloss. In damp areas or near bathrooms, I like plastic because it won’t rust or chip like painted steel.
Round back-end connection is a stepped plastic collar intended for common duct sizes. On my units, the collar had clearly marked rings to cut for different diameters, and it took a minute with a fine-tooth saw to size. The collar snaps and seats into the box tightly. The face screws actuate swing-out “wings” that clamp the unit to the ceiling—no separate boot, no backing ring, no framing blocks for a typical install.
The damper mechanism deserves a call-out. That center knob gives smooth, incremental control rather than the vague push/pull you get on many budget registers. I could feather small changes to balance rooms without it drifting over time.
Installation experience
The company touts a 73-second install, and with measurements pre-marked and the duct connection ready, I got close. My first one (measuring and cutting included) took a few minutes; subsequent units went in fast. The general process:
- Cut the opening: an 8x8 face needs a slightly larger rough opening to clear the integrated box. There’s no paper template in the box, so I traced the housing to make one. If you’re working with ceiling tiles, test-fit on a scrap first.
- Size the collar: choose your duct size on the stepped collar, cut along the ring, and deburr.
- Connect the duct: I prefer a worm-drive clamp plus UL 181 foil tape or mastic for a reliable seal. A zip tie will technically hold, but it’s not a great long-term seal.
- Insert and clamp: slide the box into the opening, then turn the face screws to deploy the wings. They draw down evenly and cinch the box against drywall or tile. The clamping range handled 5/8-inch mineral fiber tiles and 1/2-inch drywall without issue.
- Dial the damper: start fully open, then balance later with the system running.
Clearance is the main thing to check ahead of time. Because the box is integrated, you need space above the ceiling. In a crowded joist bay or tight soffit, measure twice. For one plaster ceiling with shallow clearance, I detached the mounting box and surface-mounted the face to the substrate. You lose the “quick install” advantage, but it’s a workable workaround.
Airflow and performance
The four-way pattern distributes air evenly, which helps reduce hot/cold spots and eliminates the “jet” effect you get with some one- or two-way grilles. On a typical residential blower speed, I found:
- With the damper halfway closed, throw is gentle and diffuse—great for bedrooms or offices where drafts are unwelcome.
- Fully open, the diffuser still breaks up the airstream nicely, and noise stayed low. Even within a foot of the grille, there was no whistle or chatter unless I choked the damper aggressively on a high-static run.
Balancing multiple rooms was easy using the center knob. The tactile resistance feels right—no need to reach up with a screwdriver, and no accidental bumps changing the setting.
Fit and compatibility notes
- Ceiling types: The clamp system worked well in drywall and drop ceilings. The wings have enough travel to account for uneven tile surfaces and minor thickness variations.
- Duct sizes: The stepped collar is convenient, but plastic collars can be temperature-sensitive. On one unit, the smaller ring wasn’t perfectly round after unpacking. Cutting to the larger size resolved it, but if you need an exact 6-inch connection, check the collar before cutting so you’re not surprised mid-install.
- Depth: Measure your plenum or joist space. The integrated box simplifies installation but demands more depth than a face-only grille.
- Code and plenum use: If you’re working in a return-air plenum or commercial space, confirm local code requirements for plenum-rated materials and fire/smoke dampers. Plastic components aren’t appropriate everywhere.
Noise and comfort
The diffuser is impressively quiet for a plastic unit. Plastic can transmit vibration if the box is loose, but the clamp held tight against both drywall and tile. With balanced airflow and the damper set no more than 60% closed, noise remained a soft whoosh. I only induced whistle when I used the diffuser as the primary restriction on an oversized branch—better to balance at the trunk or with an in-line damper if the branch is truly overfed.
Comfort-wise, the four-way pattern helps eliminate drafts beneath the register. In a home office, I could sit directly under the unit without that cold shoulder feeling. Temperature uniformity across the room improved compared to the old, single-direction grille.
Maintenance and durability
The face wipes clean easily, and the center cap pops off for access to the knob hardware if needed. The plastic finish has stayed white with no chalking or yellowing so far. Because the damper is controlled from the face, there’s no need to access the duct for routine adjustments.
If you plan to paint, scuff lightly and use a primer that bonds to plastic. I’d avoid painting the damper mechanism or any surfaces that rub—paint buildup can make the knob feel gritty.
What I liked
- Fast, tidy installation once the opening is cut
- Integrated box eliminates a separate boot and saves time
- Smooth, precise damper control with a center knob
- Even, low-draft four-way airflow pattern
- Clean, modern look; plastic won’t rust in humid spaces
What could be better
- No cutout template included; I made my own
- The stepped collar on one unit arrived slightly out of round on a smaller ring
- Packaging consistency could be tighter; don’t count on included ties or extras
- The integrated box adds depth—watch your clearances in shallow cavities
Who it’s for
- Homeowners replacing dated or rusty grilles who want a cleaner look and better control
- Pros or DIYers installing multiple drops in a remodel or basement finish where speed matters
- Drop ceilings and drywall ceilings where the clamping wings can do their job without additional framing
It’s less ideal if you’re working in ultra-tight cavities, strict plenum-rated environments, or if you need metal construction for durability in high-abuse commercial settings.
Tips for a smooth install
- Make a cardboard template before cutting your first opening.
- Dry-fit the box and check clearance above the ceiling to avoid surprises.
- Use a proper clamp and foil tape or mastic on the duct connection for a tight seal.
- Balance with the system running; aim for small, incremental damper changes to avoid noise.
- If the collar isn’t perfectly round on a smaller size, consider cutting to the next ring or use a short metal transition.
Recommendation
I recommend the MV-4 diffuser for most residential installs and light commercial spaces where a clean look, quick installation, and precise airflow control are priorities. It’s strong for a plastic unit, quiet in real-world use, and the integrated box plus clamping wings save meaningful time on a multi-room job. Just plan your cutout carefully, verify depth and duct size in advance, and bring your own clamps. With those caveats, it’s a reliable, efficient upgrade over standard registers.
Project Ideas
Business
Rapid-Install HVAC Retrofit Service
Build a service targeting landlords, property managers and small commercial clients that leverages the patented 73-second install to replace old diffusers and upgrade airflow quickly between tenancies. Market time-savings and low disruption (fast installs, minimal labor). Offer packaged pricing per unit including inspection, minor duct sealing, and basic balancing.
Custom Decorative Diffuser Line
Source OEM diffusers in bulk and create a premium, design-forward product line—painted finishes, powder-coated overlays, laser-cut faceplates, or wood-look trims—to appeal to interior designers and homeowners. Sell through an ecommerce store, Etsy, or local showrooms. Emphasize easy DIY install and low noise for boutique apartments, vacation rentals, and remodels.
Smart-Damper Retrofit Kit
Develop an add-on kit that adds a small motor and wireless controller to the diffuser's adjustable damper, enabling zoned airflow control from a phone app or smart home hub. Sell kits to HVAC contractors and DIYers, or offer an installation service. Position as an affordable zoning solution for better comfort and energy savings without major ductwork changes.
DIY Lighting & Maker Kits
Package the diffuser with LED modules, wiring harnesses, mounting hardware and instruction guides as a ready-to-build pendant or recessed light kit for makers and crafters. Sell kits at maker fairs, on Etsy, or through hobby retailers. Include bundle options (grow-light kit, color-changing mood kit) and how-to videos to lower the learning curve.
Trade Training & Content Monetization
Create short, practical training workshops and video content showing the patented quick-install method, diagnostics, balancing and simple upgrades (smart dampers, decorative faces). Offer paid in-person trainings for local contractors and free short clips on social platforms to drive leads. Monetize with affiliate links to the diffuser product, sell branded toolkits, or partner with suppliers for referral fees.
Creative
Hanging Planter Pendant
Turn the 8x8 diffuser into a hanging planter: line the integrated ceiling box with a waterproof liner or coco coir, add potting mix and small trailing plants (pothos, ivy, succulents). Use the patented quick-install mechanism to mount it to a joist or ceiling hook and hang multiple units at staggered heights for a floating indoor garden. Add a small waterproof LED grow puck inside the box to provide light for low-light spots.
Ambient LED Light Fixture
Convert the diffuser into a soft ceiling light: mount a slim LED panel or color-changing puck into the integrated box, position a frosted diffuser behind the grille for even glow, and use the four-way grille to cast patterned light. The quick-install hardware hides wiring and makes swapping panels or replacing LEDs fast—great for custom mood lighting in studios or kids' rooms.
Decorative Shadowbox Display
Create a recessed shadowbox for small collectibles or art: use the integrated box as the chamber to mount a small object or silhouette on a backing, add directional LED strips inside, and use the grille as a textured front. The four-way slats create interesting shadow patterns on the ceiling or wall when backlit—an affordable, modular way to make bespoke wall art.
Recessed Cable & Charging Hub
Use the diffuser as a recessed ceiling or wall hub to hide and organize cables: route power and data lines into the integrated box, add USB chargers or a small power strip mounted inside, and use the grille as an accessible cover. Ideal for conference rooms, maker spaces, or above desks where you want a tidy, low-profile charging point.
Modular Acoustic/Decor Grid
Repurpose multiple diffusers into a ceiling or wall grid: fill the integrated boxes with acoustic foam or recycled fabric batting, cover with breathable fabric behind the grille, and paint the grille faces for a decorative acoustic panel system. The units interlock visually and are easy to install/replace—useful for home studios, cafes, or creative workspaces wanting both sound treatment and visual interest.