
Features
- HIGH QUALITY - Repair kit for white quartz, granite, marble, cultured marble, silestone, corian, porcelain, acrylic, stone repairs in minutes
- 3 WHITE TONES INCLUDED - mix and recreate the color of your countertop, sink, bathtub, toilet or tiles
- RECOMMENDED - For damages, chips, edge chips, scratches, cracks no larger than a penny both for indoor and outdoor use
- NON-TOXIC - Approved for use in countertop food prep areas, odorless
- WORKS GREAT - On quartz, marble, granite, corian, porcelain, tiles, silestone, natural stone as a quartz countertop repair kit, granite repair kit or quartz chip repair kit
- MADE IN AMERICA - Repair Kit made in the USA by HIMG Surface Repair
Specifications
| Color | Whites |
| Unit Count | 1 |
Related Tools
Kit with three white-tone resins for mixing to match and fill chips, edge chips, scratches, and cracks up to the size of a penny on quartz, marble, granite, cultured marble, Corian, porcelain, tiles, acrylic and other stone surfaces. The non-toxic, odorless formula is suitable for countertop food-preparation areas and for indoor or outdoor use.
HIMG White Tones - Quartz Countertop Repair Kit White - Quartz, Marble, Granite, Acrylic, Porcelain Countertop Chip Repair Kit - White Quartz Chip Repair Kit - HIMG Surface Repair Review
A chip on a bright white countertop is the kind of blemish your eye can’t unsee. I picked up the HIMG White Tones kit to address a couple of small nicks—one on a white quartz island edge and another on a porcelain sink—and put it through a few real-world repairs. Here’s how it performed, where it shines, and what to know before you start.
What’s in the box and first impressions
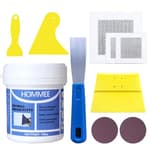
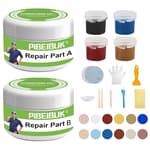
The kit centers on three white-tone UV-curable resins packaged in syringes—think: bright white, warm/off-white, and gray-white. You mix them to match your surface, then cure with the included UV light. My kit also came with clear adhesive film, mixing cards/sticks, polishing compound, a razor, small sanding papers, and a couple of alcohol swabs. You’ll need AAA batteries for the light.
The resins are odorless, which made working in the kitchen comfortable. Consistency was smooth—about toothpaste-thick—and easy to control in small amounts. Everything you need for small fills is here, but I’d recommend having extra isopropyl alcohol and painter’s tape on hand.
Color matching: the make-or-break step
Matching “white” is deceptively tricky. Under kitchen lighting, whites can skew warm or cool, and quartz often has subtle flecks or translucency. I started with pea-sized test dabs on a scrap of clear film, adding micro-drops from each syringe until I got close. For my cool-toned quartz, a 3:1 mix of bright white to gray-white was near-perfect; for the porcelain sink, a touch of the warm/off-white made it disappear.
A few practical takeaways:
- Mix tiny amounts and test under the same lighting where the surface lives.
- Err slightly lighter than your target; sanding and polishing can deepen the appearance a touch.
- You can’t realistically replicate sparkly or speckled inclusions; aim to match the base field color and keep repairs small for the best camouflage.
Preparation matters (more than you think)
I cleaned the areas thoroughly with dish soap, followed by an alcohol wipe to remove any residue. For the edge chip on the quartz, painter’s tape helped create a small dam to keep resin from sagging. On flat surfaces, the included clear film does the heavy lifting—it flattens the fill and gives you a smooth top once cured.
If your damage is deep, plan on building in thin layers. The kit can fill up to penny-sized defects, but thin, controlled applications cure faster, shrink less, and finish cleaner.
Application and curing: quick but hands-on
The workflow is straightforward:
1. Mix your color and pre-test.
2. Apply a small amount, slightly overfilling the cavity.
3. Lay the clear film over the fill and smooth it with the spatula, pushing out any bubbles.
4. Set the UV light over the area and cure.
Cure times were short—usually a few minutes per layer. The included light is functional, but it’s not the most ergonomic tool I’ve used. I built a little “UV tent” using the product box as a stand to keep the light in place without babysitting it, which made things less fiddly. If you’re working near an edge or vertical surface, a strip of packing tape can substitute for the clear film to hold the resin flush while it cures.
Sunlight can also cure the resin, but I found the handheld light more predictable.
Finishing: from good to invisible
Once cured, the top under the clear film was already glassy. Where there was a slight ridge, I used the razor to shave off excess and then stepped through the included sandpapers, finishing with the polishing compound. On the quartz edge chip, the repair blended seamlessly—the sheen matched, and you couldn’t catch a fingernail on it.
One note on sanding whites: aggressive sanding around the patch can introduce micro-scratches that temporarily read as gray. Keep the abrasion minimal, feather the edges only, and let the polish restore gloss. If your surface is matte or honed, skip heavy polishing and stop at a fine grit.
Performance on different surfaces
- White quartz (edge chip): Excellent. The mix matched the base white, and the UV cure produced a rock-solid result that has held up to daily wiping and the occasional bump from cookware.
- Porcelain sink (small nick): Also excellent. The warm/off-white mix was spot on; the gloss level matched well after polishing.
- Test on cultured marble sample: Good. Color match was easy; finish was high-gloss. I’d keep repairs small to avoid noticeable patches on patterned veining.
Outdoor suitability is advertised, and the resin’s hardness suggests it will handle temperature swings, but I’d still keep repairs modest and well-filled to avoid moisture getting underneath.
Durability and maintenance
After several weeks, both repairs look the same as day one. The fills feel as hard as the surrounding material and have resisted staining from coffee and tomato sauce. Being non-toxic and odorless is reassuring for kitchen use, though I still gave everything a full cure before food prep resumed.
Because the kit uses UV-cured resin, you can reopen it for future touch-ups without worrying about a chemical pot life. I recapped the syringes and used them again a few weeks later with no change in consistency.
Limitations and caveats
- Pattern complexity: If your “white” quartz has visible specks, glitter, or translucent depth, you won’t recreate that structure—only the base tone. On larger patches, that mismatch can be noticeable.
- Burn marks or stains beneath: Filler won’t hide underlying discoloration. Clean and de-stain first; if the surface itself is scorched, the mark may still telegraph through.
- Ergonomics of the UV light: It works, but it’s a little clunky. Building a light stand or using tape helps.
- Supplies: The kit includes what you need for a few repairs, but extra alcohol wipes and painter’s tape make the process smoother.
- Crack repairs: Hairline cracks can be stabilized superficially, but this is not a structural fix for long or active cracks. For anything beyond a penny-sized defect, call a pro.
Tips for better results
- Work clean: Degrease, and don’t touch the cavity with bare fingers before filling.
- Go in layers: Especially for deeper chips—thin applications cure clearer and flatter.
- Use the film wisely: Smooth it firmly to push out air; the surface finish after curing will be much closer to final.
- Color test under true lighting: Kitchen LEDs can skew cool; adjust your mix accordingly.
- Feather lightly: Minimize sanding outside the patch; then polish to match the surrounding sheen.
- Keep it tiny: The smaller the repair, the less your eye will pick up any color or texture mismatch.
How it compares and who it’s for
Compared to generic two-part clear epoxies, the HIMG White Tones kit delivers a better visual blend on white surfaces thanks to mixable tones and fast UV curing. The result looks more like the native material and less like a glossy blob, especially on horizontal surfaces where the clear film can level the fill.
It won’t replace a professional for large patterned repairs or structural cracks, but it neatly fills the gap for common countertop dings, sink chips, tile edge nicks, and small surface pits—jobs that are too minor (and too expensive) to outsource.
Recommendation
I recommend the HIMG White Tones kit for DIY repairs of small chips and nicks on white or near-white quartz, marble, granite, porcelain, and similar surfaces. It’s easy to control, cures quickly, and the three-tone system makes a convincing color match feasible on most solid white fields. Expect to spend more time on color testing than on the actual repair, and plan for thin, layered fills for the best finish. If your surface has heavy speckling, translucent depth, or underlying stains, or if the damage extends beyond penny-size, a professional repair will yield more predictable results. For everyday chips, though, this kit earns a spot in the home maintenance drawer and pays for itself the first time you make a blemish disappear.
Project Ideas
Business
Mobile Countertop Chip Repair Service
Offer on‑site penny‑size chip and scratch repairs to homeowners, landlords and property managers. Market as a fast, inexpensive alternative to full replacement. Bundle with color‑matching using the three white tones, same‑day service, and a short warranty to generate repeat and referral business.
Real Estate & Home Staging Add‑On
Partner with realtors and stagers to perform quick cosmetic repairs and subtle decorative inlays that improve listing photos and perceived value. Offer a flat staging repair package (kitchen sink/countertop touchups, tub/sink chips) to speed turnover and boost sale price.
DIY Repair Kits + Video Tutorials
Create bundled DIY packages that include the White Tones kit plus specialty applicators, micro‑sanding pads, step‑by‑step guides, and short how‑to videos. Sell through Etsy, Shopify, or local hardware stores. Add virtual coaching sessions or ‘repair review’ photos as a premium upsell.
Workshops & Micro‑Classes
Run hands‑on workshops (community centers, maker spaces, or partner with kitchen showrooms) teaching homeowners and small contractors how to color‑match and repair chips. Charge per attendee and offer kits for purchase at the class — a way to build local brand recognition and product sales.
Creative
Penny‑size Decorative Inlays
Turn small chips into intentional design accents: carve out a tiny recess (penny‑size), mix the white tones to create a subtle contrast or marble vein, pour and level the resin, then sand and polish flush. Use several inlays in a deliberate pattern (corner clusters, a line along an edge) to make a unique, built‑in accent on countertops, tabletops or windowsills.
Mini Faux‑Marble Touchups for Small Furniture
Refresh damaged marble or marble‑look tops on side tables and nightstands. Use the three white tones to recreate veining and fill chips/scratches, blending repaired spots into the pattern. Finish by sanding and buffing to match sheen — an affordable way to transform thrifted furniture into high‑end pieces.
Custom Coasters & Tile Art from Reclaimed Pieces
Collect small, damaged tile or stone offcuts and use the kit to fill chips and create decorative veins or patterns. After curing, sand and buff the surface, seal edges, and attach cork backing to make coasters or assemble several tiles into a small wall panel or trivet with a coordinated marble look.
Sink & Bathtub Accent Repairs (Faux Veining)
Use the non‑toxic, odorless resins to repair small chips in porcelain sinks or tubs and also to add delicate white veins for a cohesive, high‑end finish after patching. This works well for creating a consistent look when replacing hardware or updating small areas without full refinishing.