Features
- Versatile Use: Repair a wide range of surfaces including bathtubs (acrylic, fiberglass), sinks, tiles, countertops (granite, marble, quartz, epoxy), porcelain fixtures, ceramic, and stone. The PIBEIBUK kit handles common household surface damage.
- User-Friendly Repair: Complete your fixes with ease. Our kit includes essential tools for repairing holes, chips, deep scratches, cracks, dents, and minor surface defects on various materials.
- Durable & Low-Odor Solution: Achieve a strong, lasting bond after curing. This repair compound forms a hard, resilient finish with high adhesion strength and features a low-odor formula for more comfortable use indoors.
- Accurate Color Matching: Blend the included 4 color pastes (black, gray, cream, white) to match common shades like blue, brown, red, and more. White is the base shade for mixing. Restore your surface appearance effectively.
- PIBEIBUK Assurance: We stand behind our product. Contact us within 60 days if you are not satisfied with your repair kit purchase.
Specifications
| Color | Black, Brown, Maroon, Blue, Gray, White |
| Unit Count | 6 |
Related Tools
A surface repair kit for fixing chips, cracks, scratches, dents, and holes in bathtubs, sinks, tiles, countertops and other surfaces made of acrylic, fiberglass, porcelain, ceramic, stone, and engineered stone. The kit includes repair tools and four color pastes for mixing accurate shades, and provides a low-odor compound that cures to a hard, high-adhesion finish for durable repairs.
PIBEIBUK Surface Repair Kit for Tubs, Tiles, Countertops - Fixes Chips, Cracks, Scratches, Holes Review
Why I reached for this kit
A dropped toilet tank lid, a tiny chip on a quartz countertop, and a hairline crack in an acrylic tub—three different problems on three different materials. I wanted one kit that could reasonably address all of them without turning my bathroom into a chemistry lab. The PIBEIBUK repair kit appealed because it promises broad material compatibility, a low-odor formula, and the basics you need to complete a repair from fill to finish. After several weeks of use on those three fixes, I have a good sense of where it shines and where it needs a little finesse.
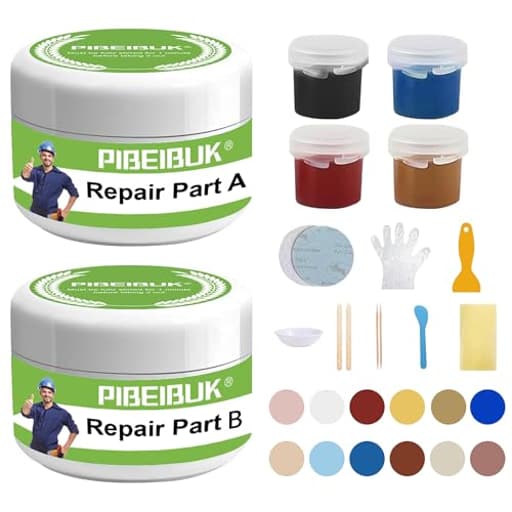
What’s in the box and first impressions
The kit includes the repair compound, a small set of pigments (white as the base, with black, gray, and a warm off-white/cream for tinting), a plastic spatula, mixing sticks, and a selection of sandpapers. The instructions are straightforward and avoid jargon; even if you’ve never done a surface repair before, you won’t feel lost.
Two immediate positives stood out:
- The odor is genuinely mild for this type of product. I worked in a closed bathroom with the fan on and never felt overwhelmed.
- The compound mixes smoothly and has a workable open time. It doesn’t flash-cure on the palette, so you can nudge color and consistency without rushing.
If you’re planning a few distinct repairs, bring masking tape, a razor blade, and a microfiber cloth. Those small additions make prep and clean-up neater than relying on the spatula alone.
Application: from prep to polish
I followed the same basic workflow for each repair:
1. Clean and degrease the area thoroughly. Any soap scum or residue will undermine adhesion.
2. Mask around the damage with tape to keep the footprint tight.
3. Mix a small batch: start with white, then tint toward your target color.
4. Apply in thin lifts rather than trying to fill deep voids in one go.
5. Allow to set, then sand flush, stepping through finer grits.
6. Buff to blend the sheen with surrounding material.
On the acrylic tub’s hairline crack, I opened the crack slightly with a razor to give the compound something to bite into. The kit’s filler had just enough body to bridge without sagging, and it feathered nicely at the edges. After an hour it was firm enough for a careful touch, and I left it overnight before sanding and testing with water. No weeping, no pinholes.
For the porcelain lid, the challenge was shape rather than structure—rebuilding a small missing corner. The filler is dense enough to sculpt, but it’s still easier to approach this in two or three layers. I rough-shaped the first application, sanded, added a second to refine the corner, then finished with a thin skim coat. A razor used as a micro-scraper helped flatten ridges before sanding.
On the quartz chip, getting the color right mattered more than depth. I filled slightly proud of the surface, sanded flush, and then buffed to coax back some shine. With stone, any repair will be more visible from certain angles; blending sheen is as important as hue.
Color matching: good range, with a few caveats
The pigments give you decent latitude. White is your base, black is for darkening, gray cools the mix, and cream warms it. For most common whites and off-whites, this is enough. I matched a bright tub white easily, and a slightly warmer sink glaze with a small touch of cream. Stone tones took more back-and-forth. For mid-gray quartz, I ended up relying mostly on white plus a touch of black to avoid overcooling the mix.
A few practical notes:
- Go darker than you think by a hair. After curing and sanding, light colors can read a shade brighter.
- For deeper browns or very saturated hues, the included pigments are a constraint. You can get “close enough” for small defects, but dramatic colors (cobalt tiles, deep espresso stones) are more trial and error.
- Mix small batches and test a dab on a disposable surface; the wet color shifts slightly as it sets.
If you plan multiple repairs in light colors, ration your white base—unsurprisingly, it’s the workhorse component and the one you’re most likely to burn through.
Finish and blending: convincing on most surfaces
After curing overnight, the compound sands cleanly without clogging paper. The included abrasives are fine enough for feathering to the surrounding surface, though I supplemented with an ultrafine sheet for a final pass on the countertop. On glossy porcelain and stone, a short session with a polishing compound (I used a generic automotive polish I had on hand) helped the patch visually recede.
This is a key point: flawless gloss matching is hard with any repair kit. If your fixture is mirror-gloss, expect to spend a bit of time on the final polish. On satin or eggshell finishes, blending is much faster and the repair is practically invisible at a normal viewing distance.
Durability and water resistance
I stress-tested the tub repair with repeated hot/cold cycles and several long showers. The patch stayed put, no hairline telegraphing through. The porcelain corner, once fully cured, felt like part of the lid—no chalkiness, no softness under a fingernail. On the quartz chip, routine wiping with kitchen cleaners did not dull the repair or lift edges.
The compound cures hard with good adhesion, but remember a limitation common to all fillers: it’s not a structural reinforcement. If your base material flexes under load (a thin tub bottom, for example), a filler alone won’t eliminate ongoing movement. For larger cracks in high-stress zones, a backing reinforcement beneath the surface is the better fix. For small to moderate chips and hairline cracks, this kit holds up admirably.
Learning curve and usability
There’s a rhythm to getting great results:
- Do the smallest possible footprint. Mask close; you’ll spend less time blending.
- Build depth in layers. It cures more uniformly and sands flatter.
- Shape wet where you can. Lightly drawing a clean spatula over fresh filler saves sanding later.
- Step your abrasives. Don’t jump straight to a fine grit; you’ll chase low spots.
The instructions communicate the essentials, and the low-odor formula makes indoor work less punishing than many two-part systems. Cleanup is easiest if you wipe tools immediately after use. Dried material bonds tenaciously—good for your repair, less fun for your spatula.
What could be better
- Pigment range: For unusual colors or very dark browns, the included tints make matching harder. Adding a small brown pigment or a more saturated warm tone would expand coverage.
- Gloss dialing: There’s no dedicated clear topcoat, so getting a perfect porcelain-like gloss may require external polish or a buffing compound. The kit sands and buffs well, but expect extra steps on high-gloss fixtures.
- Volume balance: The white base gets used most. A larger white tube relative to the tints would better fit real-world usage.
None of these are deal-breakers, but they’re worth knowing so you can plan for them.
Who it’s for
- DIYers tackling chips, scratches, hairline cracks, and small voids on tubs, sinks, tiles, and countertops.
- Renters and homeowners who want a strong cosmetic fix without a full replacement or professional call-out.
- Anyone sensitive to strong chemical odors who still needs a hard-curing compound.
If you need to rebuild large sections or reinforce flexing structure, this is not the right tool by itself.
The bottom line
The PIBEIBUK repair kit hits the essentials: it adheres well across common bathroom and kitchen materials, cures hard, sands cleanly, and doesn’t stink up the room. With a bit of patience on color and a careful polish on glossy surfaces, it delivers repairs that blend convincingly and hold up in daily use. It’s not magic—gloss and exotic colors take work—but for the typical white tub or sink and neutral countertop, it’s an effective, approachable solution.
Recommendation: I recommend this kit for small to medium cosmetic repairs on acrylic, fiberglass, porcelain, ceramic, and engineered stone surfaces. It’s easy to use, genuinely low-odor, and durable once cured. If you anticipate matching deep browns or vivid colors, supplement with an extra pigment, and if you’re chasing a perfect gloss on porcelain, plan on a final buff with a separate polish. For most household fixes, though, this kit earns a permanent place on the shelf.
Project Ideas
Business
Mobile Surface Repair Service
Offer on-site cosmetic repairs for bathtubs, sinks, countertops and tiles to homeowners, realtors and landlords. Typical jobs take 30–120 minutes; charge per repair (e.g., $75–$250 depending on size/complexity). Market via local Facebook groups, Nextdoor, and Google Local Services. Low startup cost (kits + a few hand tools) and high margin on quick fixes.
Airbnb & Short-Term Rental Maintenance Contracts
Partner with property managers and Airbnb hosts to provide recurring cosmetic maintenance: quick touch-ups between guests to repair minor chips and scratches that would otherwise lead to negative reviews or costly replacements. Offer monthly or per-incident plans, fast-response windows, and before/after photos. Emphasize low-odor cures for rapid turnover.
DIY Workshop & Instructional Content
Host paid in-person workshops or online classes teaching homeowners and DIYers how to make repairs and custom finishes using the kit. Sell bundled packages (class + kit) and create evergreen video courses. Monetize further with downloadable color-matching guides and a members-only troubleshooting forum or private support line.
Niche E‑commerce: Pre-Mixed Color Kits & Consultation
Sell specialty pre-mixed color pods, single-surface kits (porcelain, quartz, acrylic) and small-batch custom color mixes by mail. Offer a color-matching service: customers send photos and measurements, you ship a matched sample. Upsell instructional PDFs, finishing supplies and a priority support add-on. Low inventory for custom mixes; charge premium for convenience and accuracy.
Contractor/Remodeler Add-On Service
Position yourself as a finishing service for contractors and remodelers to handle cosmetic issues they don’t want to address (small chips, seams, repair touch-ups). Offer bundled rates for job-site callbacks and warranty work. This saves contractors time on punch-list items and gives you steady B2B revenue—market at contractor meetups, supply houses and via direct outreach.
Creative
Vintage Tub Revival
Restore an old or vintage bathtub with chips, scratches and small cracks. Use the kit to fill chips and deep scratches, blend the four color pastes to match the original finish, sand smooth once cured and polish for a near-seamless restoration. Great as a weekend upcycle: pick a tub at a salvage store, repair the visible damage, and stage it for sale or use in a guest bathroom.
Textured Faux-Stone Tabletop
Create a durable faux-stone tabletop by layering the repair compound over a prepared plywood top. Sculpt texture and veins while the compound is workable, blend shades with the color pastes to mimic granite or marble, sand and seal once cured. Use for small coffee tables or accent pieces—lightweight, cheap to make, and visually high-end.
Custom Tile Patch Mural
Turn a damaged tile wall section into a feature by repairing broken tiles and using the compound to build low-relief shapes. Mix colors to create a small tile mural or border that integrates repaired tiles with intentional decorative fills. Ideal for bathroom backsplashes, shower niches, or kitchen focal points.
Chic Planter & Pot Repair + Accent
Repair chips and holes on ceramic or porcelain planters, then use the color pastes to paint subtle accents or metallic-look repairs (mix with mica powders or metallic paints). The result is a repaired, reinforced planter with designer details—sell as an upcycled home decor item or gift.
Wearable Hardware & Fixture Touch-Ups
Repair and refresh fixtures like sinks, faucets surrounds, tile thresholds and countertops by filling scratches and small chips and color-matching the finish. Use the kit to create tiny custom insets or badges on furniture (e.g., house numbers, small logos) by sculpting the cured compound and coloring it—adds bespoke touches to furniture or props.