Features
- Designed to remove mortar and caulk between bricks
- Fits SDS-max rotary hammer drills (compatible with most brands)
- Compatible with some Hilti hammers using TE‑Y or TE‑FY shanks (shanks sold separately)
- One-piece, heat-treated steel construction
Specifications
| Type | Seam tool |
| Length | 15.0 in |
| Cutting Edge Width | 1.125 in (1-1/8 in) |
| Shank | SDS-max |
| Pack Quantity | 1 |
| Intended Use | Removal of mortar and caulk between bricks |
| Compatibility Notes | Fits SDS-max rotary hammers; Hilti compatibility with TE‑Y/TE‑FY shanks (sold separately) |
Related Tools
Related Articles

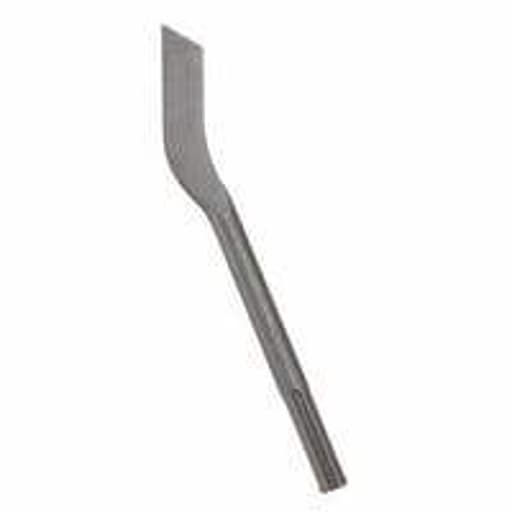
Seam tool designed for removal of mortar and caulk between bricks. Intended for use with SDS-max rotary hammer and demolition hammers. Constructed from heat-treated steel in a one-piece design for durability.
Bosch 1-1/8 in x 15 in Seam Tool (SDS-max) Review
Why I reached for this seam tool
On repointing and facade maintenance jobs, I prefer a controlled, low-spark method for clearing joints before new mortar or sealant goes in. That’s where a dedicated SDS‑max seam tool earns its keep. I’ve been using this Bosch seam tool across a handful of masonry repairs—clearing failed mortar between brick courses, removing stubborn caulk in expansion joints, and tidying up control joints in CMU. Paired with a rotary hammer in hammer‑only mode, it delivers steady, predictable removal without the plume of dust and heat you get from abrasive wheels.
Design and build
The tool is a one-piece, heat‑treated steel chisel with a 1-1/8 in cutting edge and a 15 in overall length. The long shank gives you reach into deeper reveals and helps keep hands away from the work surface, which I appreciate when the hammer’s side handle is crowding the wall. The wide, flat edge is ground evenly and arrives ready to work—no burrs or soft corners in my sample.
The one-piece construction matters. Some chisels use brazed tips that can loosen or shear under torsion; this one is a single forged piece, so it behaves as a solid unit. After multiple days of stop‑and‑go use, I saw only modest edge rounding—no chips, no twist, no “mushrooming” at the shank.
Compatibility and setup
It’s an SDS‑max shank, so it drops into most large rotary hammers and demolition hammers without drama. I ran it primarily on a Bosch SDS‑max rotary hammer and a mid‑size demolition hammer; both had chisel position lock, which lets you orient the blade exactly parallel to the joint.
If you’re on Hilti platforms, it’s compatible with models that accept TE‑Y or TE‑FY shanks. You’ll still need the correct shank/adapter for your hammer; check your specific model before buying. This is not an SDS‑Plus accessory—if your hammer is the smaller SDS‑Plus type, this tool won’t fit.
Setup is simple:
- Hammer‑only mode (no rotation)
- Chisel rotation locked so the cutting edge tracks the seam
- Lightly grease the shank as recommended by your hammer’s manual
Performance in mortar
On older lime-rich mortar that had started to soften, the seam tool made quick, low‑effort progress. I worked with a shallow angle—about 10–15 degrees to the face—and feathered the trigger. The 1-1/8 in blade spans a wide area, which helps keep the chisel from wandering and reduces the tendency to “dig” into the brick arris. I found it most efficient to take two passes:
1) A light opening pass to break the crust and identify any hard pockets
2) A follow-up pass to bring the joint to the depth needed for repointing (typically 2–2.5x the joint width)
On modern, high‑strength mortar (Type S or harder) the tool still works, but expect a slower pace. I switched to a slightly higher impact rate and shorter strokes, taking care to maintain a shallow angle so the edge skims the joint rather than prying at the brick edges. For very hard or fully packed joints with lots of aggregate, a diamond tuckpointing wheel is faster; I often used the seam tool for cleanup after a grinder pass, especially near window returns, corners, and areas where sparks and dust are a concern.
Control is the strength here. Compared to a grinder, the seam tool is gentler on the brick face and generates fewer accidental scuffs. It’s not magic—if you jam the edge straight into the joint or lever against the brick, you can still cause spall—but with moderate pressure and the right angle, I had very few chip-outs.
Caulk and joint sealant removal
For expansion joints and failed elastomeric sealants, this tool shines. I score the sealant edges with a utility knife first, then run the chisel down the joint in long strokes. The broader edge lifts material cleanly and breaks adhesion without tearing into adjacent surfaces. On a painted CMU expansion joint, I cleared 25 linear feet in minutes, leaving a surface that needed only a quick brush and solvent wipe before backer rod and new sealant went in.
If the sealant is particularly gummy or thick, a cooler impact rate prevents smearing. The 15 in length is handy around deep reveals and overhangs where you can’t easily position a shorter chisel.
Vibration, feel, and control
This is a big‑hammer accessory, so there’s some vibration and noise. With the blade parallel to the joint and a shallow attack angle, impacts feel more like tapping than jackhammering. I found a light hand goes further than raw force. Let the hammer’s BPM do the work; pressing hard invites the edge to skate or bite unpredictably.
The long shank provides good leverage and keeps the mass of the hammer aligned with the chisel. On vertical head joints, I used shorter, controlled strokes to avoid punching through behind the face of the wall. On bed joints, longer strokes with two hands on the tool were steady and efficient.
Durability and maintenance
After clearing roughly 180 linear feet of mixed mortar and caulk, the cutting edge showed uniform wear with minor rounding at the corners. A quick dressing on a bench grinder restored a crisp edge. Heat-treated one‑piece steel seems to be holding up well; no signs of temper loss or blueing, and the shank engagement surfaces remain tight.
A few practical tips:
- Dress the edge occasionally; a sharp edge improves control and speed.
- Keep the shank lightly greased per your hammer’s spec to minimize wear and vibration.
- Wipe the blade after use and oil lightly to prevent rust, especially if you cut wet or in damp conditions.
Dust and safety
Chiseling generates less airborne dust than dry grinding, but it’s not dust‑free. I still ran a HEPA vac with a wide nozzle near the work area and used an elastomeric respirator for silica. Safety glasses, hearing protection, and gloves are a must. On historic or brittle brick, I’ll sometimes tape both sides of the joint to reduce incidental scuffs and visually reference my travel line.
Where it fits—and where it doesn’t
Strengths:
- Controlled removal of mortar and sealant with less risk of scarring than a grinder
- Good reach and visibility thanks to the 15 in length
- Durable, one‑piece construction that stands up to jobsite use
- Broad cutting edge that tracks straight and resists wandering
Limitations:
- Not ideal for very narrow or highly irregular joints; a narrower chisel or hand tools may be safer
- Slow on hard, high‑cement mortars; a grinder is quicker for bulk removal
- Requires an SDS‑max (or compatible TE‑Y/TE‑FY) hammer; SDS‑Plus users are out of luck
Practical workflow
My best results came from a hybrid approach:
- Use the seam tool to open joints, remove the bulk, and work areas where a grinder is risky.
- Switch to a grinder for heavily compacted, high‑strength mortar on long runs.
- Return to the seam tool for cleanup at corners, near window frames, and where precision matters.
For caulked expansion joints, the seam tool handled the entire job start to finish, especially after scoring edges. The wide edge reduces the tendency to gouge adjacent surfaces and speeds up removal.
Final recommendation
I recommend the Bosch seam tool for anyone with an SDS‑max hammer who needs a controlled, durable option for clearing brick joints and removing sealant. It’s well‑built, tracks straight, and offers good reach and visibility. While it won’t replace a diamond wheel for the hardest mortars or the narrowest joints, it fills a valuable role: fast, precise joint clearing with less scarring and fewer sparks. If your work involves repointing, facade maintenance, or sealant replacement—and you already run SDS‑max—this chisel earns a place in the kit.
Project Ideas
Business
Tuckpointing & Repointing Service
Offer per-linear-foot removal and replacement of failing mortar on residential facades, chimneys, and patios. The SDS-max seam tool speeds clean, uniform joint raking while minimizing brick damage.
Commercial Expansion Joint Renewal
Specialize in removing degraded caulk or mortar in masonry expansion joints on retail and industrial buildings and re-sealing with proper elastomeric sealants to reduce leaks and energy loss.
Dust-Controlled Masonry Maintenance Packages
Market seasonal facade maintenance for HOAs and property managers that includes joint raking with dust shrouds/HEPA, repointing, and waterproofing. Offer tiered service plans and multi-building discounts.
Reclaimed Brick Sourcing & Sales
Carefully separate and clean mortar from demolition bricks using the seam tool, then grade, palletize, and resell reclaimed bricks to designers and DIYers. Add delivery and custom matching services.
Historic Restoration Specialist
Niche service focused on removing inappropriate hard mortar or caulk from older soft brick structures and repointing with compatible lime mortars. Emphasize gentle techniques and compatibility testing.
Creative
Brick Patio Repoint & Pattern Refresh
Use the seam tool with an SDS-max hammer to remove deteriorated mortar between patio pavers, allowing you to re-lay or slightly shift bricks to create herringbone or basketweave accents, then repoint with a contrasting mortar for a crisp, refreshed design.
Rustic Garden Wall Facelift
On a non-load-bearing garden wall, rake out select mortar joints to inset decorative tiles or glass accents, then repoint around them with a contrasting color for a mosaic band. The 1-1/8 in edge helps clean joints quickly without chipping brick.
Fireplace Surround Restoration
Carefully remove old hard mortar or caulk from a brick fireplace surround, then repoint with lime mortar and tool a neat, slightly recessed profile to achieve a classic, period-correct look.
Reclaimed Brick Coffee Table Base
Use the seam tool to free bricks from an old walkway without damage, clean residual mortar, and stack/bond the reclaimed bricks into a sturdy base for a wood or glass tabletop.
Outdoor Pizza Oven Stand Tune-Up
Refresh mortar joints on a brick oven stand or BBQ island by removing cracked, heat-fatigued mortar and repointing for better durability and a clean, professional aesthetic.