Features
- RICH INCLUSIONS: This wooden filler set comprises 12 unique colors of resin repair fillers, offering a hassle-free solution for repairing wood furniture stains and scratches. Please note that the wooden furniture repair kit serves as a touch-up set, helping to blend colors to minimize the visibility of scratches or scuffs. It can also be used to repair small dents or cracks. After application, dry the area with a hair dryer and allow it to air dry for 2-3 days (away from water).
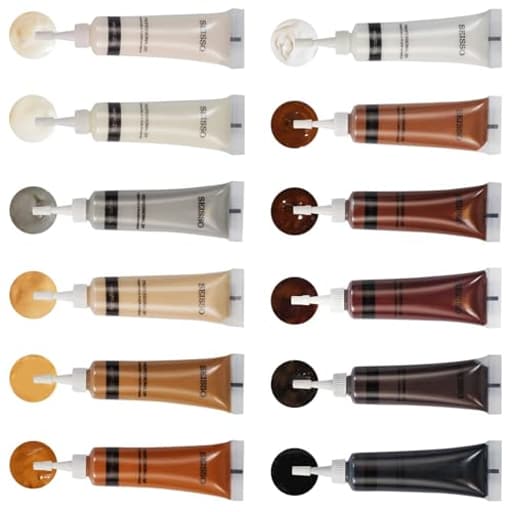
- DIVERSE RANGE OF COLORS: The set includes 12 unique colors—white, black, oak, padauk, black walnut, yellow sandalwood, teak, grey, ivory, amber yellow, original wood, and wood white. You can easily match the colors as needed, eliminating concerns about finding the right color to match your furniture.
- EASY APPLICATION & LONG-LASTING REPAIRS: Clear instructions are provided to alleviate any concerns about application difficulties. No additional glue, pens, markers, wax, paint, or crayons are needed. Simply squeeze the repair filler into the affected area and use the tail scraper to smooth the surface. Our furniture repair kit boasts high-quality materials that effortlessly and securely blend with the furniture's surface, drying quickly and providing long-lasting repairs.
- IDEAL FOR WOOD SCRATCH REPAIR: This kit is perfect for addressing scratches on wooden veneers, desks, wooden floors, cabinets, tables, beds, doors, and more. It effectively rectifies various damages such as debris, cracks, dents, holes, pet marks, and wear. With this kit, you can repair your furniture on your own without the need for professional assistance, saving you both time and money, and revitalizing your furniture.
- HELPFUL TIPS & 100% SATISFACTION GUARANTEE: If you find the color too dark, please avoid applying excessive force and instead gently apply and wipe off. It's best to test color mixtures in less visible areas to alleviate concerns about suitability. We promise to provide you with 100% satisfactory service. If you encounter any dissatisfaction with our products, please feel free to contact us.
Specifications
| Color | 12Colors |
| Size | 12 |
| Unit Count | 1 |
Related Tools

A wooden repair kit with 12 resin filler colors for touching up scratches, dents, cracks and other surface damage on wooden furniture, floors, cabinets, doors and veneers. The fillers are squeezed into the damaged area and smoothed with the included tail scraper; they dry quickly (fully air-cured in about 2–3 days) and are intended to blend with wood tones without additional adhesives or paints.
SEISSO Wood Repair Kit Touch up Paint Restore Any Wooden Furniture Stain, 12 Colors Cover Surface Scratch for Wooden Floor Table, Filler Furniture Paint Oak, Cabinet, Door, Veneer, Walnut Review
A flexible, mixable touch-up kit for everyday wood repairs
Scratches, edge wear, and the odd chip are part of living with wood furniture and floors. I tried the Seisso wood repair kit on a mix of pieces around my home—light maple shelving, a walnut box, a mahogany chair, and painted cabinets—to see how far a small set of squeezable fillers could go. The short version: if you’re willing to spend a few minutes mixing and feathering color, this compact kit can make common blemishes far less noticeable, often to the point where I had to remind myself where they were.
What’s in the kit and how it works
The kit includes 12 small tubes of colored resin filler spanning light to dark: white, wood white, ivory, original wood, amber yellow, oak, yellow sandalwood, teak, padauk, grey, black walnut, and black. There’s a simple scraper for spreading and leveling. No separate glue or hardener is needed—just squeeze the filler into the scratch or chip, smooth it, and let it dry. It sets quickly to the touch, but plan for a full air cure of roughly two to three days; keep the area dry during that time.
This is a touch-up system, not a structural repair solution. It’s designed to visually blend surface flaws and fill shallow imperfections. For deep gouges or broken corners, you’ll still want a dedicated wood filler or epoxy repair first, with this kit used afterward for color.
Application: quick wins with some technique
On narrow scratches and worn edges, the process is fast. I put a pea-sized amount of the closest color on a scrap card, nudged it lighter or darker by mixing, then pressed a tiny bead directly into the scratch. Using the included scraper (a plastic card works too), I leveled the fill and wiped away excess with a slightly damp cloth before it began to set. For hairline scuffs, a near-dry cloth lightly tinted with the mixed color helped “tone” the area without leaving a visible ridge.
For chips that exposed lighter substrate (like the corner of a dark cabinet door), I built the fill in two to three thin passes. The first pass focused on leveling. Subsequent passes were about dialing in color and grain direction—more on that below. The filler grabs quickly, which is helpful for vertical surfaces, but it also means you should work in small sections and have your color mixed before you touch the piece.
A hair dryer on low gently accelerated the surface set so I could carefully buff any haze from the surrounding finish. Then I left everything alone for 48–72 hours before cleaning or exposing it to moisture.
Color matching: the core skill
Straight from the tube, some colors were nearly spot on for common finishes (oak and black walnut were particularly useful). The strength of the kit, though, is in blending. Mixing is as simple as touching two small dabs together with the scraper until you get a match. A few tips that made a big difference:
- Start lighter. It’s easier to darken a mix with a speck of black or walnut than to recover from going too dark.
- Warm vs. cool. Amber yellow and padauk warm up a mix; grey and black cool it down or mute a too-vivid blend.
- Whites in layers. On painted or very light woods, use white or wood white as a base, then glaze with a hint of ivory to avoid a sterile patch.
- Feather the edges. Lightly blur the border of the repair with a clean cloth to avoid a hard halo in the sheen.
To mimic a grain line across a wide scratch, I applied the base color first, let it set, then used a toothpick with a slightly darker mix to draw a faint line following the grain. It sounds fussy, but it takes seconds and sells the repair.
Performance on different surfaces
- Maple bookshelf (light finish): A blend of wood white, ivory, and a touch of oak covered small scratches convincingly. On shallow dents, a couple of thin passes kept the fill flush without a noticeable patch.
- Walnut box (dark finish): Black walnut with a dot of black hid corner wear and a tiny chip on the lid. On close inspection under raking light, I could see a slight sheen difference; from normal viewing distance, the repair disappeared.
- Mahogany chair (reddish tone): Teak plus padauk warmed nicely to match the chair’s tone. Edge wear along a rung responded well to tinting rather than heavy filling.
- Painted cabinet (white): White blended well over hairline scuffs. For a larger chip exposing substrate, I layered white twice, lightly smoothing between passes. The color match was good, though painted surfaces make any change in sheen more obvious.
On an older oak floor with pet scratches, thin tinted passes toned down the light lines without creating sticky ridges that would catch dirt. I wouldn’t use this kit for deep floor gouges, but as a fast cosmetic fix for traffic lines and surface scuffs, it worked well.
Drying, durability, and cleanup
The filler skins over quickly—within minutes—so it stays where you put it. That speed helps avoid sagging on vertical repairs but shortens open time. After a day, light touch-ups near the area didn’t disturb the fill. After two to three days, the filler felt set and water-resistant in normal use. I avoided wet cleaning until after that window and haven’t seen any softening with routine wipe-downs.
Cleanup is straightforward if you catch it before it sets. A slightly damp cloth removed smears from the surrounding finish. Once cured, it’s best to mechanically remove any unwanted ridge with a plastic scraper rather than solvent.
Limitations to keep in mind
- Not for structural damage. It’s a cosmetic filler. Large voids, broken corners, or soft, punky wood need a different repair first.
- Quick drying reduces work time. You’ll get better results by pre-mixing color and working in small areas.
- Sheen mismatch can show on high-gloss finishes. Feathering edges helps. You can also minimize build by tinting scuffs rather than trying to fill them proud.
- Multiple passes may be needed. On deeper scratches, the filler can shrink slightly as it cures. A second light application the next day brings it flush.
These aren’t deal-breakers, but they shape how you approach a repair. The kit rewards a light touch and patience over heavy single-pass fills.
Practical tips from use
- Test in an inconspicuous spot to confirm color and sheen behavior.
- Pre-mix on a disposable card and keep the amount tiny; fresh mixes look better than overworked blends.
- Build color gradually: base match first, then add warmth/coolth as needed.
- Keep a damp cloth on hand to immediately wipe halo smears before they set.
- For a cleaner edge, mask alongside a long scratch with low-tack tape; remove tape right after leveling.
- Use a hair dryer on low to set the surface, then leave it alone to cure fully for 2–3 days away from water.
- Cap tubes tightly and store them upright in a cool, dry place to prevent drying between projects.
Value and positioning
The appeal here is breadth and simplicity: 12 blendable colors cover most common wood tones without buying separate pens, waxes, or stains. For homeowners, renters, and DIYers, it’s a handy “fix it now” kit that lives with other household supplies. For pros, it’s a useful punch-list tool for blending install nicks and job-site scuffs in minutes.
It’s not a replacement for full refinishing or heavy-duty wood repair products, but that’s not its purpose. As a cosmetic touch-up system, it offers a good balance of control, speed, and permanence.
Recommendation
I recommend the Seisso wood repair kit for anyone who needs reliable, quick cosmetic fixes on wood furniture, cabinets, and floors. Its strengths are the mixable color range, easy application, and fast set that keeps repairs tidy. Expect to spend a little time dialing in color and layering thinly, especially on deeper scratches or glossy surfaces. If you need to rebuild missing wood or handle large structural damage, pair it with a dedicated filler first. For everyday scratches, scuffs, and chips, this kit made my blemishes hard to spot and kept me from reaching for paint or a more involved refinishing job.
Project Ideas
Business
Mobile Touch-Up Service
Offer fast, on-site furniture and floor touch-ups for homeowners, real estate agents and Airbnb hosts. With a compact kit you can correct scratches, chips and small cracks quickly between showings or check-ins—charge per fix or on a per-visit basis and emphasize speed and color-matching expertise.
Furniture-Flipping Repair Specialist
Buy low-cost damaged furniture, use the filler kit to repair surface flaws and then refinish or stage the pieces for resale. Efficient small repairs lower turnaround time and cost, increasing margins on flipped pieces; document before/after photos to build a portfolio and raise resale prices.
Kits + Custom Color-Match Packs
Create curated repair kits and sell them online or at craft markets targeted to homeowners and small businesses. Offer add-on services like custom-mixed color samples, video walk-throughs, or personalized color match consultations for a premium. Bundles and refill packs drive repeat sales.
Workshops & Corporate Team-Building
Run hands-on classes teaching furniture touch-up, edge repair and creative filler techniques for hobbyists or corporate team-building events. Charge per participant, provide kits as part of the fee, and upsell retail repair kits and follow-up virtual lessons.
Property-Maintenance Partnerships
Partner with property managers, small hotels and realtors to provide routine surface-maintenance contracts—quick fixes between tenant turnovers and before open houses. Offer a retainer or per-call pricing and guarantee discreet, fast color-matched repairs that preserve rental or listing appearance.
Creative
Invisible Scratch Rescue
Use the 12-color filler set to precisely match and hide nicks, scratches and small dents on tables, cabinets or floors. Mix small amounts of adjacent tones to nail the grain color, apply with the included nozzle, smooth with the tail scraper, warm gently with a hair dryer to accelerate curing, and wipe any excess. Great for making thrift-store finds look original again without sanding or refinishing.
Accent Inlay & Faux Grain
Create intentional decorative accents by filling shallow grooves or routed channels with contrasting or marbled mixes of the resin filler to simulate inlays or unusual grain patterns. Use the different colors to make striped or marbled edge details on shelves, picture frames or box lids—design, apply thin layers, then blend the edges while tacky for a smooth finished look.
Edge & Chip Makeover for Upcycles
When upcycling chairs or dressers, use the kit to rebuild missing veneer edges, chip-outs and worn corners before painting or sealing. Match the nearest wood tone, build up the damaged area in stages if needed, and refine with the tail scraper. This lets you preserve the piece’s character without stripping or replacing large sections of wood.
Mini Mosaic & Patchwork Art
Turn multiple small repairs into a deliberate decorative pattern: fill dozens of tiny gouges or drilled holes with varied colors to form dotted murals, simple mosaics or geometric patterns on tabletops and panels. The effect transforms damage into an artistic surface treatment that reads as intentional craft.
Pet-Repair to Patterned Finish
Rather than hiding pet teeth or claw marks, use the fillers to create a controlled distressed or patchwork look. Blend darker and lighter tones into the marks to make rustic highlights, or fill and then feather surrounding color to create a sunburst or weathered finish on select areas for a bespoke, worn-in aesthetic.