Features
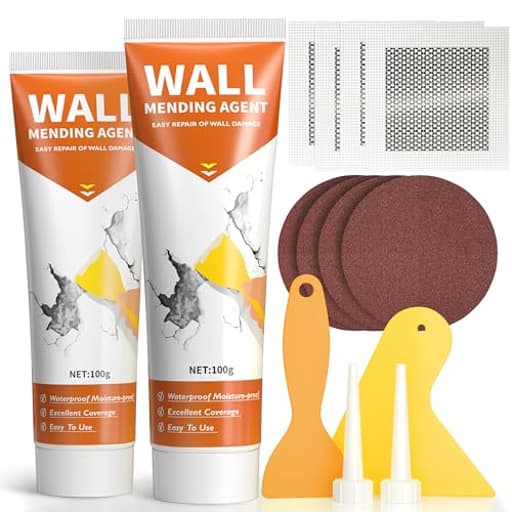
- Complete Repair Kits Wall Repair Paste (100g),Nozzle Extenders,Plastic Putty Knife, Sandpaper,Wall patch.A Cost-Effective option for repairing holes & cracks in walls
- Simple Steps&Expert Results: White semi-fluid putty for easy repair of nail holes,cracks and scratches-Simply squeeze, scrape,after drying and sanding,it can be painted on request
- Filling stability: The high density of the paste,High adhesion and fast drying properties,firmly fills the wall,can be used for ceiling repair,not cracked&crushed, not easy to fall from the wall,to provide a long time protection for your wall
- Safe Ingredients: Formulated with resin and calcium carbonate,designed for family safety.A low-odor smart choice for apartment small repair projects
- Tips for Use: The optimal storage temperature for the product is -2°C to 45°C, please store it properly for a good experience.
Specifications
| Color | White |
| Unit Count | 1 |
Related Tools

A drywall repair kit containing white semi-fluid putty plus nozzle extenders, a plastic putty knife, sandpaper and a wall patch for filling nail holes, cracks and scratches in plaster and drywall. The high-density resin-and-calcium-carbonate paste offers high adhesion and fast drying, can be sanded and painted after curing, and should be stored between −2 °C and 45 °C.
NINGOO Drywall Repair Kit,Wall Patch Repair Kit,2 Pack Wall Patching Agent,Simple Filling of Wall Holes&Efficient Crack Repair, Plaster Wall Repair,Apartment Friendly Review
Why I reached for this kit
A couple of moves and one rambunctious child later, my walls had the usual collection of picture-hanger scars, doorstop dings, and a hairline ceiling crack I kept ignoring. I wanted a single, compact kit I could stash in a drawer and pull out for quick fixes without mixing wet joint compound or hauling out bigger tools. That’s the use case where the NINGOO drywall repair kit makes a lot of sense, and where I put it to work across drywall and older plaster surfaces.
What’s in the kit
The kit is centered around a 100 g tube of white, semi-fluid repair paste formulated with resin and calcium carbonate. NINGOO includes:
- Nozzle extenders for better control in tight spots
- A small plastic putty knife
- Sanding pads
- A self-adhesive wall patch for larger holes
It’s a compact setup designed to move from squeeze to sand without rummaging for other supplies. Everything fits in a single drawer, which is a win if you’re working in an apartment or don’t have a full tool bench.
First impressions and setup
The paste consistency sits in a sweet spot between classic lightweight spackle and thicker joint compound. It extrudes cleanly and sticks to the wall without slumping—useful on ceilings. There’s a faint, low odor when first applied that dissipates quickly. Setup is essentially zero: snap on a nozzle, test a small bead on scrap, and you’re ready.
One practical note: the tube recommends storing between roughly -2 °C and 45 °C (28 °F to 113 °F). If you keep DIY supplies in a hot garage or cold shed, bring this kit inside; temperature swings will shorten the paste’s life and can affect texture.
Application workflow
I used the kit for three common scenarios: nail holes from frames, a quarter-sized doorknob ding, and a thin ceiling crack that ran about 16 inches.
Nail holes: With the narrow nozzle attached, I squeezed a small dot directly into each hole, then scraped flush with the included putty knife. Because the paste is semi-fluid, it easily wicks into small voids rather than bridging over them. For holes under 1/8", a single application was usually enough.
Doorknob ding: I pressed the edges of the crater flush, then applied a thin coat, let it set, and repeated once more. Expect a bit of shrinkage on deeper fills; two thin passes gave me a better result than one heavy one.
Ceiling crack: I lightly opened the crack with a utility blade to remove any loose material, vacuumed the dust, and ran a minimal bead along the line. The paste’s adhesion kept it from drooping overhead, which isn’t always the case with lighter spackles.
The included plastic knife is small and flexible. It’s great for narrow spaces and corners, but if you’re fussy about perfectly flat feathering, a slightly wider, stiffer metal knife will give you a more professional finish. Still, the kit tool gets the job done for small repairs.
Drying time, sanding, and dust
Thin applications set up quickly. In my tests, small fills were ready to sand in under an hour; thicker fills needed longer. I’d plan for two passes on deeper holes with 30–60 minutes between. The paste sands easily and produces a fine powder, so wear a mask and wipe down surrounding surfaces after. The sanding pads provided are appropriate for knocking down high spots and feathering edges; for immaculate paint prep, I often follow with a finer grit (220+) from my own stash.
Finish quality and paint
Once sanded, the paste blends well and takes paint without drama. On flat and matte wall paints, I could spot-paint over small fills with minimal flashing. On eggshell and higher sheens, a quick prime coat over the repair area helped avoid dull patches telegraphing through. The final color is bright white, so unpainted patches will stand out—the intent here is repair plus paint.
On the ceiling crack, the repaired line stayed stable after painting, with no immediate re-telegraphing. Time will tell with seasonal movement, but the adhesion feels robust.
The wall patch option for bigger holes
The self-adhesive patch included is the familiar aluminum mesh with a thin backing. For a hole roughly the size of a quarter to a silver dollar, it adheres firmly and gives the paste something to grab. My routine: stick the patch, apply a thin coat to embed, let it set, then feather a second coat wider than the first. While the paste works for this, a conventional joint compound feathers more smoothly over larger patches; if you have multiple big holes, this kit’s 100 g capacity will feel tight. For one-off damage, it’s adequate and convenient.
Adhesion and durability
The resin-based formula bonds convincingly to both primed drywall and the denser, slightly chalky plaster in my older hallway. No sagging, no flaking when sanded, and the filled areas feel solid to the tap. The high-density paste helps avoid pinholes that can appear with ultra-light spackles. Expect a small amount of shrinkage on deeper fills; plan on two light applications for a flush finish.
Odor and indoor friendliness
The low odor is noticeable for being almost unnoticeable. In a closed room, I never felt the need to open windows beyond normal ventilation. That makes it apartment-friendly, especially when you’re tackling late-evening fixes before move-out. Clean-up is simple: damp paper towel for fresh smears, dry wipe then vacuum for sand dust.
Where it shines
- Quick, contained fixes for small holes, dings, and short cracks
- Overhead work and vertical fills where runny spackles can slump
- Low-odor repairs in tight living spaces
- Occasional, one-tube projects where mixing compound would be overkill
- Starter kit convenience: paste, knife, sanding pads, and a patch in one packet
Limitations and practical tips
Capacity: 100 g goes a surprisingly long way on nail holes, but it’s not a whole-room solution. For extensive skim work or multiple large patches, you’ll want a tub of joint compound.
Tooling: The included knife is fine for basic tasks. For pristine feathering, keep a 3–4" metal knife on hand.
Nozzle care: The paste sets fast enough that the nozzle can clog between sessions. Purge a small bead before capping, wipe the tip clean, and consider a small pin or cap to keep air out. I’d love to see a cleaning pin included.
Priming: Spot-prime repaired areas, especially on eggshell and higher sheens, to avoid flashing.
Temperature: Store indoors to preserve consistency. Don’t apply on very cold walls; give the room a few minutes to warm up for best results.
Layering: For holes deeper than about 1/4", fill in thin lifts rather than one heavy glob to reduce shrinkage lines and sanding time.
How it compares
Compared with ultra-light vinyl spackles, this paste is a bit denser, which pays off in adhesion and fewer pinholes, particularly on slightly chalky surfaces. Versus pre-mixed joint compound, it’s cleaner and faster for small jobs, though joint compound still wins for larger patches and finish feathering over wide areas. The integrated kit format puts it ahead of single-tube spackles when you don’t already own sanding pads or a knife.
Safety and cleanup
Ingredients are resin and calcium carbonate, both common in household wall fillers. I experienced no irritation, but standard precautions apply: avoid dust inhalation when sanding, clean surfaces with a damp cloth, and wash hands after use. Fresh paste wipes off with a damp paper towel; once cured, it sands off easily.
Recommendation
I recommend the NINGOO drywall repair kit for renters, new homeowners, and anyone who needs a reliable, low-odor, grab-and-go solution for small wall repairs. It’s easy to control, dries quickly, sands cleanly, and takes paint well. The included patch broadens its usefulness, and the semi-fluid paste performs better than many lightweight spackles on vertical and overhead repairs. It’s not a replacement for a bucket of joint compound on larger projects, and I’d like a better nozzle management solution, but for the everyday dings and nail holes that actually show up in most homes, it’s exactly the right size and formula.
Project Ideas
Business
Quick Touch-Up Service for Landlords & Hosts
Offer a fast-response small-repair service focused on nail holes, cracks and scuffs for landlords, Airbnb hosts and property managers. Market same-day or next-day touch-ups using this fast-drying kit so units are guest-ready quickly; price per fix or offer room-based packages. Include before/after photos and an upsell for full repainting.
Real-Estate Prep & Staging Repairs
Partner with real-estate agents and stagers to provide minor wall repairs that increase curb appeal and allow properties to photograph better. Create bundled pricing for pre-listing touch-ups (per-room or per-property) and offer a rapid turnaround to meet staging schedules. Emphasize low-odor, apartment-friendly formula for occupied homes.
DIY Repair Workshops & Events
Host one- to two-hour hands-on classes teaching homeowners how to fix common wall problems using the kit. Charge per attendee and include a kit as part of the ticket price; workshops can be run in community centers, maker spaces, hardware stores or online as virtual classes. Sell additional kits at the event and offer follow-up coaching or subscription tips.
Subscription Refill & Maintenance Kits for Hosts
Create a subscription service supplying replacement putty cartridges, sandpaper, and small accessories to Airbnbs, short-term rental managers, and HOAs. Include short how-to videos and scheduling reminders for routine inspections. Charge monthly or quarterly and offer tiered plans based on unit count.
Retail Bundles & Branded Kits for Local Stores
Develop small packaged bundles that pair the repair kit with finishing accessories (mini paint sample, texture comb, pigment sachets) and pitch them to local hardware/hobby stores or online marketplaces. Provide point-of-sale demo cards, short usage guides, and wholesale pricing to encourage retailers to upsell to DIYers and crafters.
Creative
Textured Relief Wall Art
Use the semi-fluid putty to build raised patterns and organic textures on stretched canvas or a primed board. Apply through nozzle extenders for fine lines or spread with the plastic putty knife for broader strokes; after drying sand smooth or selectively distress, then paint or gild for a modern relief panel. Make sets of 2–3 sizes and sell as coordinated wall art or use as a weekend craft gift.
Faux-Plaster Picture Frames & Mirror Borders
Refresh plain frames or create custom ornate borders by sculpting decorative motifs with the putty directly onto wood or MDF frames. The product sands and paints easily, so you can achieve antique plaster, metallic or crackle finishes. Ideal for upcycling thrift-shop frames into boutique pieces to sell at craft fairs or online.
Embossed Tile Panels (Mosaic Wall Tiles)
Use the included wall patches as bases and apply putty layers to create repeated embossed tile motifs (geometric, botanical, etc.). Once cured and sanded, paint tiles in coordinating colors and mount them on a board or directly on a feature wall for a removable decorative panel. Good for small kitchen backsplashes, headboards, or gallery-style installations.
Miniature & Dollhouse Interior Finishes
Create realistic interior walls, plaster textures and repaired surfaces for dollhouses, scale models or dioramas. The putty’s fine grain and fast drying make it perfect for tiny cracks, skirting boards and faux stucco finishes; sand and paint to exact scale. This niche craft sells well to hobbyists and model-makers.
Upcycled Furniture Accents
Repair chips and add decorative raised panels or faux inlays to tabletops and cabinet doors using putty as a sculptable medium. After curing and sanding, paint or stain and seal for a high-end upcycled finish. Transform plain furniture into statement pieces to sell locally or on marketplaces.