Features
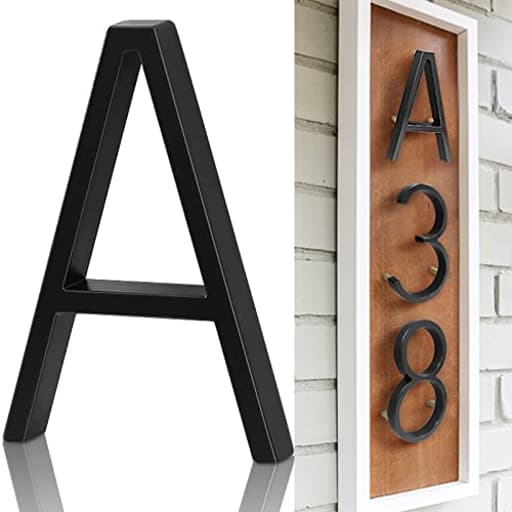
- Big for Easy to Read : Each black house number sign for outside measures 5 inch high,which meets many 911 community requirements.The post man and your friends will not ignore numbers for address on your house anymore.(Each symbol measures approx,please understand.)If you mount the house numbers on solid wall,stone,you can use plastic anchors.If mount it on wood board,please don't use plastic anchors
- 3D Floating Address Numbers : Floating design helps these farm house numbers create great 3-Dimensional shadows effect,more visible and fashionable.These house numbers for outside can be installed with spacers for a 3D effect or you can also use it without spacers for a flush look.Unique Design creates a different and more beautiful look for your home
- Durable and Weather-Resistant : Our black modern house numbers are made of durable zinc alloy,perfect for outside use.With black finish,the floating house numbers are durable,rust-resistant,weather resistant and sun resistant,will last for long time.Spacers and screws are made of durable,rust resistant stainless steel,don't need to worry about them breaking down.Solid choice for outdoor usage
- Easy to Install : Each address number for house comes with screws,plastic mounting anchors,floating spacers and a paper of templates.Steps:Determine desired location and tape the templates on the wall;Drill holes for anchors by using a 7/32 in drill bit;Instal plastic anchors;Tight up the bolt by screw and tap the number together with the spacer;Push the numbers into the respective drilled holes by hand irstly and then use the plastic hammer to tighten the numbers into the drilled holes
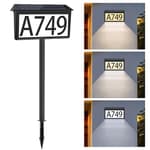
- Wide Applications : The house numbers for outside can be put on the wall,the wood,the door,mailboxes,the yard,the garage,the fence,the street,etc.It will bring a lot of convenience to your daily life.If there is any issue about our house numbers for outside,please do not hesitate to tell us,we will solve it as soon as possible
Specifications
| Color | Black |
| Size | 5 Inch |
Related Tools


5-inch metal address characters designed for exterior mounting to display house numbers or letters. They are made of black zinc alloy with stainless steel screws and spacers to create a floating 3D effect (spacers included) and are rust- and weather-resistant. Installation hardware and templates are included for mounting on walls, wood, mailboxes, fences, or garages (use plastic anchors for masonry; do not use plastic anchors on wood).
Ranslen 5" Metal Floating House Numbers,Ranslen Black Zinc Alloy Solid Modern House Address Number,Anti-Rust House Numbers Decorative Address Sign for Door Garden Mailbox with Nail Kit,Coated Black,Letter Review
A small hardware upgrade can do a surprising amount for curb appeal. That was my experience after swapping out my aging address markers for the Ranslen floating house numbers. They’re simple, black, and modern—but the real win is how the floating standoff creates a crisp shadow that reads clearly from the street without looking flashy.
Design and build
The Ranslen numbers are 5 inches tall, which is a sweet spot for visibility and code compliance in many neighborhoods. In hand, each piece feels rigid and well-cast with a smooth, matte-like black coating. The finish is consistent and doesn’t show the tiny pits or rough edges you often see on budget castings. I wouldn’t call them heavy, but they don’t feel flimsy either.
Hardware-wise, you get stainless steel studs and spacers for the floating effect, plus plastic wall anchors and a paper drilling template. The studs thread into the back of each number at three points. That triple mounting spreads the load nicely (useful in wind and on uneven surfaces), but it also adds to the precision required during layout and drilling.
The look leans modern: crisp edges, clean black, and an intentional standoff from the wall that creates that 3D shadow line. If you want a more traditional appearance, you can skip the spacers and install them flush. The black coating is subdued enough that it won’t read glossy; it sits comfortably on painted wood, fiber cement, brick, or metal mailboxes.
Visibility and sizing
At 5 inches tall with a bold face, these are easy to read from the sidewalk. The shadow line from the standoffs actually improves legibility in daylight because it creates contrast between the number and the surface behind it. Two notes from my install:
- On darker siding (charcoal, navy, forest green), the black-on-dark contrast is low. Consider a lighter backplate, a painted strip behind the numbers, or a location where the background is lighter (trim, fascia, or masonry).
- If you mount in a shaded entryway, the floating effect still helps because the numbers stand off the surface, but you’ll get the best visual pop in areas with some ambient light.
Installation: clean results, finicky process
Expect an intermediate-level install. The included paper template is helpful, but it’s not foolproof. I strongly recommend making your own layout line with painter’s tape and a level, then using the template only to mark hole spacing for each number.
My successful process on fiber cement siding looked like this:
Plan and layout
- Snap a level line with painter’s tape.
- Dry-fit the numbers to set spacing (I used a scrap of wood as a spacer to keep gaps consistent).
- Mark hole locations with an awl through the template.
Drill
- The instructions call for a 7/32-inch bit. In my test holes, that produced a snug fit for the plastic anchors in masonry, but it was too aggressive for fiber cement and completely wrong for wood.
- For masonry or stucco: use the included plastic anchors with a 7/32-inch masonry bit. Vacuum the dust so anchors seat fully.
- For wood, PVC trim, or composite: do not use the plastic anchors. Pre-drill a smaller pilot hole and thread the studs directly into the material. A dab of exterior-grade adhesive or silicone in the holes adds stability and seals out moisture.
Assemble and set
- Thread the stainless studs into the back of the number.
- Add spacers if you want the floating effect.
- Test-fit each stud into its hole before committing. If the hole is too tight, open it slightly; forcing the studs can leverage the anchors loose or cause misalignment.
- Press in by hand, then finish with a soft-faced mallet or tap through a folded cloth to avoid marring the finish.
Seal
- A small bead of clear exterior silicone in each hole before final seating helps with water ingress and keeps the studs from backing out over time.
Where installation can go sideways:
- Plastic anchors can collapse into hollow or soft siding if the hole is slightly oversized or the material crumbles. If you’re working on vinyl or lap wood siding, skip the anchors and use the studs like screws into pilot holes, backed with adhesive.
- The three-point mounting demands accurate drilling. If one hole is off by even 1–2 mm, the stud can bind. Dry-fitting before final placement is essential.
- Templates can stretch or print slightly off. Trust your tape line and level more than the paper.
None of this is rocket science, but it rewards a deliberate pace. I spent more time on layout than drilling, and it paid off with a perfectly straight run.
Durability and weather performance
Installed outdoors, the numbers have handled rain, coastal humidity, and direct sun without obvious fading or rust. The black coating resists fingerprints and wipes clean. The stainless studs and spacers are the right call—no telltale orange staining below the mount points, even after a few storms. To keep things tight long-term, that dab of silicone during installation helps prevent moisture cycling from loosening the studs.
I also tested one number on a metal mailbox. The studs are overkill there, so I skipped drilling and used a strong exterior adhesive for a flush mount. The coating bonded well and has shown no peeling or bubbling.
Day-to-day impressions
- Readability: Excellent from the street at 30–50 feet. The shadow line makes more difference than I expected.
- Style: Modern, minimal, and not showy. They work with contemporary facades and don’t look out of place on transitional or farmhouse exteriors.
- Flexibility: Floating or flush, wall or mailbox. They handle most common substrates with the right prep.
- Maintenance: Low. An occasional wipe-down is all mine have needed.
What could be better
- Anchors: The included plastic anchors are fine for solid masonry but are the weak link on softer or hollow materials. Upgrading to quality masonry anchors or skipping them entirely on wood improves the experience.
- Template clarity: A heavier stock or pre-cut stencil would make alignment easier and prevent slight skew from handling the paper.
- Starter guidance: A short chart on bit sizes and pilot-hole recommendations for different materials (wood, masonry, composite, vinyl) would save first-time installers from guesswork.
Tips for a smooth install
- Use a level and a physical spacer block between numbers—eyeballing spacing almost always results in a slight “wave.”
- Pre-thread the studs into the numbers and check that all three studs sit co-planar before marking holes. If one stud bottoms out early, back the others out to match.
- For wood, drill undersized pilot holes and use silicone instead of plastic anchors. For brick or stucco, vacuum the holes before inserting anchors.
- Consider contrast. If your siding is dark, mount on trim or paint a small strip behind the numbers to improve visibility.
- Don’t rush the final tap-in. If you feel resistance, pull the piece, adjust the hole slightly, and try again.
The bottom line
The Ranslen floating house numbers deliver a clean, modern look with genuinely better readability, thanks to the standoff shadow. Materials and finish are solid for outdoor use, and the stainless hardware is appropriate for the job. Installation isn’t “stick it and forget it” simple; it rewards careful layout and, in many cases, better anchors or a different approach depending on your surface. Once installed, though, they look intentional and far more premium than standard screw-through plates.
Recommendation: I recommend these if you’re willing to spend a little extra time on layout and use the right mounting strategy for your surface. The visual payoff is real, durability is reassuring, and the flexibility to go floating or flush broadens where and how you can use them. If you’re set on a five-minute, no-drill install, look elsewhere. But for a small project with a big impact, these numbers hit the mark.
Project Ideas
Business
Curb Appeal Installation Service
Offer a local service installing modern floating house numbers plus complementary upgrades (mailbox refresh, entry light positioning, small planter installation). Service includes site visit, accurate templating, professional drilling/anchoring (masonry or wood), and optional night-LED backlighting. Price as packages (basic number install, number + mailbox refresh, premium staging) and market to realtors, homeowners associations, and new-build communities.
Custom Address Sign Shop
Create and sell custom address signs online and at local craft markets using these 5" zinc alloy characters. Offer finishes, backing materials (wood, metal, acrylic), and layout options (vertical/horizontal, stacked). Upsell with engraving, integrated backlighting kits, or seasonal frames. Use product photography showing day/night visibility and shadow effects; sell through Etsy, Shopify, and Instagram ads targeted at homeowners and decorators.
Home Staging & Real Estate Add-On
Partner with home stagers and real estate agents to provide quick curb upgrades before listing photos and showings. Fast installs of stylish numbers make properties more photogenic and easier for buyers to find. Offer short-term rental of high-quality display signs for open house weekends, and provide discounted bulk rates for realtors who list multiple properties.
DIY Kit & Workshop Series
Package the numbers with pre-cut backing boards, templates, basic tools, and step-by-step instructions as a DIY kit. Run in-person workshops at maker spaces, hardware stores, or community centers where participants build a personalized address sign and learn proper installation techniques. Monetize through kit sales, class fees, and add-on material purchases (LED strips, specialty paints). Promote corporate team-building or bridal-party craft events.
Creative
Floating Shadow Address Art
Use the 5" floating numbers as the centerpiece of a backyard or entryway art panel. Mount the numbers on a reclaimed wood board (stain or whitewash first), place the stainless steel spacers to create a deep shadow effect, and surround with a painted stenciled pattern or metal geometric inlays. Add a small integrated LED strip behind the numbers for night visibility. Good as a gift or focal point on a porch wall.
Mixed-Material Mailbox Makeover
Refresh an old mailbox: paint the mailbox body in a high-contrast color, attach the black zinc alloy numbers with spacers for a crisp 3D look, and add a moss or faux-succulent border around the base of the numbers for texture. Include weatherproof sealant around drill holes and use the included template for perfect placement. Result is a durable, stylish curbside upgrade.
Planter & Address Combo
Create a freestanding wooden planter box with the floating numbers mounted on the front face. Use the spacers so the numbers pop off the planter, then fill with seasonal plants. For a modern look use vertical slats and black numbers; for farmhouse style, distress the paint and use the flush installation option. This combines visibility with curb appeal and works well in front of the house or on a porch.
Seasonal/Swap-Out Number Frame
Build a shallow shadowbox frame with a removable front panel that holds the 5" numbers. Design the frame to allow easy swapping of decorative backings (holiday prints, mirrored surfaces, seasonal textiles). Use the spacers when you want depth or remove them for a low-profile look. Great for renters who want a reusable, portable address display for porches, apartments, or front doors.