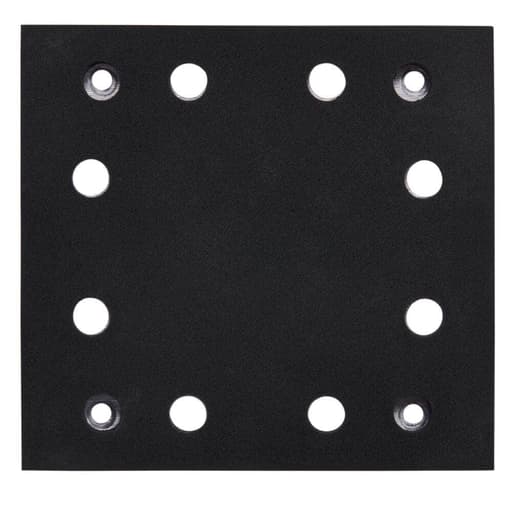
Features
- Compatible with DCW200 and DWE6411 1/4-sheet sanders
- Provides a smooth finishing surface
- Genuine replacement pad (single piece)
- Includes 1 pad
- Warranty: 3-year limited warranty; 1 year free service; 90-day satisfaction guarantee
Specifications
| Color | Black |
| Number Of Pieces | 1 |
| Product Height | 2.375 in |
| Product Length | 4.438 in |
| Product Width | 4.562 in |
| Returnable | 90-Day |
Related Tools
Related Articles

Replacement pad for 1/4-sheet palm sanders. Provides a flat backing surface to support sanding sheets and help achieve a consistent finish. Designed for use with compatible 1/4-sheet sanders; sold as a single pad.
DeWalt 1/4 Sheet Palm Sander Replacement Pad Review
A worn pad can make a good sander feel sloppy, so I treat pad replacements as essential maintenance rather than an afterthought. I installed this DeWalt replacement pad on my quarter-sheet sanders to see if it restores that crisp, consistent finish I expect. Short version: on compatible models it does exactly what it should, with a few installation quirks worth noting.
Setup and compatibility
I installed the pad on a DCW200 first, since it’s explicitly listed as compatible. Fit was spot-on: screw holes lined up, dust ports matched my punch, and the clamps seated square. If you’re running the DCW200, this pad feels purpose-built.
I also tried it on a 1/4-sheet DeWalt with some years on it. That’s where tolerances get interesting. The mounting pattern on older units can vary a touch. On mine, the holes were close but not perfect, and I had to take a minute to confirm seating and thread engagement before torquing. The takeaway: if your sander is an older type or you’re not sure of the exact revision, verify the hole pattern before you assume it’s a drop-in. If you have the model number on the sander label (and the “Type” revision), check that against DeWalt’s compatibility list. For current DCW200 and DWE6411 units, it’s a straightforward swap.
A small install note: the screws for the pad on my DeWalt take a Torx driver (T20 in my case). Have a Torx bit handy. Snug is enough—overtightening compresses the foam and can deform the pad, which defeats the purpose of replacing it.
Build quality and feel
This pad is firm but not rigid, which is exactly the balance I want on a finishing sander. Too soft and you round edges or telegraph inconsistencies; too hard and you get chatter, witness marks, and a grabby feel. The foam density here helps the sander stay flat while still absorbing vibration. The edges are slightly relieved so paper can wrap without cutting into the pad, and the face is uniform and square.
The backing surface is dead flat out of the package. I checked it against a small granite plate with feeler gauge checks across the corners—the contact pattern was even. That sounds nitpicky for a pad, but flatness shows up in your final grit passes, especially on wide face frames and cabinet panels.
Performance in the cut
On 150–220 grit, the pad provides predictable contact pressure across the whole sheet. With the DCW200, I was able to feather out pencil lines consistently without “hot” spots. On corner approaches, the pad didn’t collapse, which helps maintain clean, straight edges on rails and stiles. On an older pad you can feel the sander start to rock; that’s gone here.
Sanding across veneer edges is a good test. I used this pad for a light cleanup on a walnut veneer end panel, staying disciplined with pressure. The support was even enough to keep me out of trouble. If you’re heavy-handed, a fresh pad won’t save you from burn-through, but it does reduce the risk by keeping the sheet flat and fully supported.
The other noticeable improvement is consistency from sheet to sheet. A tired pad can cause the same paper to feel “tired” faster. With this pad, fresh 220 grit cut the way it should, and the sander didn’t skate.
Dust collection and paper alignment
Quarter-sheet sanders live and die by dust evacuation, especially in the upper grits where loading is common. The hole pattern on this pad matched the DCW200’s base. Using the paper punch that came with the sander, alignment was simple, and dust pickup was solid. If your sander didn’t come with a punch, take a second to match holes carefully—it matters. Misaligned holes will choke dust flow and make papers clog prematurely.
Durability and wear
Pads fail in predictable ways: the face glazes from heat, corners chunk out from catching edges, and the screw holes wallow out if the pad has been removed/reinstalled a bunch of times. After several hours of mixed use on poplar, maple, and pre-finished ply (careful touch-ups), this pad shows the normal light polishing at the contact face but no breakdown. The corners are holding up, which I credit to the firmness and the slight edge relief.
If you want to extend pad life:
- Don’t bear down; let the paper do the work.
- Keep paper holes aligned for better dust removal (lower heat).
- Avoid tipping onto edges at speed; square up before making contact.
- Blow out the pad face periodically so grit doesn’t embed.
Installation tips
- Clean the platen before you install the new pad. Any debris or leftover adhesive will print through and create high spots.
- Start all screws by hand before tightening any one of them. That keeps the pad centered.
- Tighten in a crisscross pattern to even out compression.
- If your screws are worn or the heads are stripped, replace them—nothing ruins a future pad swap faster than a rounded fastener.
- After installation, run the sander against a scrap with worn paper for 30 seconds to “seat” the pad, then switch to fresh paper.
Everyday use impressions
With the new pad on, the sander returns to being a finishing tool instead of a compromise. I used it for flush-sanding edge-banding, prepping face frames, and easing shop-made trim. The improvement is subtle but cumulative: fewer passes, cleaner scratch pattern, and more control near edges. On the DCW200, vibration felt slightly reduced compared to my worn pad, which is easier on the hand for longer sessions.
This pad doesn’t magically upgrade your sander; it simply restores it. That’s the point. If your finish quality has drifted and you’ve blamed paper, technique, even dust collection, check your pad first. It’s a consumable, and replacing it can be the cheapest “tune-up” you do.
Value and warranty
It’s a single-piece pad, and you’re buying it to fix a specific problem. From a value standpoint, I judge it on how many hours of clean finish I get before the corners start to crumble. So far, it’s tracking well. DeWalt backs it with a 3-year limited warranty, a year of free service, and a 90-day satisfaction guarantee. For a consumable, that’s generous and removes most of the risk if you run into a compatibility issue.
What I like
- Firm, flat support that improves finish consistency
- Clean fit on modern DeWalt quarter-sheet models (DCW200, DWE6411)
- Good corner durability and vibration control
- Straightforward install with the right driver
What could be better
- Compatibility can be finicky on older or off-revision sanders—double-check your model and type
- Torx screws may surprise folks without the bit
- Sold as a single pad only; heavy users may wish for multi-pack pricing
Recommendation
I recommend this pad for anyone running a DCW200 or DWE6411 who’s noticed finish quality slipping or corners rounding. It restores the sander’s flatness and feel with a minimal, tool-bag-level install. If your sander is an older DeWalt variant, confirm the hole pattern and have a Torx driver on hand. In the right match, the pad does exactly what a good replacement should: it disappears behind the work and lets the paper and your technique shine.
Project Ideas
Business
Mobile Trim & Cabinet Touch-Up
Offer on-site scuff-sand and refinishing for doors, baseboards, and cabinet faces for realtors and landlords prepping listings. Keep multiple replacement pads to maintain a dead-flat sanding surface across jobs. Bill per room or linear foot.
Weekend Finishing Kit Rentals
Rent turnkey kits that include a 1/4-sheet sander, a fresh replacement pad, assorted pre-cut papers, dust adapter, and step-by-step guides. Upsell consumables and optional finishing oils. Ideal for DIYers tackling small furniture or board refreshes.
Subscription Consumables Bundles
Launch an e-commerce subscription delivering 1/4-sheet sandpaper assortments plus replacement pads compatible with popular models (e.g., DCW200, DWE6411). Offer project-specific packs (cutting boards, cabinets, guitar bodies) to increase AOV.
Craft Blanks, Prepped & Ready
Produce and sell pre-sanded craft blanks—cutting boards, charcuterie paddles, picture frames—finished to 220–320 grit using a fresh backing pad for consistency. Market to Etsy makers and local art stores who want ready-to-finish pieces.
Finishing 101 Workshops
Host hands-on classes covering grit progression, dust control, and pad maintenance/replacement. Bundle tuition with a consumables kit (replacement pad + paper assortment). Partner with makerspaces or hardware stores for venue and customer flow.
Creative
Heirloom Cutting Board Refresh
Use your 1/4-sheet sander with a fresh replacement pad to flatten and smooth end-grain or edge-grain cutting boards. Progress through grits (80→120→180→220) for a glassy surface, ease the edges, and finish with mineral oil/beeswax. The flat backing pad helps avoid dish-outs and ensures a uniform, professional finish.
Vintage Picture Frame Upcycle
Revive ornate or flat wooden frames by gently scuff-sanding flaking finishes and smoothing nicks. The replacement pad keeps the sanding surface true so you don’t round over delicate profile details. Prime and repaint, or apply gold leaf for a boutique look.
Toy Blocks & Montessori Tiles
Cut hardwood offcuts into blocks or tiles and use the sander with a fresh pad to achieve consistent faces and silky chamfers. Add non-toxic paint or engraved letters/shapes. The even pad pressure helps keep block dimensions consistent and kid-safe smooth.
Mid-Century Nightstand Restore
Carefully level light veneer ripples and old finish on a vintage nightstand. With a new backing pad, the sander stays flat, minimizing veneer burn-through. Finish with toner lacquer or oil/varnish blend for a period-correct sheen.
Ultra-Smooth Painting Panels
Create artist-grade wood panels by sealing plywood or MDF, then sanding between gesso or primer coats. The fresh pad supports uniform pressure, giving acrylic and oil painters an exceptionally smooth, consistent surface.