Features
- Carbide tip for increased durability
- Tip/profile to reduce cracking of glass and tile
- Compatible with corded and cordless drills
- Designed for drilling a variety of glass and tile materials
Specifications
| Diameter | 3/16 in |
| Bit Length Listed | 2-1/4 in |
| Packaged Length | 5.8 in |
| Height | 0.2 in |
| Width | 1.9 in |
| Weight | 0.0 lb (manufacturer site listing) |
| Material | High speed steel with carbide tip |
| Applicable Materials | Glass, Tile |
| Measurement Type | Fractional |
| Package Quantity | 3 (seller listing) |
| Includes | (1) 16901 (manufacturer listing) |
| Gtin | 0028874169012 |
| Upc | 8165470896349 |
| Product Type | Glass & Tile Drill Bits |
Related Tools
Related Articles

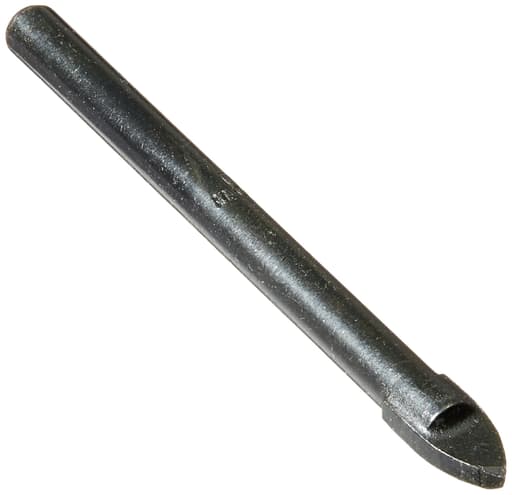
Drill bit intended for use on glass and tile. It has a carbide tip for improved durability and a tip/profile designed to reduce cracking of the workpiece. Suitable for use with corded or cordless drills.
Black & Decker Glass/Tile Drill Bit, 3/16-Inch x 2-1/4-Inch Review
Why I reached for this bit
Glass backsplashes and glossy wall tile can make even a steady hand feel clumsy. I’ve cracked my share of tiles over the years, usually because I was rushing with the wrong bit or too much speed. That’s exactly why I keep a 3/16-inch glass/tile bit like this Black & Decker on hand. It’s purpose-built for brittle surfaces, and in practice it removes a lot of the anxiety from small anchor holes in finishes you really don’t want to replace.
Design and build
This is a straightforward, spear-point glass and tile bit with a carbide tip bonded to a high-speed steel shank. The 3/16-inch diameter is a common size for plastic wall anchors and #8 screws, so it sees frequent use in kitchens and baths. The listed length is 2-1/4 inches, which keeps the bit compact and easy to control. Don’t expect deep reach—this is meant for typical wall tile and glass panels, not thick masonry.
The business end is what matters here: the carbide point is ground to a chisel-like profile that scores the surface before it cuts. That geometry, combined with the inherent toughness of carbide, is what reduces surface chipping and catastrophic cracking in brittle materials. It’s compatible with both corded and cordless drills. A variable-speed driver is ideal.
Fit and finish are what I expect from a mainstream brand. The shank ran true in my chucks (no noticeable wobble), and the tip arrived properly centered with clean grinding.
Setup and technique
Glass and tile drilling isn’t about brute force; it’s about control and heat management. Here’s the approach that worked consistently with this bit:
- Mark the hole location and lay down painter’s tape to give the tip some bite.
- Set the drill to low speed, no hammer mode.
- Start at a slight angle to help the tip “catch,” then level out once the surface is scored.
- Apply light to moderate pressure—let the tip do the work.
- Keep the tip cool with a trickle of water or occasional dips. Overheating kills carbide edges quickly.
- Clear dust by lifting the bit every few seconds.
On a typical 12-volt or 18-volt drill, I stay below 600 rpm for ceramic and porcelain, and I go even slower for glass. With a corded drill, I use the lowest speed range. The bit’s geometry doesn’t like speed; it likes patience.
Performance on glass
On 1/4-inch annealed glass shelving and a glass mosaic backsplash, this bit behaved exactly as a glass/tile spear point should. Starting cleanly is half the battle, and the tip didn’t skate once I used tape and a slight angle. I got neat entry holes with minimal conchoidal breakout, and the exit was acceptably clean when I backed the work with a sacrificial board.
Important caveat: don’t attempt tempered glass. No glass/tile bit can drill it—it will shatter. For laminated glass, go slow and keep the bit cool, understanding you’re drilling two layers with an interlayer between.
Performance on tile
Ceramic wall tile: This is the sweet spot. The bit chewed through glazed ceramic cleanly and predictably. Entry chipping was minor, and I didn’t see radial cracking around holes. For bathroom accessories and backsplash anchors, it did exactly what I needed.
Porcelain tile: Dense porcelain is tougher. The bit still worked, but I had to slow way down, use more water, and accept that progress would be measured. Entry was clean on glazed faces with tape. If you’re drilling many holes in porcelain or you encounter extra-hard PEI 4–5 tile, a diamond tile bit will be faster. For a handful of 3/16-inch holes, this bit handled the task without drama.
Natural stone tile: While not its target material, it will pass through softer stones (like slate) if you keep it cool. For granite or polished marble, I switch to diamond.
Across all tile, the 3/16-inch size matched plastic anchors well, leaving a snug fit in ceramic and a fair fit in porcelain (which sometimes benefits from a light wallowing to relieve tension).
Hole quality and control
Entry-hole appearance matters on finished surfaces. The spear tip’s scoring action produced round, clean entries with only a faint halo where the glaze fractured microscopically. Using tape and light pressure minimized this further. The bit’s short overall length helps control—less flex, less runout. If you’re used to masonry bits chattering and wandering, this is a noticeably calmer experience.
Exit holes are where chipping can happen. When possible, I drilled just deep enough to break through without slamming the tip out the back. On removable pieces, backing with wood eliminated breakout.
Durability and bit life
Carbide is hard but brittle, and heat is its enemy. With proper cooling and low speed, I drilled multiple holes in ceramic and a few in porcelain without dulling the edge. After pushing it too fast on one porcelain floor tile, I noticed a slight slowdown and a bit of glazing on the cutting edge—user error. A quick dress on a diamond card brought it back.
Realistically, for occasional use—picture rails, towel bars, curtain hardware—this bit should last a long time. If you do production work in porcelain, a set of diamond tile bits will outlast and outperform, but that’s a different tool category.
Compatibility and handling
The standard round shank fit my keyed and keyless chucks securely. The compact length pairs nicely with smaller 12V drivers in tight spaces, like behind faucets. The flip side is reach: if you need to go through thick substrates behind tile, plan accordingly, or pre-drill from the substrate side with a longer masonry bit.
It’s worth noting that listings vary between single and multi-pack. Mine arrived as a single, carded bit. If you have a big job in porcelain, buying spares is smart.
Limitations and gotchas
- Not for tempered glass. No exceptions.
- Depth is limited. It’s meant for face drilling through tile and thin glass.
- Heat sensitivity. Run it too fast and dry, and you’ll dull or chip the carbide.
- Porcelain speed. It works, but it’s not fast on very hard tile.
These aren’t faults so much as the nature of spear-point glass/tile bits. Within that envelope, it performs as expected.
Comparisons and use cases
Against a diamond-coated tile bit of the same size, this bit starts more positively on glossy surfaces without a pilot, thanks to the spear tip. Diamond bits often require a guide or more careful starting technique but will cut faster in hard porcelain once underway. Versus a standard carbide masonry bit, this one wins handily on entry chipping and crack avoidance in glaze and glass. A masonry bit’s percussive intent and tip geometry are simply wrong for brittle surfaces.
If your primary need is occasional holes for wall anchors in kitchens and baths—think shelves, hooks, and bars on ceramic or glass mosaics—this is a sensible, low-hassle choice. For a remodeler drilling dozens of holes a week in porcelain, I’d supplement it with a small set of diamonds.
Tips for best results
- Tape the surface and mark your hole clearly.
- Start at a slight angle, then square up after the tip bites.
- Use low speed, steady pressure, and water for cooling.
- Disable hammer mode.
- Back the work when possible to reduce exit chipping.
- Let the bit cool between holes, especially in porcelain.
These small steps matter more than brand when you’re trying to avoid cracks.
Recommendation
I recommend this Black & Decker 3/16-inch glass/tile bit for homeowners and pros who need a reliable, low-drama solution for small holes in ceramic tile and non-tempered glass. The carbide spear tip starts cleanly, controls chipping, and pairs well with common cordless drills. It’s compact, easy to handle, and, with proper technique and cooling, durable enough for repeated use.
I wouldn’t choose it for production drilling in hard porcelain or for deep holes through thick substrates—that’s where diamond bits or longer masonry tools take over. But for its intended purpose—neat, controlled entry holes in brittle finishes—it strikes the right balance of performance and simplicity.
Project Ideas
Business
Tile Retrofit Installations
Offer on-site drilling and installation of bath accessories—grab bars, hooks, shower caddies, and shelves—on existing tile. Use 3/16-inch holes for common anchors, work dust-free with water cooling, and seal penetrations with silicone. Market to property managers and realtors for quick upgrades; price per hole plus accessory markup.
Upcycled Bottle Lighting Studio
Produce and sell drilled-glass bottle lamps and string-light decor. Standardize 3/16-inch pass-through holes with grommets, batch with simple jigs, and offer custom labels or etched designs. Sell on Etsy and at markets, and partner with local bars for branded, eco-friendly merch made from their empties.
Pre-Drilled Sea Glass Craft Kits
Source or tumble glass, drill clean 3/16-inch holes, and package kits for wind chimes, sun catchers, and jewelry. Include wire, jump rings, instructions, and QR video links. Wholesale to gift shops and coastal boutiques, and run seasonal workshops where attendees assemble their pieces on-site.
Custom Tile Address and Signage
Design ceramic or porcelain tile address plaques and small business signs with pre-drilled 3/16-inch mounting holes and stainless standoffs. Offer weatherproof finishes and installation services. Target new homeowners, Airbnb hosts, and storefronts; upsell matching doorbell surrounds or mailbox number tiles.
Mobile Glass/Tile Drilling Service
Provide a niche service where customers bring glass jars, tiles, or ceramics for precise 3/16-inch holes—cord pass-throughs, vents, or mounting points. Set up a compact, water-cooled station at maker markets and fairs, charge per hole, and sell add-ons like grommets, anchors, and polished edges. Clear policy: no drilling tempered glass.
Creative
Upcycled Bottle Fairy-Light Lamps
Drill a 3/16-inch hole near the base of glass wine or soda bottles to feed a thin string of micro-LED fairy lights inside. The carbide-tipped, crack-reducing profile helps prevent chipping as you work at low speed with water as coolant. Add a small rubber grommet to the hole for a clean finish, then decorate the exterior with glass paint or etching cream for patterns.
Sea Glass Wind Chimes
Collect sea glass or flat glass shards and drill 3/16-inch hanging holes to string them with fishing line or wire. Suspend rows from a driftwood branch so pieces lightly touch for a pleasing chime. The bit’s profile minimizes cracking on brittle glass; keep the surface wet and start at a slight angle to begin the hole before leveling out.
Retrofit Tile Hooks and Caddies
Add robe hooks, towel rings, or shower caddies to existing tile without replacing surfaces by drilling 3/16-inch anchor holes where needed. Use masking tape to mark and prevent walking, drill at low RPM without hammer action, and insert plastic or stainless anchors. This turns a basic bath into a more functional space with minimal cost.
Mosaic House Number Plaque
Create a mosaic tile plaque for your address and drill 3/16-inch mounting holes in porcelain or ceramic tiles for stand-offs or screws. Arrange colored tiles on a backing board, grout, then mount to masonry with exterior-grade anchors. The carbide tip helps pierce glazed surfaces cleanly for a professional finish.
Planter Drainage and Hanging Teacups
Convert ceramic mugs, teacups, or small glazed pots into planters by drilling a 3/16-inch drainage hole in the base. For hanging versions, drill two opposing 3/16-inch holes near the rim and thread with wire or cord. Keep the piece wet, apply gentle pressure, and avoid drilling tempered items.