Features
- Floor gap repair floating flooring tool.
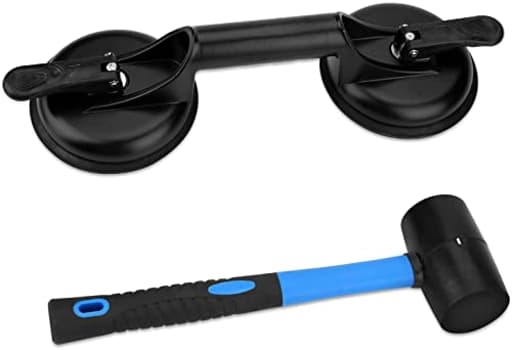
- Great for Wooden floor and can't use on handscraped surface floor, only use on smooth furface.What You Get: 1 floor gap fixer, 1 plastic mallet.
- The length of the mallet is 11.8 inch and the weight is 0.96 lb, The diameter of Cups is 4-2/3inch ,the Suction Pad thickness is 7mm.
- Suction cup made with durable aluminum body and heavy duty plastic handle, Mallet made with heavy duty plastic.
- Important Compatibility Instructions:This product will not work properly if your floor has the following conditions:-Visible texture or uneven surface、Soft elastic floor (such as PVC)、Dust/wax/moisture on the surface
Specifications
| Color | Blue |
| Unit Count | 2 |
This floor gap repair tool uses a suction cup and plastic mallet to pull and align floating laminate or wooden floorboards for gap repair on smooth surfaces. The kit includes a 4‑2/3" suction cup with aluminum body and 7 mm pad plus an 11.8" (0.96 lb) plastic mallet; it is not suitable for handscraped, textured/uneven, soft elastic (PVC) floors, or surfaces with dust, wax, or moisture.
FCHO Floor Gap Fixer Tool for Laminate Floor Gap Repair Include Suction Cup and Mallet Review
Why I reached for this gap fixer
A couple of winters ago, hairline seams in my floating laminate turned into visible gaps across a traffic path. The boards hadn’t failed—seasonal movement had just walked the joints open. Instead of prying up trim and tugging entire rows, I tried this FCHO gap fixer: a 4-2/3" aluminum-bodied suction cup paired with an 11.8" plastic mallet. It’s a simple idea—lock onto a plank, then drive it back toward the gap—and if you work within its design limits, it’s an efficient way to tune up a floating floor.
What you get and how it’s built
- Suction cup: 4-2/3" diameter with a 7 mm rubber pad, aluminum body, plastic lever/handle. The body is rigid and the lever action is positive; you can feel the cup flatten and seal as you lock it down.
- Mallet: 11.8" long, roughly 0.96 lb, all-plastic head and handle. The head face is slightly forgiving, which matters when you are striking near a factory finish.
The cup’s footprint is sized for modern wide planks—you get a stable grip on 6"–9" laminate or engineered boards. On narrow strip floors (3"–3-1/2"), the cup can overhang seams or bump into adjacent boards, which compromises suction and leverage. Materials feel more durable than the price suggests, and the cup’s pad thickness helps it deal with minor micro-unevenness on otherwise smooth floors.
Setup and technique that actually works
The difference between fuss and success with suction tools is preparation and sequence.
- Clean and dry: Any dust, floor polish, wax, or moisture weakens the seal. I degrease with isopropyl alcohol, then dry thoroughly. If you’ve ever used a “refresh” product on your floor, clean twice.
- Position over a single board: Center the cup fully on the plank you want to move. Avoid straddling a seam.
- Lock and test: Flip the lever, tug by hand to confirm a solid hold. If it slides easily, break the seal and try again—don’t start striking yet.
- Short taps, mid-span: I get the best movement hitting the cup’s body/handle with short, controlled mallet taps, roughly mid-board, and working in 1/16"–1/8" increments. Driving from mid-span reduces the risk of chipping ends.
- Work from the middle out: If multiple gaps snake across a room, start near the center of the affected run and close gaps in sequence toward a free edge or an expansion joint. This minimizes rebound.
- Protect edges: If you’re working near baseboards, slip a scrap of cardboard behind the target board to avoid scuffing paint in case you overshoot.
With this method, most of my gaps closed in two to four taps per board. The mallet’s lighter weight is an asset—you’re less likely to shock the locking tongues or dent a finish.
Performance on different surfaces
On smooth laminate and click-together engineered wood, the tool does exactly what it claims. The cup seals quickly and holds through multiple strikes. I measured movement at roughly 1/8" per three taps under normal friction.
On slightly textured laminate with a satin micrograin, I could still get a seal, but it took more care: impeccable cleaning and firm lever pressure. Once attached, the cup held well enough for modest repositioning.
On medium-textured luxury vinyl plank (LVP/PVC), the results were inconsistent. The manufacturer warns against soft elastic floors and textured surfaces, and that matches my experience. Even with careful prep, the cup would sometimes creep or release under impact. I could coax small adjustments on a few boards, but I wouldn’t count on it for a full-room touch-up.
On narrow hardwood strips (3–3.5" solids), the diameter was simply too large to sit fully on a single board. Without a full seat, the cup wobbled and wouldn’t maintain a reliable grip. For that scenario, traditional tapping blocks or a pull bar remain the better approach.
Ergonomics and control
The cup’s lever is easy to operate, and the aluminum body provides a reassuring target for tapping. The plastic mallet feels light at first, but the bounce is controlled and the face doesn’t scar the cup or the floor if you mis-hit. After about an hour of kneeling and repositioning, I appreciated that lighter mass—no hand buzz, no over-driving.
One ergonomic caveat: the cup’s profile is tall enough that striking from very low angles near toe-kicks is awkward. In tight kitchens, I did better by rotating the cup 90 degrees and driving from a diagonal, taking shorter taps.
Durability and maintenance
After multiple sessions, including a kitchen run where I moved four adjacent rows, the cup pad shows minor scuffing but no chunking or edge roll. The lever hinge stayed tight, and the seal remained consistent as long as the pad was clean. Wipe the pad with a lint-free cloth after each session; grit trapped on the rubber will reduce performance, and any residue from floor polishes can glaze the pad.
The plastic mallet will pick up cosmetic marks but no chips or cracks. For very stubborn boards, I occasionally wished for a slightly heavier head. Instead of swinging harder, I increase the number of taps to keep stress off the locking mechanism.
Limitations and how to minimize them
- Surface compatibility: It shines on smooth laminate and engineered wood. It struggles on textured or resilient PVC surfaces, just as the instructions warn. If your floor has visible texture or is a soft LVP, set expectations accordingly.
- Narrow planks: The 4-2/3" cup needs a full landing. Anything under roughly 4-1/2" wide can be problematic.
- Contamination: Waxed or “revived” floors can be slick. Plan on extra cleaning time, or avoid using it until the coating wears off.
- Structural constraints: If your floor has no expansion room at the perimeter (trim tight to the boards), you might close a gap only for another to open elsewhere. Free up an edge if necessary.
Tips from real use
- Mark your target: Use painter’s tape to set a stop line so you don’t overshoot and pinch the joint too tightly.
- Stabilize the receiving board: Put your free hand or a knee on the board opposite the gap to keep the movement isolated.
- Sequence matters: Close long seams in multiple passes. Don’t try to shove a 1/2" cumulative gap in one go; distribute the movement across several boards.
- Humidity follow-up: If seasonal movement created the gap, address the cause—aim for 35–55% relative humidity to keep joints stable.
Who will get the most out of it
- Homeowners with floating laminate or engineered wood in wide planks and a relatively smooth finish.
- Pros and property managers who need a quick, non-marring way to tune up minor separations before turnover.
- DIYers who’d rather not remove baseboards or disassemble rows to chase a handful of gaps.
If your home is predominantly textured LVP, I’d look instead at other repair strategies: strategic disassembly, heat and re-seat, or manufacturer-specific adhesives for problem boards.
Value
As a two-piece kit, it covers the essentials without the usual “you’ll also need” caveats. I appreciated not having to swap to a steel hammer or fish for a tapping block—the included mallet and the cup make a sensible pairing. For the cost, even a single successful afternoon of gap closing in a hallway or kitchen pays for itself compared to a service call.
Bottom line and recommendation
This gap fixer is a straightforward, well-built tool for pulling floating boards back together on smooth laminate and click-together engineered wood. The suction cup’s size, the 7 mm pad, and the aluminum body inspire confidence, and the light plastic mallet makes it easier to nudge boards without bruising a finish or snapping a tongue. Where it stumbles—textured surfaces, soft PVC planks, and narrow strip floors—are all clearly outside its design envelope.
I recommend it for anyone maintaining smooth-surface floating floors who wants a fast, controlled way to eliminate visible seams without disassembling rows. It’s effective, gentle on finishes, and easy to learn. If most of your flooring is textured LVP or narrow hardwood strips, skip it and choose a method better suited to those materials.
Project Ideas
Business
Mobile Floor Gap Repair Service
Offer a local on‑site service that quickly removes small gaps in floating laminate/wood floors using this suction‑cup tool plus sealants/finish. Market to homeowners, landlords, and realtors as an affordable, same‑day fix (pricing example: $75–$250 depending on area covered). Highlight speed, minimal disruption and that work is only for smooth, finished floors—offer a site check for textured/PVC floors and refer alternate solutions.
DIY Floor Gap Repair Kit + Video Course
Package the suction cup + mallet with cleaning pads, quick‑set filler, small application tools, and step‑by‑step instructions or a short online video. Sell via Etsy, Amazon, or your own site. Include explicit compatibility notes (smooth, dry, non‑textured floors) and upsell 1:1 virtual coaching sessions to troubleshoot tricky repairs.
Real‑Estate Staging & Touch‑Up Packages
Partner with realtors to offer pre‑listing floor touch‑ups—close visible plank gaps to improve perceived quality and listing photos. Price as a fixed package (e.g., basic touch‑up, deep repair, full check), and provide before/after photos for marketing. Emphasize quick turnarounds and that the method is ideal for smooth finished floors common in condos and model homes.
Hands‑On Workshops and Social Content
Run local workshops or livestreams teaching homeowners how to identify gaps, clean surfaces, and use the suction cup + mallet safely. Monetize with ticketed classes, sponsorships from flooring suppliers, and affiliate links to the tool. Produce short how‑to clips (Instagram/Reels, YouTube) demonstrating quick repairs on smooth laminate to drive tool sales and local service inquiries.
Creative
Plank‑Panel Wall Art
Use smooth, leftover laminate or hardwood planks to build tight, decorative wall panels. Clean the plank surfaces, lay them face‑up, use the suction cup to pull adjacent boards tightly together while you fasten a thin backer or apply adhesive, and tap seams flush with the mallet. Because the suction requires a smooth, dry surface, reserve this for finished laminate or sanded/varnished solid boards. Finish with stain or clear coat for a gallery‑quality piece.
Resin & Plank Serving Trays
Create small serving trays or charcuterie boards by arranging smooth planks, pulling them tight with the suction cup tool, then clamping or screwing a hidden frame while epoxy resin is poured into a routed border. The suction cup keeps the seams aligned during glue‑up so resin pours are clean and even. Ideal for smooth laminate offcuts or re-sanded hardwood; avoid textured/handscraped surfaces and PVC.
Floating Plank Headboard
Build a lightweight headboard from floating laminate planks: lay the planks on a flat surface, use the suction cup to snug seams and the mallet to tap boards flush while you tack them to a plywood backing. The tool speeds alignment and reduces gaps so the visible face looks continuous. Use only smooth‑finish planks and ensure surfaces are clean and dry before suctioning.
Seamless Demo Repair Props
Make portable demo sections showing before/after floor repairs for craft fairs or a portfolio. Intentionally create small gaps on a smooth plank section, then use the suction cup and mallet to demonstrate real‑time gap closing, filling, and finishing. These props highlight the tool’s effectiveness for customers and are great sales visuals at markets or workshops.