Features
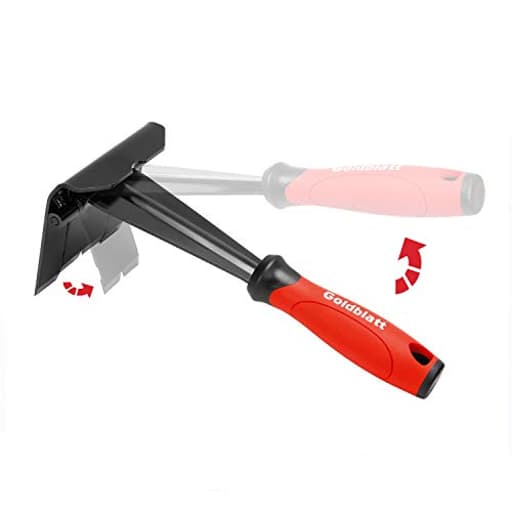
- Trim Saving - The trim removal tool has a larger, flatter and wider contact area than clumsy traditional tools and features an integrated wedged center that provides increased removal efficiency and prevents damage to both the trim and wall.
- Sturdy Pry Bars - Our trim puller is made from carbon steel and 65Mn steel with black electrophoretic and polished finish, which protects against corrosion and gives our pry bar added durability and strength. So the Trim Puller is a very beefy tool, and it will hold up well to repeated whacking.
- Multi-Function - Ideal for commercial work, repair and remodel projects where care and precision are needed, including cabinets, countertops, flooring, and many more. It can be used on a kitchen remodel, removing a couple of sections of baseboard, a countertop from some base cabinets, and pulling up a ceramic tile floor. The very edge can also be used to pry up the staples.
- Ergonomic Handle - All our trim puller is built with an ergonomic, comfortable and textured dipped handle. An impact-absorbing TPR+PP handle makes it comfortable to hold, though.
- Revolutionary Tool - Our Trim Puller is a very beefy tool. The Built-in spring design assists in separating the trim from the wall freely and quickly. The 15-degree wedged center is for easy extraction of trim and baseboards.Goldblatt holds a U.S. patent for this Trim Puller, patent number US 11,142,921.
Specifications
| Size | 10.15" x 4.25" x 4" |
A trim puller designed for removing baseboards, molding, siding, flooring, tile and other trim components during remodeling or repair. It features a flat, wide contact area and a 15° wedged center with a built-in spring to assist separation and reduce damage, and is constructed from carbon and 65Mn steel with a corrosion-resistant finish and a textured TPR+PP impact-absorbing handle.
Goldblatt Trim Puller, 4-Inch Tile Removal Multi-Tool for Commercial Work & Home Improvement, Baseboard, Molding, Siding and Floor Removal, Remodeling Review
Why I reached for this trim puller
I picked up the Goldblatt trim puller for a flooring and paint refresh that meant removing a mix of baseboard, quarter round, and a couple of floor transitions. I’ve done this kind of work with traditional pry bars and putty knives plenty of times, and while that setup “works,” it’s slow and tends to leave the wall and trim worse for wear. This tool promised wider contact, a wedged center, and a built-in spring—features aimed squarely at saving surfaces and speeding up the job. After several rooms’ worth of use, I’m convinced it earns a permanent spot in my kit, with a few caveats worth noting.
Build quality and design
The first impression is that this is a stout, purpose-built tool. The body is made from carbon steel and 65Mn spring steel with a corrosion-resistant finish. The business end is a roughly 4-inch-wide flat foot with a 15-degree wedged center rib. That wedge is the key: it converts hammer taps into controlled separation along the length of the trim, rather than creating point loads that dent drywall.
A built-in spring helps the foot return and maintain separation as you move along the run. It’s not a dramatic action, but it does make repositioning snappier and keeps the tool from sticking in the joint. The handle is a textured TPR+PP overmold. It’s comfortable, grippy even with dusty hands, and it does soak up some shock when you’re tapping it with a mallet. At about 10 inches long overall, it’s compact enough to wield in tight spaces but long enough to get leverage without over-muscling.
Fit and finish are solid. Edges are smooth where they should be, the wedge is straight, and there’s no slop in the spring. After several sessions of “whack, pry, repeat,” the finish shows scuffs but no chips, and the edge remained true.
Getting it into the wall/trim joint
In practice, setup matters more than the tool itself. I always score paint and caulk with a sharp utility knife before I touch trim. That simple step lets the wide foot slide in cleanly and prevents the paint film from tearing the drywall face paper.
The entry technique is straightforward:
- Find a natural starting point—an inside corner, a splice, or near a door casing.
- Hold the foot flat to the wall, centered on the trim, and tap the heel with a rubber mallet to seed the wedge.
- Once you see the trim lift a hair, move a few inches and repeat, then start prying.
On tight baseboards, the thickness of the foot is both a blessing and a limitation. The wider, thicker blade spreads force beautifully once it’s in, but if the board is glued hard to the wall or the caulk bead is thick and cured, it can take a few extra taps to get started. In those cases, I’ll still use a thin putty knife as a sacrificial starter, then switch to the trim puller for the real work.
On-the-job performance
Baseboards and casing
This is where the tool shines. The wide foot spreads load across more drywall, so you don’t end up with crescent-shaped divots typical of narrow pry bars. I work over studs whenever possible; you can feel them as you go, and the leverage is more predictable. Nail heads either pull through the trim or back out a bit, but in both cases I saw minimal wall damage—mostly tiny nail holes and the usual caulk cleanup. For long runs, the spring action and wedge let me “walk” the tool along the board quickly.
Quarter round and shoe molding
The wedge is gentle enough for small profiles. A couple of light taps, and the molding pops without splintering. For repaint or refinish jobs where you plan to reuse the trim, this is a big advantage.
Flooring transitions and thresholds
The leverage and wide foot make short work of most thresholds. I prefer to start at one end and slide along; the wedged center lifts the strip evenly, and the handle damping keeps the operation controlled. Again, scoring caulk or adhesive beforehand keeps things tidy.
Tack strip and staples
Pulling carpet tack strip off concrete is never pleasant, but this tool makes it tolerable. The 4-inch edge gets under the strip, and a couple of pries usually pop segments cleanly, leaving nails in the strip rather than the slab. I recommend eye protection here—tack strip shards are no joke. The very edge of the foot is also handy for teasing up staples from subfloor; it’s not a dedicated staple puller, but it’s good enough in a pinch.
Tile starts and flooring demolition
For tile or stubborn plank flooring, I use the trim puller to create an initial gap and lift the first piece. It’s not a chisel and shouldn’t be treated like one, but once you have an entry point, the leverage helps get demolition moving without gouging the substrate as badly as a narrow bar can.
Ergonomics and user experience
The handle is noticeably more comfortable than bare steel. During longer sessions, I had less hand fatigue than with a crowbar or flat bar, particularly when tapping repeatedly with a mallet. The angle of the cap and the 15-degree wedge translate force efficiently, so you don’t have to swing hard to get separation. Balance is good; it feels slightly on the beefy side for its size, which contributes to the planted feel when prying.
Noise and vibration are also reduced. The spring and overmold combine to tame the sharp “ring” you get from striking steel-on-steel tools.
Durability and maintenance
After prying off several rooms’ worth of trim and pulling tack strip, the foot is still flat and the wedge is straight. No rolling or mushrooming at the striking area. The black finish has scuff marks, but no corrosion or flaking. Maintenance is simple: knock off dust, wipe it down, and if you’ve been working in damp areas, a light oil keeps it looking new.
Limitations and learning curve
- Initial entry on tight or heavily glued trim can be stubborn. A thin putty knife as a starter saves the wall and your patience.
- In areas without a stud behind the drywall, you can still dent the surface if you pry aggressively. Work gently until you find backing.
- It’s not a replacement for every pry bar. For deep nail pulling or twisting fasteners, you’ll still want your traditional bars and dedicated nail pullers.
- The blade thickness means you can’t slip it into paper-thin gaps. Score, tap, and don’t force it.
None of these are deal-breakers; they’re the realities of a purpose-built tool. Once you get a feel for its rhythm—tap, lift, move—the speed and cleanliness of the work improve dramatically.
Tips from the field
- Always score paint and caulk before prying.
- Start near corners or seams, then “walk” the tool along the trim.
- Pry over studs when possible; you’ll feel solid resistance.
- Use a rubber or dead-blow mallet for controlled tapping.
- For delicate finishes, add a strip of painter’s tape on the wall above the foot as extra insurance.
- Wear eye protection, especially when working around tack strip or brittle trim.
Who will benefit
If you remove trim, even occasionally, this tool pays for itself in saved patching and repainting. DIYers will appreciate the cleaner results and shorter learning curve compared to juggling a putty knife and crowbar. Pros and remodelers will like the speed, the reduced callbacks for wall repairs, and the durability to withstand repeated whacking. It’s also a smart addition for flooring installers who routinely deal with baseboards, transitions, and shoe molding.
Final take and recommendation
The Goldblatt trim puller does exactly what it sets out to do: it speeds up trim removal while minimizing collateral damage. The wide, flat foot and 15-degree wedge are thoughtfully executed, the spring action smooths out the workflow, and the handle keeps long sessions comfortable. It’s stout enough to invite confident hammer taps and controlled prying, and it holds up to abuse better than a lot of general-purpose pry bars.
Its main limitation—the thicker foot—only shows up at the very start of a stubborn run; once seeded, it outperforms traditional bars by a wide margin. If you respect its intended use (separation and prying, not chiseling), it’s a reliable, efficient, and surface-friendly tool.
I recommend this trim puller. It’s a practical upgrade that turns a tedious, damage-prone task into a faster, cleaner process, whether you’re tackling a single room or rolling through an entire remodel.
Project Ideas
Business
Trim Salvage & Resell Service
Offer precision salvage of trim, baseboards, and moldings from remodels using the Trim Puller to preserve profiles. Clean, refurbish, and list pieces on marketplaces (Etsy, Facebook Marketplace, ReStores) or supply to contractors doing period restorations. Pricing: per linear foot (salvage fee) + resale markup. Market to heritage contractors, DIYers, and set up a pickup/disposal add-on for convenience.
Precision Demo for High-End Remodelers
Position a demo crew that focuses on careful removal of cabinets, countertops, baseboards and tile to avoid unnecessary wall damage. Use the tool’s ergonomic handle and spring-wedge for faster, gentler extraction. Sell as a premium demo option to remodelers who want to protect surfaces, reclaim materials, and save time on repairs. Charge per hour or per linear foot and offer a damage-guarantee to build trust.
Tile Recovery & Reuse Service (Green Remodeling)
Specialize in removing intact tile for clients aiming to reuse or recycle materials. Salvaged tile can be sold to landscapers, artists, or secondhand building centers, or converted into products like mosaic art or stepping stones. Promote sustainability and partner with eco-friendly builders. Revenue streams: removal fee, resale of tile, and finished-product sales.
Mobile Trim Repair & Reinstallation Package
Offer a mobile service that removes damaged trim, repairs or replaces only the necessary sections, and reinstalls trim to save homeowners money versus full replacement. Use the Trim Puller to extract trim cleanly, then perform on-site repairs (nail replacement, filler, paint match) and reattach. Sell bundled packages to realtors and stagers who need quick turnarounds for listings—charge per job with optional rush fees.
Creative
Upcycled Picture Frame Sets
Use the Trim Puller to carefully remove intact baseboards and molding with minimal damage, then cut and miter joints to build rustic or period-accurate picture frames. The wide contact area and 15° wedge help preserve the trim profile so you can keep original detailing. Steps: salvage long runs, de-nail/clean, cut to size, glue and clamp, sand, stain/paint, and add hanging hardware. Sell as sets or make custom frames for local photographers and galleries.
Slim Floating Shelves from Reclaimed Baseboard
Turn straight lengths of removed baseboard into narrow floating shelves for entryways, bathrooms, or kitchens. The tool’s spring-assisted separation preserves straight edges so you get long, usable boards. Process: pry, remove fasteners, plane/trim to depth, rout a channel for mounting hardware, finish with varnish. These are quick builds for craft fairs or Etsy listings with low material cost.
Tile Mosaic Stepping Stones
Use the Trim Puller to lift ceramic tiles intact from demo sites for mosaic projects. Because the tool minimizes tile and substrate damage, you recover whole tiles for creative reuse. Lay salvaged tiles into concrete forms to make custom garden stepping stones or tabletop tiles. Offer themed mosaics (geometric, floral, names) as gifts or garden décor.
Wainscoting & Accent-Wall Panels
Salvage lengthwise molding and trim to create wainscoting panels or decorative wall borders. The Trim Puller’s flat, wide contact area reduces wall damage so you can remove and later reinstall pieces or repurpose them into panel frames. Combine with painted beadboard or reclaimed boards for high-contrast accent walls in cafes, boutiques, or home interiors.