Features
- Two-in-one belt and disc sanding station
- Beveling tabletop adjustable from 45° to 90°
- Belt angle adjustable from 0° to 90°
- Tension spring adjustment for secure belt tracking
- Dust port accepts a 2.5-inch vacuum hose
- Includes miter gauge for sanding miter angles
- Safety switch for quick shut-offs
- Base with pre-drilled holes for bench mounting
Specifications
| Weight | 28 lbs |
| Amperage | 4.3 A |
| Belt Size | 4 x 36 in. |
| Sanding Disc Diameter | 6 in. |
| Beveling Table Range | 45 - 90 degrees |
| Belt Angle Range | 0 - 90 degrees |
| Cord Length | 6 ft. |
| Dust Port Diameter | 2.5 in. |
| Mounting | Base with pre-drilled holes |
| Pad Size (Mm) | 101.6 x 914.4 |
| Tool Length (In) | 6 |
| Tool Width (In) | 4 |
| Included | 6-inch abrasive disc; 4 x 36 inch abrasive belt; miter gauge; adjustment wrenches; belt/disc sander (1) |
Related Tools


Related Articles

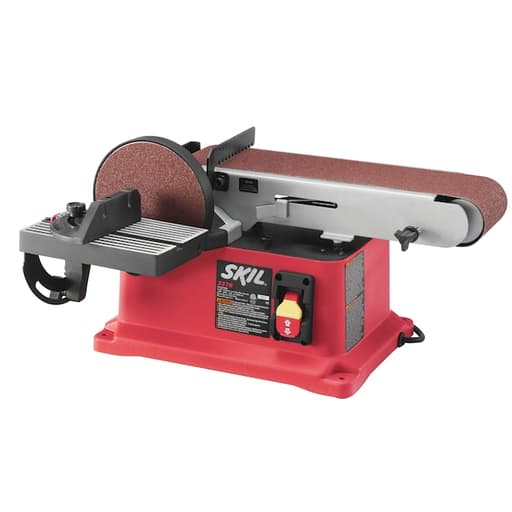
A benchtop sanding station combining a 6-inch disc and a 4 x 36-inch belt. The disc is intended for edge and detail work while the belt is for flattening surfaces, contouring, and smoothing curves. The table and belt angle are adjustable to allow sanding at various angles up to 90 degrees. Belt tracking is maintained by a tension spring. The base has pre-drilled mounting holes and a dust port compatible with a 2.5-inch vacuum hose.
Skil 4 IN. x 36 IN. Belt/Disc Sander Review
A compact sanding station that earns its space
I didn’t realize how often I reach for a stationary sander until this little benchtop workhorse took up residence on my bench. The Skil belt/disc sander combines a 4 x 36-inch belt and a 6-inch disc in a compact, 28-pound package that’s easy to move when needed but stable enough for real work once it’s bolted down. After several weeks of shaping small furniture parts, trimming miters, and cleaning up end grain, I have a good sense of where it shines, where it struggles, and who will get the most out of it.
Setup and build
Out of the box, assembly is straightforward. The machine arrives largely preassembled, with the belt and disc installed and an assortment of wrenches and a miter gauge included. I appreciated the pre-drilled mounting holes in the base; fixed mounting is worth the few minutes it takes because it noticeably reduces vibration and frees both hands for control. The 6-foot cord is adequate for most benches without hunting for an extension.
Fit and finish are what I expect in this price class. Cast and stamped parts are cleanly formed, fasteners line up, and nothing felt flimsy. The belt platen arrived flat on my unit, which matters if you rely on the belt for squaring edges. The safety switch is easy to find and positively clicks off—peace of mind during awkward sanding operations.
Power and performance
With a 4.3-amp motor, this sander isn’t a hogger, and it doesn’t pretend to be. It’s happiest doing exactly what a 4 x 36 combo should do: quick stock refinement, smoothing saw marks, fairing curves, and dialing in joinery to a line. On hardwoods like maple and walnut, it maintains speed when I use a light, controlled touch. Lean into it and you can stall the belt or glaze an abrasive; let the abrasive do the work and it runs smooth and consistent.
The disc and belt complement each other nicely. I use the disc for tight control—sneaking up on a 45-degree miter or truing end grain. The 6-inch size is compact, but it’s large enough for picture frame parts, small box components, and jig-making. The belt is my go-to for edges, convex curves, and cleaning up bandsawn profiles. Being able to rotate the belt from horizontal to vertical quickly opens up a lot of ergonomic options, from flattening small panels to standing pieces on end for controlled end-grain sanding.
Belt tracking and abrasive changes
Belt tracking is handled by a tension spring and an adjustment knob. Once I dialed it in on a new belt, it held alignment through repeated starts and stops, even when I rotated the belt assembly for vertical sanding. Swapping belts is uncomplicated, though not completely tool-free. The included wrenches make it painless; plan on a minute or two to loosen, release tension, slip off the belt, and reset tracking for the new grit.
Practical tip: keep a small assortment of belts on hand—80 grit for quick stock removal, 120–150 for smoothing, and 220 for delicate curves. On the disc, I reserve a finer grit for end grain and miters; the smaller surface area heats up faster, so a light touch prevents burning.
Tables, angles, and miter work
The tabletop on the disc side adjusts for bevels and locks down firmly. The angle scale is fine for a ballpark setting, but for precise work I square the table with a reliable engineer’s square and use a bevel gauge when setting common angles. Once locked, the table stayed put during sanding, which is more important than the marking accuracy. The belt housing also tilts, so you can go from a horizontal work surface to a vertical belt for edge work. Between the two angle adjustments, the machine covers most common sanding setups.
The included miter gauge is a welcome addition, but like most bundled gauges, the bar is a loose fit in the slot. It’s serviceable for rough angle sanding; if you need dead-on miters for show surfaces, upgrade the gauge or add a strip of tape to tighten the fit. I got good results truing 45s on small frames by pairing the disc with a shop-made auxiliary fence.
Dust collection and cleanup
A 2.5-inch dust port makes it easy to connect a shop vac. With suction applied, dust capture at the disc is reasonably effective; the visible plume is greatly reduced and cleanup is quicker. The belt side produces more stray fines, especially on heavy passes or when sanding close to the edges, which is common for open-belt designs in this class. I still recommend a vac hookup along with a mask—sanding dust adds up fast, and collection helps keep the abrasive cutting longer.
Maintenance is minimal: vacuum out the housing occasionally, wipe the platen clean, and avoid letting pitch build up on the belts and discs. If tracking starts to wander, a quarter-turn on the adjustment knob usually brings it back in line.
Ergonomics, noise, and vibration
Noise is what you’d expect for a small benchtop sander—louder than a random orbit sander, quieter than a lunchbox planer. I use hearing and eye protection. With the base bolted down, vibration is controlled, and the machine runs noticeably smoother than when it’s just sitting on the bench. Controls are within easy reach. The safety switch is particularly useful for quick shutoffs when I feel a piece start to chatter.
Heat buildup is something to watch on the disc with hard woods and fine grits. Pausing between passes or rotating the workpiece helps prevent glazing and burning.
Limitations and quirks
- Not a heavy stock remover. If you need to hog off millimeters of material across wide surfaces, this isn’t the tool; step up to a larger belt sander or a more powerful combo.
- The 6-inch disc is compact. For larger parts, you’ll run out of real estate quickly. For small components and finesse work, it’s ideal.
- Angle scales are reference-only. Expect to verify with a square or bevel gauge.
- The miter gauge is basic. It works, but anyone doing precision angle work will want to upgrade.
- Dust collection on the belt is adequate, not perfect. A vac helps a lot, but some fines escape.
None of these were deal-breakers for me, and most are shared across similarly sized combination sanders.
Where it excels
This sander earns its keep in small-shop workflows and project finishing. I used it to:
- Fine-tune miters on frames and trim pieces
- Smooth and square end grain on small components
- Fair curved profiles after bandsawing
- Knock down saw marks and sneak up on a fit for joinery
- Ease edges and clean up router burn marks
In each case, the machine provided controlled material removal with predictable results, as long as I respected its power and used sharp abrasives.
Tips for best results
- Mount it. Bolting the base to a bench or a board you can clamp down makes a noticeable difference.
- Set the table square with a reliable reference before critical sanding.
- Use fresh abrasives. It’s the easiest way to improve cut quality and reduce heat.
- Let the machine do the work. Light pressure yields cleaner, faster results and protects the motor.
- Keep a small brush or crepe block handy to de-gunk belts and extend their life.
The bottom line
The Skil belt/disc sander is a practical, no-nonsense addition to a small shop. It’s compact, reasonably quiet for its class, and flexible enough to handle a wide range of sanding tasks from shaping to precision touch-ups. The 4.3-amp motor offers sufficient power for careful work on hardwoods, the belt tracking is stable once set, and the ability to tilt both the table and belt makes it adaptable. Its shortcomings—basic miter gauge, reference-only scales, and middling dust capture on the belt—are expected at this size and price, and they’re easy to work around with shop-made aids and good technique.
Recommendation: I recommend this sander to hobbyists, DIYers, and small professional shops that need a reliable, compact sanding station for everyday tasks. It’s a strong value if you prioritize control and versatility over raw removal rate. If your work routinely involves large panels, aggressive stock removal, or production-level throughput, you’ll outgrow it and should look toward heavier, more powerful machines. For the rest of us, this is a well-balanced tool that punches above its size and earns its footprint on the bench.
Project Ideas
Business
Custom Edge-Profile Service for Cutting Boards
Offer local makers and hobbyists edge-sanding, chamfering, and rounding services for their cutting boards and serving trays. Use the disc for perfect square ends and the belt for ergonomic curves and uniform bevels at 45°. Provide menu pricing per inch of edge, with add-ons like handle shaping and finish sanding. The dust port enables a cleaner, client-facing workspace.
Small-Part Deburr and Flush-Sanding for Wood Shops
Partner with CNC/router and laser shops to handle post-processing: flushing tabs, easing edges, and truing faces on small parts. Use the miter gauge for exact 90° and 45° edge cleanups and the belt for consistent rounding. Offer quick turnaround and standardized grit progression so parts arrive assembly-ready.
Batch Home Decor Production
Produce geometric coasters, trivets, and beveled picture frames at scale. Cut blanks, then sand precise miters on the disc with the included miter gauge and add decorative 45° chamfers on the belt. Sell curated sets with mixed woods and finishes on Etsy and at markets. Jigs mounted to the base allow consistent replication.
Knife Scale/Handle Blank Supplier
Source hardwood offcuts, resaw, and process into flattened, thicknessed handle blanks. Square ends on the disc and deliver sets with consistent dimensions and progressive sanding (e.g., 120/180/220). Market to knife makers and craft retailers seeking ready-to-fit scales, with optional shaping to customer templates.
Picture Frame Miter Tune-Up
Offer a service to refine and square picture frame miters that come off a saw slightly out of true. Use the disc with the miter gauge to micro-correct angles and ensure tight, gap-free corners. Provide bundle pricing for frame kits, plus optional bevel accents and pre-finish sanding for a ready-to-glue package.
Creative
Geometric Wall Shelves
Create hexagon or triangle wall shelves with perfectly fitting miters using the 6-inch disc and included miter gauge set to 30°, 45°, or 60°. Use the belt in horizontal mode to flush and flatten shelf faces and vertical mode to refine inside corners. Add subtle chamfers by tilting the table to 45° for a crisp, modern look. The dust port keeps cleanup easy when batch-making multiple units in different sizes.
Curved Cutting Boards + Coaster Set
Laminate contrasting hardwoods into blanks, then sculpt fluid curves on the 4 x 36-inch belt for ergonomic handles and rounded corners. Square the ends cleanly on the disc, and tilt the belt to 10–15° to create a comfort chamfer all around. Repeat the same profiles for matching coasters. Finish sanding through grits for a gift-ready kitchen set.
Laminated Toy Cars and Trucks
Glue up multi-layer bodies, then shape fenders and rooflines on the belt in vertical mode for controlled contouring. Use the disc to true wheel faces and sand axle blocks with the miter gauge for consistent, square alignment. Soften all edges with a light 45° bevel on the table for kid-safe toys. Paint or oil to complete a playful, durable collection.
Intarsia Animal Plaque
Cut animal silhouette pieces on a scroll saw, then refine each piece’s edges and subtle bevels using the adjustable disc table at varying angles. Use the belt to fair longer curves and blend transitions. The precise angles help each piece nest tightly for a crisp intarsia mosaic. Mount to a backer and finish with oil for depth and contrast.
Knife Scales and Tool Handles
Flatten rough scale blanks on the belt, square ends on the disc, and taper thickness consistently by adjusting the belt table a few degrees. Shape finger grooves and palm swells with controlled passes in vertical belt mode. Repeatable sanding jigs attached to the pre-drilled base allow batch production with uniform dimensions.