Features
- Designed for use before staining new, soft and porous wood surfaces, such as aspen, cherry, birch, poplar or pine with an oil-based stain
- It penetrates the grain of the wood to promote uniform acceptance of oil-based wood stain
- Reduces streaking and blotching to help ensure beautiful, even coverage
- Apply to raw wood using a clean cloth, a foam brush or paint pad applicator
- Clean up with mineral spirits
Specifications
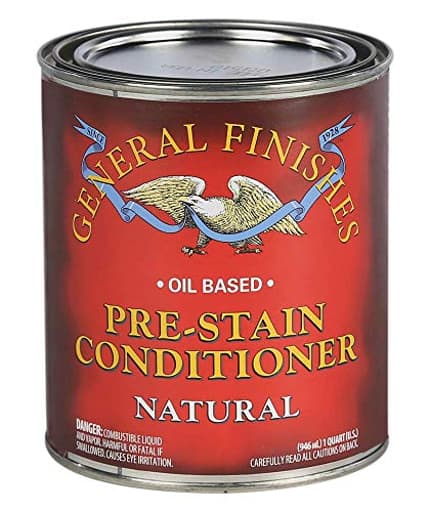
| Color | Natural |
| Size | 1 Quart |
| Unit Count | 1 |
Oil-based pre-stain wood conditioner for use on new, soft, porous woods such as aspen, cherry, birch, poplar, and pine before applying an oil-based stain. It penetrates the grain to promote uniform stain acceptance and reduces streaking and blotching for more even coverage. Apply to raw wood with a clean cloth, foam brush, or paint pad and clean up with mineral spirits.
General Finishes Oil Based Pre-Stain Wood Conditioner, 1 Quart Review
Why I reached for this pre-stain
The fastest way to ruin a stain job on pine or birch is blotching. After too many patchy results over the years, I started working a pre-conditioner into my finishing process. The General Finishes pre-stain has become my go-to when I’m staining soft and porous woods and want predictable, repeatable color. It’s an oil-based conditioner designed to soak into raw wood and even out stain absorption. In practice, it does exactly that—so long as you use it where it shines and follow the timing on the can.
What it is—and isn’t
This is not a finish; it’s a preparatory step. The product is thin, almost like a light oil, and it’s meant to penetrate the grain and partially fill thirsty fibers so your stain doesn’t flood the soft springwood while starving the hard latewood. You’ll still see grain and character; you just won’t get the wild, cloudy blotches that softwoods and certain hardwoods are notorious for. It pairs best with oil-based stains, gel stains in particular. If you’re working with water-based stains, choose a compatible water-based conditioner instead.
Color-wise, it’s “natural,” meaning it doesn’t add visible tint. It does, however, slightly lighten your final stain color compared with an unconditioned surface. That’s the trade-off for uniformity, and it’s one you can easily manage by doing a sample board and, if needed, adding another coat of stain.
My test beds: pine, poplar, birch, cherry—and a maple curveball
I’ve used this on a handful of recent projects:
- Clear pine shelving and face frames
- Poplar cabinet doors
- A birch butcher block top
- Cherry drawer fronts
On all four, I finished with oil-based stains, including a gel stain and a wiping stain, then topcoated with an oil-based polyurethane. Across those projects, the pre-stain consistently tamed blotching, especially on pine, birch, and poplar. Cherry benefited too, though cherry’s natural figure still shows (as it should), just without the uncontrolled cloudiness.
On hard maple, results were mixed. Maple isn’t the intended target for a product like this; it’s dense, less absorbent, and splotches differently. In my tests, the pre-stain didn’t improve uniformity and, in a couple of spots, seemed to exaggerate unevenness. On maple, I have much better luck with a light shellac washcoat or a dye stain approach. If maple is your primary species, I wouldn’t buy this expecting a miracle.
Application and workflow
The application is simple and forgiving:
- Surface prep: I sand softwoods to 180–220 grit. Over-sanding to a glossy surface can reduce absorption and make color inconsistent, so don’t burnish.
- Application: I like a foam brush for flat panels and a cotton rag for edges and profiles. Flood it on to get a uniformly wet surface, then keep moving to avoid dry spots.
- Dwell and wipe: Let it soak in per the can’s guidance, then wipe off the excess. I had the best consistency when I stained within the recommended window. Waiting overnight reduced the effect.
- Two-coat trick: On really blotch-prone boards (knotty pine, certain birch cuts), a second light coat evened things further. Just remember the more you seal, the lighter your stain goes; plan your color accordingly.
End grain needs extra attention. I typically give it a second pass after the first has soaked in to avoid the “black end grain” effect. The conditioner helps a lot here; you’ll still need to wipe thoroughly to prevent shiny, oil-rich patches that resist stain.
One nice side effect of this being oil-based: it doesn’t raise the grain. You won’t have to do an extra de-nib sand like you would with water-based conditioners.
Pairing with stains and topcoats
This product plays best with oil-based stains. Gel stains, which already deliver good control on blotchy woods, become even more consistent. I’ve also had no issues applying oil-based polyurethane over the stained surface after proper dry time. If you’re planning to put a water-based topcoat over an oil-stained surface, give the stain adequate time to cure and test adhesion—standard best practice, not a quirk of this conditioner.
If you run multiple coats of conditioner or wipe it too lightly, you can over-seal the surface and make it tougher for the stain to bite. The fix is simple: lighten up your conditioner coat and adjust your staining schedule. This is where sample boards save time.
Coverage, handling, and cleanup
The quart size is sensible for furniture-scale work. It goes a long way on most boards and gets used up quickly on end grain and very thirsty softwoods. Because it’s thin, it spreads easily and self-levels well, but that also means drips—protect adjacent surfaces and the floor.
It’s oil-based, so expect solvent odor. Ventilation is important. Cleanup is with mineral spirits, and you should dispose of oily rags safely. I lay them flat on a nonflammable surface to dry fully before disposal to avoid spontaneous combustion—a risk with all oil-soaked rags.
What I like
- Predictable results on softwoods and blotch-prone hardwoods like birch, poplar, and cherry
- Easy, fast application with rag or foam brush
- Doesn’t raise the grain
- Plays nicely with oil-based and gel stains for an even, professional look
- Helps tame end-grain absorption without resorting to glue sizing
Where it falls short
- Not particularly helpful on dense hardwoods like hard maple; other methods work better there
- Can lighten stain color; you’ll often need an extra pass of stain to match a target shade
- Oil-based odor and mineral spirits cleanup may be a downside for some shops
Tips for best results
- Always do a sample with your exact wood, conditioner timing, stain, and topcoat.
- Don’t over-sand; stop at 180–220 on softwoods.
- Keep the surface uniformly wet during application; avoid letting dry patches soak longer than others.
- Wipe thoroughly and stain within the recommended window; letting it sit too long reduces the effect.
- For highly blotchy boards, try two light coats rather than one heavy one.
- Treat end grain as its own mini-project: extra conditioner, careful wipe, and test before committing.
Who will benefit most
If you regularly stain pine casework, poplar face frames, birch tops, or cherry pieces and you want to move from “pretty good” to “confidently consistent,” this pre-stain belongs in your kit. Hobbyists will appreciate the simplicity and forgiving workflow. Pros will appreciate the repeatability and the way it speeds color matching across mixed species and parts.
If your work leans heavily on maple or you favor water-based stains, look at species-specific methods or a water-based conditioner instead.
Final thoughts and recommendation
Used where it’s intended, the General Finishes pre-stain solves a common finishing problem with minimal effort. It takes the unpredictability out of staining soft and porous woods, yields cleaner color, and doesn’t add steps you don’t already have time for. It isn’t a universal cure-all—maple and other dense hardwoods still call for different tactics—but on pine, birch, poplar, and cherry, it consistently gives me more even, professional-looking results.
I recommend it. The reasons are straightforward: it reliably reduces blotching on the species most prone to it, it’s easy to apply, it doesn’t raise the grain, and it integrates seamlessly into an oil-based staining workflow. Account for the slight lightening effect with a sample board and plan your stain schedule, and you’ll get exactly what you hoped for—uniform color that still showcases the wood.
Project Ideas
Business
Furniture Flip Business
Buy inexpensive pine/poplar pieces, use the pre-stain conditioner to guarantee even stain results, refinish and resell at a markup. Emphasize 'consistent color' and 'professionally finished' in listings to attract buyers.
Stain-Consistency DIY Kits
Assemble and sell kits for DIYers that include a quart of pre-stain conditioner, a small sample stain, foam applicators, disposable cloths, and step‑by‑step instructions or a QR code to a how‑to video. Market on Etsy, Shopify, and at craft fairs.
Boutique Home‑Decor Line
Produce small-batch items (frames, shelves, signs) in predictable, repeatable stain colors by using the conditioner in your workflow. Sell to local boutiques, online, or via subscription boxes; advertise consistent finish as a quality differentiator.
Local Cabinet/Trim Refinishing Service
Offer on-site refinishing for poplar/trim and soft-wood cabinetry where blotching is a common problem. Use the pre-stain conditioner to ensure uniform results and position the service to contractors and homeowners renovating interiors.
Hands‑On Staining Workshops & Content
Host workshops teaching stain techniques that highlight pre-stain conditioning. Create short social media demos (before/after, time‑lapse) to build an audience, then sell product bundles and private lessons to attendees.
Creative
Even-Stain Rustic Picture Frames
Build simple picture frames from pine or poplar and use the oil‑based pre-stain conditioner to avoid blotchy patches. Apply with a clean cloth or foam brush, wipe excess, then top with an oil stain and clear coat for a consistent, gallery-quality finish.
Custom Floating Shelves
Make floating shelves from knotty pine or poplar; the conditioner will penetrate the grain and prevent streaking so the stain reads uniform across boards and knots. Perfect for a matched set where consistency matters.
Two‑Tone Accent Wall Panels
Create tongue‑and‑groove or shiplap panels and precondition the raw wood before staining to ensure even color across a large surface. Use alternating stain intensities for a subtle two‑tone effect without blotchy transitions.
Upcycled Nightstand or Side Table
Refinish a vintage pine nightstand by stripping, applying pre-stain conditioner to prevent blotches on soft wood, then staining and sealing. The conditioner helps achieve a professional, resale-ready look on upcycled furniture.