Features
- ▼ 100-Pack. ▼ Black stainless steel screws (Hardness class #12.9 + Dacromet black coating) are included. Saving time and money. ▼ Made of anti-UV engineering Nylon plastic. No corrosion. ▼ Includes 1 Square Driver Bit: Size 0.09" x 0.09" (2.3mm x 2.3mm); Hex size 1/4".
- ▼ Design PATENTED. ▼ Clean-look and consistent 1/4" deck board spacing. No more predrilling and countersinking. ▼ Decking grooved edges "C" opening must be 0.15" or bigger.
- ▼ Compatible with AZEK, Cali-Bamboo, Deckorators, DuraLife, Envision, EverNew, Fiberon, MoistureShield, Lumberock, TimberTech, Trex, WearDeck, Zuri branded edge-grooved composite, hardwoods, treated lumber, cedar, & vinyl deck boards.
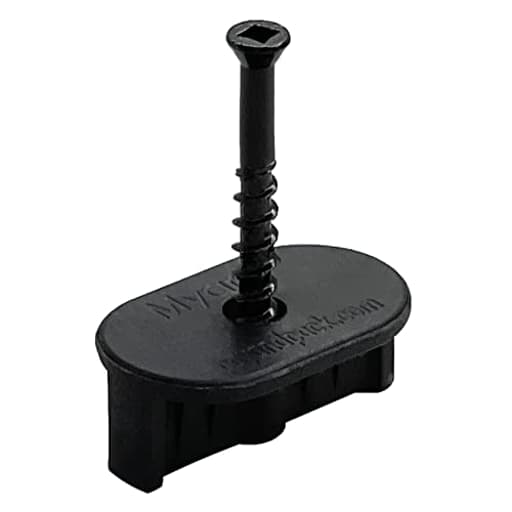
- ▼ INSTALLATION: (1) Insert a Myard hidden fastener clip into the grooved edges of decking over a joist. (2) Drive the screw ONLY halfway (Fully tighten later once all boards are in place). The wings must remain level with the joist for the next board to fit correctly. (3) Continue to add clips on each joist against deck boards.
- ▼ INSTALLATION: (4) Install "next" boards, make sure boards are pressed firmly against the clips and secured under the wings. (5) Do NOT over-tighten the screws. Please set proper driver torquing (2 to 6 drill power). The screw head will be resting on the top of the clip, but not sinking into the clip.
Specifications
| Color | 100 pack |
| Size | Fasteners |
Related Tools
Pack of 100 hidden deck fastener clips for grooved-edge composite, hardwood, treated lumber and vinyl decking that secure boards to joists and maintain a consistent 1/4" gap (requires a groove "C" opening of 0.15" or larger). Clips are molded from UV-resistant nylon and include black Dacromet-coated class 12.9 screws and a 2.3 mm square driver bit; screws should be driven halfway during initial installation and tightened fully after all boards are in place to avoid over‑tightening.
Myard Universal Hidden Deck Fastener Clips for Grooved Edges of Composite Decking Boards to Joists, 1/4" Gap Spacing, with Square Driver Bit Review
Why I picked these clips
I rebuilt a composite deck this season and wanted a clean, fastener-free surface with predictable board spacing. I went with the Myard hidden deck clips because they promise a consistent 1/4-inch gap, include hardened, black-coated screws, and ship with a square driver bit in every 100-pack. I used them across grooved composite boards on treated lumber joists—standard 16-inch on-center framing with a couple of double-joist seams. My goals were simple: neat lines, stable boards, and a process that wouldn’t turn into a fussy, time-consuming dance.
What stands out
- Consistent 1/4-inch spacing: The clips do a solid job of holding a uniform gap. If you like the look and drainage of a quarter-inch, these make it brain-dead easy.
- Simple installation cadence: Insert clip at each joist, start the screw only halfway, drop the next board, then final-tighten once a few rows are set.
- Forgiving plastic body: The UV-resistant nylon has a little flex that helps when your joists aren’t perfect.
There’s nuance, though, and it’s mostly about torque control. The clips rely on the screw head seating on the top of the nylon body. If you over-drive, you can deform the clip or, in worst cases, punch the screw head into the plastic. If you under-drive, the board can feel a touch loose. Get the torque right and the system works well.
Installation experience
The learning curve is short. I pre-staged a handful of clips along the joists to speed things up, then followed Myard’s instructions:
1) Set a clip into the groove over each joist and start the screw only halfway so the “wings” sit level with the joist.
2) Slide the next board tight against the wings, making sure both grooves fully capture the clips.
3) Repeat across the run, then come back to final-tighten the screws only until the head rests on top of the clip—no sinking.
A variable-speed impact driver on a low setting worked better for me than a drill/driver with a clutch. Joist density varies, and an impact makes it easier to “kiss” the head to the clip without overshooting. I did a quick test pass on scrap to dial in feel before committing. If you only have a drill/driver, go slow and stop as soon as the head seats.
Pro tip: Check that every clip sits flush with the joist before setting the next board. If a clip is tilted or riding high, you’ll fight the next board into place and risk misalignment.
Grip and feel underfoot
Once tightened correctly, the boards lock down without squeaks or perceptible play. I checked a few spots with a pry bar and was impressed by how securely the groove locks into the wings. The 1/4-inch gap provides good drainage and airflow; if you’ve ever dealt with leaf-litter slime between closely spaced boards, you’ll appreciate the extra clearance.
One caveat: these clips don’t correct for framing issues. If your joists are crowned or out of plane, the gentle flex in the nylon helps a bit, but you’ll still want to plane, shim, or sister joists to get the surface right before you start.
Materials and durability
The clip bodies are molded from UV-resistant nylon. Because they’re hidden, direct sun exposure is minimal, but edges do see light and heat. After install and a few hot days, I saw no creep or deformation. The wings didn’t take a permanent set when loaded properly.
The screws are hardened (class 12.9) with a black Dacromet-type coating. That coating is a good match for pressure-treated lumber and general outdoor use. For harsh coastal environments, I’d still lean stainless fasteners for the rest of the build; just know you’d be trading the included screws for a compatible head and thread, and you’d need to be very careful not to split the nylon with a different screw profile. For most inland installs, the stock screws make sense: strong, nicely coated, and a clean black look where you can see them at the edges.
Compatibility and fit
These are meant for grooved boards with a “C” opening of 0.15 inch or larger. In practice, that’s many composite brands and some grooved hardwood or PVC lines. I used them with two different composite profiles without modification. If your boards have shallow or unusual grooves, measure first.
The spacing is fixed at 1/4 inch. That’s ideal for drainage and thermal movement, but not every board manufacturer calls for a quarter-inch. If your brand specifies 3/16 inch or a variable gap by temperature, you’re locked into 1/4 with these.
Driver bit and ergonomics
Each 100-pack includes a 2.3 mm square bit. It fits well and reduces cam-out compared to Phillips. My nitpick: it’s not a size I can reliably replace at any hardware store on a Sunday afternoon. If you lose the bit, finding a perfect match may take an online order. I recommend buying a spare or two when you purchase the clips, or keeping a magnetic parts tray nearby so the included bit doesn’t walk away.
Because the screw head sits on the clip rather than countersinking into it, feedback through the driver is distinct. You’ll feel the head stop as soon as it meets the clip. Stop right there. If you don’t, you risk chewing into the nylon.
Speed and workflow
Compared with face-screwing and plugging, these clips are faster and produce a cleaner surface. Compared with some proprietary cam or wedge systems, they’re a touch slower because you need to mind torque and occasionally “massage” a board into the groove. Once you find a rhythm—clip, start, place, move—production speed is good. I averaged a few seconds per clip once set up.
Value
Price-wise, I’d call them mid-pack. You’re paying for convenience (included screws and bit) and a patent-backed design that works. There are cheaper options with thinner clips and softer screws; there are more expensive brand-specific systems that restrict you to a single board line. Myard lands in a practical sweet spot: broadly compatible, tidy spacing, and strong enough hardware to trust.
That said, budget accordingly. A decent-sized deck consumes clips quickly, and adding an extra box mid-project is common. I’d buy at least 10–15% more than your joist count math suggests to cover offcuts, mistakes, and layout changes.
Where they fall short
- Over-tightening is the enemy. If you’re heavy on the trigger, you can deform clips or push the screw head into the plastic.
- The 1/4-inch gap is non-negotiable. If your board spec calls for different spacing, these aren’t the right tool.
- The square bit size is uncommon. Lose it and you might be stuck until a replacement arrives.
None of these are deal-breakers, but they are real considerations that can slow or sour an install if ignored.
Tips for best results
- Use a variable-speed impact driver on a low setting and practice on a spare joist.
- Keep clips flush to the joist; tap them level before placing the next board.
- Final-tighten only after several rows are in; it ensures consistent spacing and makes tweaks easier.
- For starter and end boards, plan on face-fixing with color-matched screws or using a compatible starter clip system.
- Verify your board’s groove size (0.15 inch or larger) and manufacturer spacing guidance before committing.
Recommendation
I recommend the Myard hidden deck clips to DIYers and pros who want a clean, consistent 1/4-inch spacing on grooved composite or PVC boards without being locked into a brand-specific system. They’re easy to learn, hold boards securely when properly tightened, and include durable, coated screws that balance strength and corrosion resistance for most environments. Be honest about your driving habits—if you tend to over-torque, slow down and practice—or choose a metal-clip system if you want something more tolerant of heavy-handed installation. For the majority of deck builds on standard framing, these clips are a reliable, tidy, and cost-sensible choice.
Project Ideas
Business
Weekend Deck Retrofit Service
Offer a targeted service replacing visible fasteners with hidden clips for homeowners who want a quick aesthetic upgrade. Market as a half-day or weekend job using pre-packed 100-packs and the included driver bit; emphasize faster installs, consistent gaps, and no predrilling saves time and labor.
Precut DIY Decking Kits
Sell turnkey DIY kits online that include precut composite boards, the correct quantity of hidden clip packs, screws, and the square driver bit, plus step-by-step instructions and torque settings. Price by square footage and include a short video tutorial to reduce installation errors and returns.
Hardware Store Demo & Workshop Program
Set up a branded demo station inside local hardware stores using a sample board and live installs to show the halfway-screw method and final tightening. Host paid weekend workshops teaching homeowners to install with hidden clips and sell starter packs and extras on-site.
Content + Affiliate Sales Funnel
Produce how-to videos, short social clips, and downloadable checklists that demonstrate tips (e.g., insert clip wings level, set drill torque 2–6) and common mistakes to avoid. Drive viewers to buy your affiliate-linked 100-packs or your own branded kits; use before/after photos to boost conversions.
Contractor Supply & Training Package
Create a B2B offering selling bulk packs, replacement screws, and driver bits to local contractors, paired with a short on-site training module and a troubleshooting guide. Include best practices (screw halfway, do not over-tighten, compatible board C-opening spec) and offer volume discounts and fastener-branded certification to build loyalty.
Creative
Seamless Balcony or Rooftop Deck
Build a low-profile balcony or rooftop deck using grooved composite boards and the hidden clips to achieve a clean, fastener-free surface. The clips create a consistent 1/4" gap for drainage and expansion; use the included square driver bit and the halfway-screw technique to line up all boards before final tightening for a professional finish.
Modular Deck Tiles
Make removable, interlocking deck tiles by fastening short lengths of grooved decking to small plywood or joist frames with the clips. Tiles can be lifted for cleaning or reconfiguration, and the concealed fasteners keep the surface smooth for balconies, patios, or event flooring.
Outdoor Furniture with Clean Edges
Craft benches, planter benches, coffee tables or bar counters using decking boards on a steel or timber frame and attach them with the hidden clips so the furniture has uninterrupted board faces and consistent gaps. The anti-UV nylon clips prevent rust staining and keep outdoor furniture looking custom and high-end.
Slatted Raised Beds & Privacy Screens
Use the clips to create slatted sides or decking-floor bottoms for raised garden beds and vertical privacy screens. The 1/4" spacing provides drainage and airflow for plant health, and the concealed fasteners protect plants and tools from snagging on screw heads.