Features
- Easy‑squeeze trigger to reduce actuation force
- Anti‑jam magazine to help prevent jams and misfires
- Die‑cast aluminum housing to reduce weight
- Bottom‑loading steel magazine for faster reloading
- Steel handle with over‑molded/molded grip for comfort
- Accepts both heavy‑duty staples and 18‑gauge brad nails
Specifications
| Belt Clip | Yes |
| Body Material | Steel (magazine) / die‑cast aluminum housing (product overview) |
| Consumable | Staple / 18‑gauge brad |
| Consumable Leg Length (In) | 1/4 – 9/16 and 1/2 – 5/8 |
| Consumable Type | G‑Type (Heavy Duty) / Brad nail |
| Fastener Reload Indicator | Yes |
| Product Type | Manual staple gun (stapling/brad nailing) |
| Grip Material | Plastic / over‑molded grip |
| Handle Material | Plastic / steel handle with molded grip |
| Is It A Set? | No |
| Loading Mechanism | Bottom loading |
| Number Of Pieces | 1 |
| Packaging | Blister |
| Product Dimensions With Packaging (Mm) | 275 x 190 x 50 |
| Product Height (Mm) | 50 |
| Product Length (Mm) | 275 |
| Product Width (Mm) | 190 |
| Product Weight (G) | 800 |
| Product Weight (Kg) | 0.8 |
| Wire Gauge | 18 Gauge |
| Maximum Staple Leg / Crown | Staple lengths up to 9/16 in; crown ~27/64 in (0.421 in); maximum staple size listed as 0.5625 in |
| Compatible Fasteners / Notes | Use DEWALT DWHTTA700 series heavy duty staples, Arrow T‑50 heavy duty staples, Stanley TRA700 series heavy‑duty staples; accepts 18‑gauge brads (1/2 in and 5/8 in) |
| Warranty | 1 Year Limited Warranty |
| Returnable (Retailer) | 90‑Day (where specified) |
Related Tools
Related Articles

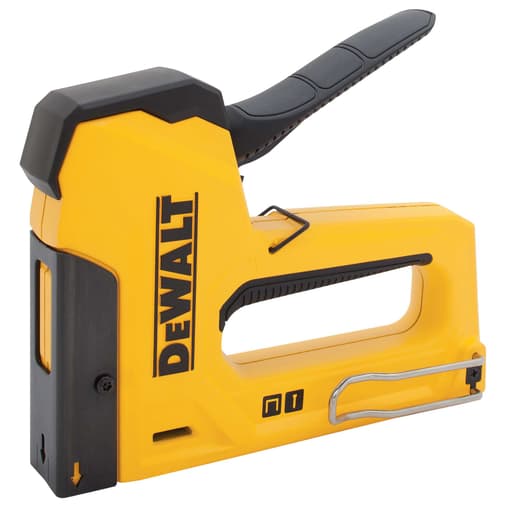
Manual staple and brad tacker intended for fastening tasks such as insulation, ceiling tile, carpet padding and trim. It uses a bottom-loading magazine and includes an anti‑jam mechanism. The housing is die‑cast aluminum for reduced weight and the handle has a molded grip for user comfort. Compatible with heavy‑duty T‑50 style staples and 18‑gauge brad nails.
DeWalt Heavy Duty Staple and Brad Tacker Review
Why I reached for this stapler
I first picked up the DeWalt tacker for a mix of small jobs: tacking insulation in a crawlspace, hanging landscape fabric along a raised bed, and fastening carpet padding on a set of stairs. I wanted something manual (no cords or compressor), built well enough to live in my tool bag, and versatile enough to throw a few light-duty brads when needed. After several weeks of use, it’s become my default hand stapler, with a few caveats you should know before you buy.
Build and ergonomics
The tool feels solid out of the box. The die-cast aluminum body keeps weight down while a steel magazine takes the wear. It’s not featherlight at around 0.8 kg, but the balance is right, so it never felt cumbersome, even during overhead work. The handle has a molded over-grip that’s comfortable and, more importantly, doesn’t get slippery as your hands warm up.
The squeeze action is smoother and lighter than most budget guns I’ve used. There’s still a noticeable “break” at the point of firing—normal for a manual stapler—but the travel is controlled, and the effort required is definitely lower than the typical bargain-bin options. If you have smaller hands or some hand fatigue, that easier actuation is a meaningful difference. There’s also a simple handle lock for storage and a belt clip. Both are basic but useful.
Loading and fastener compatibility
This tacker takes common heavy-duty T-50 style staples, which you can find almost anywhere, and 18-gauge brad nails in 1/2 in or 5/8 in lengths. The bottom-loading steel magazine is straightforward: slide the follower, drop in a strip, click it shut. It also has a reload window on the magazine so you can see at a glance when you’re running low. That little window saved me a few misfires I normally accept as “the way it goes” with manual staplers.
A tip on staples: choose the right leg length for your material. As a loose rule, aim for a leg that penetrates your workpiece by 3/16 to 1/4 inch after going through the top material. For thin fabrics or house wrap, 1/4 in typically works. For carpet pad or insulation facing into softwood, 3/8 in is my go-to. When fastening lath, thin trim, or thicker fabrics to pine, 1/2 in can make sense, but it becomes easier to leave a crown proud if you don’t press the nose firmly.
Performance on common jobs
- Insulation and house wrap: With 3/8 in staples into pine studs, I got full seating as long as I planted the nose and kept the gun square. The lighter squeeze helped reduce fatigue working overhead.
- Carpet padding: Clean, consistent staples into stair treads with 3/8 in staples. No jams, and the nose profile made it easy to get close to edges.
- Landscape fabric and privacy screen: Into fence pickets and treated 2x material, 1/4 in and 3/8 in staples seated fully when I applied firm nose pressure. On knotty sections or end grain, a few staples sat proud; a quick tap with a hammer set them flush.
- Light trim and tags: Switching to 1/2 in brads, I could pin thin trim, back panels, and labels. It’s not a finish nailer and won’t countersink in hardwood, but for non-structural pinning where you can live with a head just at or slightly above the surface, it’s handy.
On softwoods like pine and fir, the stapler has enough power to fully seat staples reliably, provided you pick an appropriate leg length and keep the nose pressed flat. In MDF and hardwoods, performance varies: it will set shorter staples in MDF okay, but if you try to drive long staples into dense stock, expect some to sit a touch proud. That’s not unusual for manual tackers; I wouldn’t use any manual stapler for serious hardwood fastening.
Accuracy and sight line
The tool’s nose has a crisp contact edge, but like most manual staplers, the exact crown exit line isn’t obvious until you get familiar with it. On horizontal surfaces, it’s easy to land staples right where you want them. Overhead or at awkward angles, aligning the staple line takes some practice. I found the most consistent method was to reference the leading edge of the nose as my sight, square the body to the work, then keep firm pressure as I squeeze. It becomes second nature after a few dozen staples, but the sight line could be more intuitive.
Brad nailing: useful, within limits
The brad capability is genuinely convenient for light pinning, but manage expectations. It accepts 18-gauge brads in 1/2 in and 5/8 in lengths only. That’s perfect for securing thin trim, holding parts while glue sets, or attaching labels and backer material. It isn’t a replacement for a pneumatic or battery finish nailer—there’s no depth adjustment, and brads won’t consistently flush in harder woods. I used it for some thin stop molding and back panels; it performed well as long as I wasn’t asking it to disappear a brad in oak.
Jams and maintenance
Over a few hundred staples and a couple dozen brads, I had one minor jam with a bent staple leg. Dropping the magazine cleared it quickly. The anti-jam design seems to do its job; more importantly, using quality T-50 style staples and keeping the tool clean goes a long way. If you do encounter a jam, open the magazine, remove the strip, and use needle-nose pliers to pull any mangled fastener at the nose. It’s a two-minute fix.
Comfort over time
Manual staplers can be fatiguing. The lighter squeeze here, combined with the decent handle geometry, kept my hands fresher than expected on longer runs. Overhead stapling still gets tiring after a while—there’s no getting around gravity—but compared with the typical springy, crunchy feel of cheap staplers, this one is smoother and easier to live with.
Durability and serviceability
Between the die-cast housing and steel magazine, the tool feels like it will survive the usual knocks. The finish has held up in a dusty crawlspace and a damp backyard weekend without any sticking or rust spots. There’s a one-year limited warranty, and parts that matter—magazine, follower, handle pivot—are robust enough to inspire confidence.
What could be better
- Sight reference: A more prominent nose marking would help with precise placement, especially overhead.
- Depth control: Manual tackers generally lack depth adjustment, and this is no exception. Technique and staple length selection are your controls.
- Brad range: Only 1/2 and 5/8 in brads. I’d love support for 3/4 in in softwood.
- Included fasteners: None in the package. Plan to buy T-50 staples (I keep 1/4, 3/8, and 1/2 in on hand) and a small box of 1/2 in brads.
Who it’s for
This is a strong fit if you:
- Need a reliable manual stapler for insulation, fabric, carpet pad, general tacking, and light trim work.
- Value a smoother, easier squeeze and solid build over the cheapest option.
- Want the flexibility to shoot a few 18-gauge brads without switching tools.
It’s not ideal if you:
- Expect staples or brads to bury flush in hardwood regularly.
- Need a precision brad nailer for finish carpentry.
- Do most of your work overhead and need perfect sight lines without practice.
Value
You can buy cheaper manual staplers, but you’ll pay in hand fatigue, jams, and inconsistent results. You can buy more expensive pneumatic or cordless staplers that outperform it in power and speed, but you’ll trade away simplicity. This one sits in a practical middle: widely compatible T-50 staples, decent power, comfortable squeeze, and just enough brad capability to solve small problems. For a primary manual tacker that will see regular use, the price-to-performance feels fair.
Recommendation
I recommend the DeWalt tacker for anyone who wants a dependable, comfortable, and versatile manual stapler for everyday fastening—insulation, fabrics, carpet padding, and light trim—without stepping up to powered tools. It drives T-50 staples cleanly in softwood when used with proper technique, reloads quickly, jams rarely, and the brad feature is genuinely useful for light pinning. If you regularly work in dense hardwoods or need flawless, flush brad placement, look to a pneumatic or cordless finish nailer instead. But for general purpose tacking where portability and simplicity matter, this stapler earns a spot in the bag.
Project Ideas
Business
Mobile Chair Reupholstery Micro‑Service
Offer on‑site dining chair and bench reupholstery: remove old fabric, add fresh foam/batting, and staple new fabric with heavy‑duty T‑50 staples. Use 18‑ga brads for thin trim or dust‑cover strips. Price per chair with volume discounts; minimal setup lets you work curbside or in clients’ garages.
Home Studio Acoustic Treatment
Design, build, and install fabric‑wrapped acoustic panels for podcasters, gamers, and music rooms. Use brads to assemble lightweight frames and staples to wrap fabric tightly for a professional look. Sell packages (starter, pro) including wall layout, panel build, and mounting.
Event Backdrops and Retail Displays
Build modular frames and staple fabric, foam, or printed scrims for weddings, photo booths, craft fairs, and pop‑ups. The anti‑jam tacker speeds production of repeatable panels; 18‑ga brads pin thin trim, signage rails, and corner gussets. Offer rental inventory and custom builds with rapid turnaround.
Property Turnover Trim & Pad Touch‑Ups
Serve landlords and property managers with quick refreshes: resecure carpet padding, tack vapor/underlayment barriers, reattach loose shoe molding or thin trim with 1/2–5/8 in brads, and staple closet liners or screening. Flat per‑unit rates make scheduling and invoicing simple.
Weatherization and Pest Exclusion Lite
Install plastic sheeting and foam board in crawlspaces, staple house‑wrap or air barriers in small exterior repairs, and attach insect mesh to vent frames. Use corrosion‑resistant staples where needed and brad in light trim strips. Package seasonal services for homeowners and small contractors.
Creative
Upholstered Headboard or Bench
Cut a plywood backer, add foam and batting, then wrap with fabric and secure using 3/8–1/2 in heavy‑duty T‑50 staples. Use 1/2–5/8 in 18‑ga brads to add thin decorative trim or strap accents. The easy‑squeeze trigger helps keep staple lines straight and tight, and the anti‑jam magazine speeds the flow when you’re doing lots of tacks.
DIY Acoustic Wall Panels
Build light frames from 1x2s, glue and pin the corners with 5/8 in 18‑ga brads, then fill with mineral wool or foam. Stretch breathable fabric (burlap/twill) over the face and secure with 3/8–1/2 in staples. Finish with a thin brad‑nailed facing strip for a clean edge. Great for home studios and echoey rooms.
Canvas Art and Slim Floating Frames
Stretch canvas or printed fabric over stretcher bars and staple on the back with 3/8 in staples. Create a minimalist floating frame from thin lattice or screen molding and pin it with 1/2–5/8 in brads. The bottom‑loading magazine keeps reloads quick when producing multiple pieces.
Fabric‑Covered Bulletin/Command Boards
Laminate cork or foam insulation onto a thin plywood backer, wrap in fabric, and fasten with 1/4–3/8 in staples. Add elastic webbing in a criss‑cross pattern (stapled at the back) for a French memo board, and brad‑nail a small trim frame to hide edges. Perfect for kitchens, offices, or dorms.
Garden Mesh Cloches and Pest Covers
Assemble simple cedar frames, then staple on hardware cloth or insect mesh with 1/2–9/16 in staples. Use 18‑ga brads to secure light corner gussets and handle tabs. These lightweight covers protect seedlings from pests while allowing sun and airflow.