Features
- Using 3M Clear Heat shrink Tubing and 3M Seamless Copper Butt Connectors.
- 3 x 3 Clear Shrink Tubes and 3 x 3 Butt Connectors.
- Clear Tubing - Seeing is believing for a Perfect SEAL every time.
- Seamless Butt Connectors - Annealed and Electro-tin Plated - Perfect CRIMP every time.
- Water/Weather proofing broken wire repairs With Ease and Confidence.
- 100% Made in the USA with quality 3M components
Specifications
| Color | Copper |


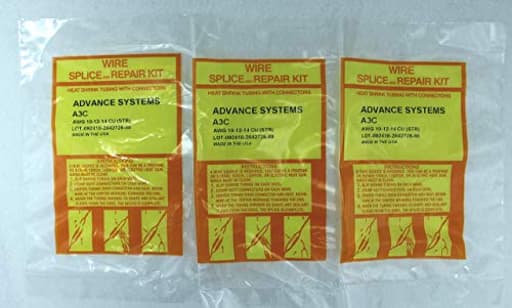
Pack of three submersible pump wire splice kits for making sealed splices on three-conductor cable using #10, #12, or #14 AWG wires. Each kit includes clear heat-shrink tubing (three per kit) and seamless annealed, electro-tin plated copper butt connectors (three per kit) for crimping and heat-shrinking to form a moisture-resistant, inspectable connection.
Advance E & I Systems 3 x A3C Submersible Pump Wire Splice Kit Repair and Installation. #10#12#14 AWG, 3 Wires Easy and Reliable. Crimp It - Shrink It and Forget it! - Pack of 3 Kits Review
Why I reached for this splice kit
I had to make a clean, submersible splice on a 3‑wire, 1 HP well pump drop cable—about 180 feet down. I wanted something slim, inspectable, and proven, not a bulky resin potting kit. The A3C submersible splice kit checked the right boxes on paper: seamless copper butt connectors, clear heat‑shrink tubing, and compatibility with common pump cable sizes (#10, #12, #14 AWG). After using it on the well job and later on a pond pump repair, I’m comfortable saying this is a straightforward, confidence‑inspiring kit when you do your prep and technique right.
What’s in the kit
Each “kit” is built for a single 3‑conductor splice:
- Three seamless, annealed, electro‑tin plated copper butt connectors (non‑insulated)
- Three clear heat‑shrink tubes sized to cover each connector and adjacent insulation
The package I used contains three of those kits, so you’re getting nine connectors and nine tubes total—enough for three full 3‑wire splices. That’s handy if you want a backup or plan to tackle multiple pumps.
Two details matter here:
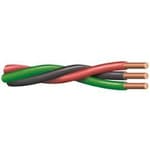
1) The connectors are seamless and tin‑plated. Seamless barrels crimp more uniformly and resist stress concentrations better than seam‑style connectors. The plating improves corrosion resistance and helps with long‑term conductivity.
2) The tubing is clear. That sounds minor until you’re in the field. Seeing the crimp, the wire insertion depth, and the shrink coverage reduces guesswork. If something’s off, you know before you bury a mistake 150+ feet down.
Installation experience
Prep and tools:
- I used a ratcheting crimper with the correct die for non‑insulated butt splices. If you only have a generic crimper, you can make it work, but the repeatability of a ratcheting tool is hard to beat.
- A variable‑temperature heat gun with a reflector nozzle made shrinking quick and even. You can get by with a standard heat gun; I wouldn’t use an open flame unless you’re very practiced—it’s easy to overcook the tubing or nick adjacent insulation.
Process:
1) Cut and strip carefully. Submersible cable insulation is tough; I used a stripping tool with an adjustable stop to avoid nicking strands. I like 5/16–3/8 inch strip length for these connectors.
2) Dry fit. Slide the tubing onto one side before crimping. Confirm the wire gauge matches the connector barrel snugly—#12 hits the sweet spot, #10 stranded fits correctly, and #14 also seats well with the right die.
3) Crimp with intent. I made two compressions spaced along each barrel on the #10 conductors and a single centered compression on #12/#14. The clear tubing lets you verify that the conductor reached the barrel midline on both sides.
4) Stagger the splices. This step pays off. Staggering reduces the finished bundle’s diameter and avoids a large rigid “lump” that’s prone to chafe during installation.
5) Shrink with control. I heated from the center outward, rotating to avoid cold spots. The tubing cinched down tight and conformed smoothly to both the connector and the cable jacket. With clear tubing, it’s easy to see when you’ve got full recovery without scorching.
Time-wise, the three splices for the well pump took about 15 minutes in the field after prep. The pond pump repair was even quicker.
Sealing and long‑term performance
Heat‑shrink over solid crimps won’t forgive sloppy prep. I wiped the jacket and connector area to remove moisture and grit before shrinking. After install, I zip‑tied the finished splice to the drop cable and taped the bundle to avoid strain or abrasion. The well pump has been running without a hiccup; the splice sits submerged and hasn’t given me any reason to worry.
For my own curiosity, I made a spare splice on cutoff cable and submerged it in a bucket for a week, then cut it open. The interior was dry, and the copper was bright under the barrel. The tubing on this kit isn’t billed as gel‑filled or necessarily adhesive‑lined; it still produced a tight, moisture‑resistant seal when properly shrunk. In harsher scenarios—constant agitation, aggressive chemistry, or if you’re splicing where the cable flexes frequently—I’d consider a dual‑wall adhesive‑lined option or an overwrap for belt‑and‑suspenders protection. For a static well drop and typical pump applications, this kit has held up well.
Electrical performance
Seamless, tin‑plated copper barrels, properly crimped, give you a low‑resistance, gas‑tight joint. I checked voltage at startup and under load at the control box, and the numbers were right where they should be given the run length and wire gauge. The crimps were uniform, with no strand splay or cold spots visible through the tubing. That clarity is useful—if you crush too hard with the wrong die, you’ll see it; if a conductor isn’t fully seated, you’ll see that too.
Fit and compatibility
- Wire sizes: The kit is intended for #10, #12, and #14 AWG conductors commonly used in submersible cables. That covers most residential well, septic, and pond pumps.
- Conductors per kit: Three connectors and three tubes per kit means it’s set up for three‑conductor splices. If your installation requires splicing a separate equipment ground, plan ahead—you’ll need an extra connector and tubing from the spares or a fourth piece from another kit.
- Profile: The finished splice cluster is slim, especially if you stagger. That’s helpful when it has to pass through well casing joints, torque arrestors, or tight conduit bends.
What could be better
- Adhesive liner: The tubing here shrinks tight and seals well, but it’s not specified as adhesive‑lined. In continuous submersion with potential cable movement, an adhesive liner adds another margin of safety by filling micro‑voids. I’d love to see a variant of this kit with dual‑wall tubing for users who want that extra insurance.
- Labeling and documentation: The components are quality, but a simple insert with recommended strip lengths, crimp die sizes, and a heating guide would help DIY users. Pro installers already know the drill, but guidance reduces mistakes.
- Fourth splice option: Including a fourth connector and tube per kit would cover equipment grounds without sending folks to a second kit. Not every install needs it, but enough do that it’d be a welcome add.
Tips to get a dependable seal
- Keep everything clean and dry before shrinking.
- Stagger your splices and orient the barrels in alternating directions to minimize bulk.
- Use a ratcheting crimper sized for non‑insulated butt connectors; avoid insulated‑terminal dies, which can under‑ or over‑crimp.
- Heat from the middle out and rotate the assembly; don’t dwell in one spot.
- Provide strain relief: tape and tie the finished splice to the drop cable so the weight isn’t borne by the joints.
Value
For the price of a single premium “brand box,” you get three complete 3‑wire splices with this pack. The component choices—seamless tin‑plated copper connectors and 3M clear tubing—are solid, and the slim profile saves headaches during installation. If you’re a homeowner tackling a single repair, you’ll have spares. If you’re a pro, it’s an easy restock item that performs like it should.
The bottom line
The A3C submersible splice kit is a straightforward, reliable way to make clean, inspectable splices on 3‑wire submersible pump cables in the #10–#14 AWG range. The seamless copper barrels crimp beautifully, the clear tubing makes quality control immediate, and the finished bundle remains compact enough for tight pulls. It’s not a resin‑potted solution, and the tubing isn’t advertised as adhesive‑lined, so if you need maximum environmental sealing for a high‑movement or chemically harsh environment, choose accordingly. For typical well drops, septic pumps, and pond applications where the splice is static and submerged, it’s a dependable, repeatable option.
Recommendation: I recommend this kit. It’s built with quality components, installs quickly with basic pro‑grade tools, and yields a tight, moisture‑resistant splice you can visually verify before it disappears out of reach. Add a fourth connector and adhesive‑lined tubing in a future revision, and it would cover nearly every use case I see in the field. As it stands, it earns a spot in my pump repair bin.
Project Ideas
Business
Pond & Fountain Electrical Repair Service
Start a mobile repair service focused on pond pumps, fountains, and outdoor lighting. Advertise reliable, weatherproof splices using premium 3M components (clear shrink for visible inspection). Offer diagnostics, same-day splice repair, and seasonal tune-ups — a low-overhead business with strong repeat revenue.
Prewired Waterproof Lighting Kits
Assemble and sell small-batch prewired LED pond-light or fountain-light kits to landscapers, garden centers, and DIY customers. Include the splice kits for plug-and-play installs; branding the kits as 'inspectable, professional-grade waterproof splices' adds perceived value and justifies a premium price.
How-To Content + Kit Bundles
Produce short video courses and step-by-step guides (YouTube, Patreon, Udemy) teaching waterproof splicing, pump wiring, and safe outdoor electrical work. Monetize through ad revenue, paid courses, and bundled kit sales (include your 3-pack splice kits in a beginner's electrician kit).
Landscape Contractor Training & Supply Program
Partner with local landscapers and pool/pond contractors to offer hands-on training sessions on waterproof splices and best practices, then supply them bulk kits at a margin. Provide co-branded packaging, a simple QC checklist, and replacement orders — recurring B2B revenue and stronger regional reputation.
Paid Workshops & Certification Nights
Host evening workshops for homeowners and makers showing safe outdoor wiring and waterproof splicing. Charge a fee that includes a splice kit and materials, and offer a simple certificate of completion. Upsell follow-up services or sell additional kits and accessories at the event.
Creative
Underwater LED Garden Orbs
Build sealed, long-lasting waterproof connections for LED-lit glass orbs or floating lanterns in ponds and water features. Use the clear heat-shrink and butt connectors to crimp and visually inspect each joint before shrinking so the lights survive submersion and seasonal weather. Great for seasonal displays or a permanent nighttime focal point in a backyard.
Weatherproof String-Light Sculptures
Design outdoor sculptural installations (wire frames, pergola art, living walls) wired with low-voltage LEDs and protected splices. The clear shrink lets you show customers or jury panels a neat, inspectable joint; the seamless copper connectors give a reliable mechanical + electrical bond. Perfect for art fairs, cafe patios, or gallery storefront windows.
Submersible Sculpture Lighting
Create kinetic or static sculptures that incorporate submerged lights and pumps (e.g., bubbling columns, fountain sculptures). Use the splice kit for all underwater wiring runs so each electrical joint is moisture-resistant and compact, enabling clean installation inside hollow sculpture elements without bulky potting compounds.
Nautical Lamps & Reclaimed-Boat Fixtures
Turn reclaimed marine hardware (portholes, winches, cleats) into table or wall lamps with authentic waterproof wiring. The kit is ideal for concealed splices inside metal housings where a clear heat-shrink lets you confirm a perfect crimp before sealing. Market finished pieces to coastal shops, Airbnb hosts, or boutique hotels.