Features
- Diameter: 16 inches, facilitates easy and quick polishing of concrete
- Compatible with low speed buffer, optimal performance at around 175 rpm
- Professional-grade diamond-impregnated pads, usable dry or wet
- Available diameters: 14", 16", 17", 20", and 27", grit range: 30-1500
- Manufacturer: Concrete Floor Supply, product type: Abrasive Wheels
Specifications
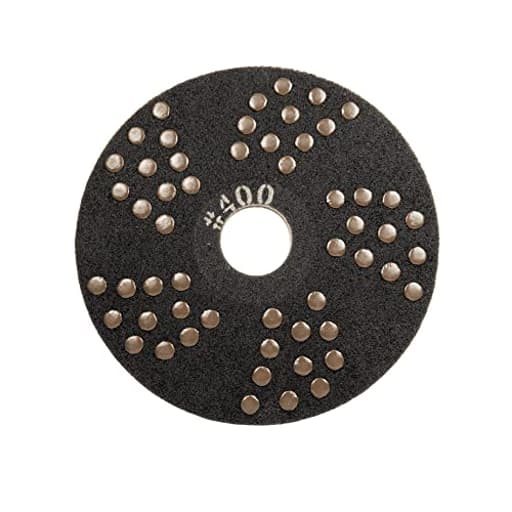
| Size | 16", 400 Grit |
| Unit Count | 1 |
Related Tools

A 16-inch, 400-grit diamond-impregnated resin satellite pad for polishing and refining concrete surfaces. It is designed for wet or dry use with low-speed buffers (optimal around 175 rpm) to smooth and prepare concrete during finishing or restoration.
Concrete Floor Supply Concrete DNA Resin Satellite Pads Review
What I tested
I put the 16-inch, 400-grit DNA resin pad to work on two real jobs: refining a ground garage slab before epoxy and cleaning up a kitchen slab after tile removal. I ran it wet and dry on a 175 rpm low-speed buffer with a standard 17-inch driver plate and a weighted handle (about 25 lb added). I also paired it before/after with other grits from the same line where appropriate, but the observations below are squarely about the 400-grit pad.
Setup and compatibility
Mounting is straightforward. The pad sits on a soft driver or hair pad—nothing exotic—and centers easily. On my machine, 175 rpm was the sweet spot. Faster isn’t better here; speed and heat will glaze the diamonds and can stress the resin “satellites.” If you’re used to metal-bond tooling on a planetary grinder, you’ll need to recalibrate expectations: this style of resin pad is for refinement, light stock removal, and surface cleaning, not aggressive flattening.
As always, edge work remains a separate task. Expect to come back with hand-held resin pads or a smaller head to chase the last inch at walls and corners.
Performance on concrete prep
Garage slab (epoxy prep): I used the DNA pad after a coarser cut opened the surface. At 400 grit, it blended prior scratch patterns and closed the surface to a uniform, satin profile that was easy to clean and prime. On a troweled garage slab with a few hairline cracks and saw cuts, the pad tracked well as long as I kept the head flat. Running diagonals reduced faint swirl patterns that can show up under raking light.
Kitchen slab (tile demo cleanup): After scraping thinset ridges, the 400-grit pass was an efficient way to erase residual trowel marks, adhesive haze, and light self-leveler blush. It will not bulldoze thick ridges or gummy mastic on its own; you’ll want a coarser grit or a scraper first. But once the bulk is gone, the 400 leaves a consistent surface that takes stain or microtoppings nicely.
If I were chasing a true polish, 400 is a transition point: it bridges from a honed finish to the beginnings of sheen. On dense, hard concrete, you’ll likely want to continue to 800/1500; on softer or more porous slabs, 400 can be a good stopping point for a low-luster finish.
Wet vs. dry use
Dry: Cutting dry with a skirt creates a lot of fine dust. A respirator and aggressive vacuuming are non-negotiable. The upside is speed and immediate visibility of your scratch pattern. In the garage, I ran dry for most of the pass and had no loading issues.
Wet: A light, consistent mist reduces dust dramatically and keeps the resin cool. The pad stayed sharp longer when I used a low flow of clean water. The tradeoff is slurry management. I kept a squeegee and wet vac nearby and bucketed the slurry for disposal. Don’t flood; too much water floats fines and robs the pad of bite.
If you see the pad skating, you’re either over-wetting or glazed. Back off the water and make a few passes dry to re-expose diamonds, or step down a grit briefly.
Finish quality
At 400 grit, the finish is uniform and forgiving. It knocks down the micro-scratches from 200 and erases most haloing from adhesive residue. On hard burnished slabs, you may see faint swirl under direct sunlight if you stick to a single path. Crosshatch passes tighten the pattern. After a quick auto-scrub, the surface looked even and ready for either densifier (for further polishing) or primer (for epoxy in the garage).
Durability and lifespan
Tool life with this style of pad is highly dependent on slab hardness, contaminants, operator technique, and whether you run dry or wet. On a typical residential mix:
- Garage, mostly dry: I covered roughly 800–1,000 square feet at 400 grit with consistent performance and visible life remaining.
- Kitchen, light wet: Slightly better wear profile; the pad cut “cleaner” and stayed cooler.
A few cautions from experience:
- Avoid sharp transitions, spalls, and exposed aggregate edges. Catching a lip can chunk the resin satellites.
- Keep the pad flat. Tilting to chase an edge concentrates pressure and accelerates wear.
- Don’t overspeed. Heat is the enemy of resin bonds.
- Break-in matters. The first 5–10 minutes set the tone; a light mist and moderate pressure help expose diamonds evenly.
I did see minor shedding of a few resin buttons after hitting a cracked joint at an angle—user error, but a good reminder to prefill wider cracks and ramp onto saw cuts.
Where this pad fits in a workflow
- As a refinement step after opening the surface with 100–200 grit
- As a cleanup tool after adhesive/thinset removal and scraping
- As an intermediate stop before densifying and moving to 800/1500 for a semi-polished sheen
- As a final pass before epoxy or stain where a 400-grit profile is appropriate
What it does not replace: metal-bond diamonds on a planetary head for heavy stock removal, leveling high crowns, or removing thick coatings. If your slab is wavy or coated, you’ll save time and money by grinding first and letting this pad do what it’s designed for—refining.
Handling, dust, and cleanup
Expect dust when running dry—more than many first-timers anticipate. If your buffer has a vacuum skirt, use it; otherwise, plan for room isolation, negative air if indoors, and meticulous cleanup. Wet use keeps the air cleaner but creates slurry. I preferred a controlled mist: just enough to keep fines down without turning the job into a mud bath.
After each section, a quick rinse of the pad face restores cut and clears fines. Don’t store the pad saturated; let it dry flat to prevent warping.
Cost and value
These pads aren’t cheap on a per-piece basis, but the cost calculus improves when you consider access to common 175 rpm buffers and the ability to do combined cleanup and refinement in one step. For a pro or serious DIYer prepping a few rooms or a two-car garage, a 400-grit DNA pad hits a reasonable cost-per-square-foot if you treat it well and avoid edge strikes. If you’re expecting it to replace a grinder on a tough slab or to remove thick coatings solo, you’ll be disappointed and you’ll burn through it prematurely.
Tips for best results
- Start with the right grit for the condition; don’t ask 400 to do a 100’s job.
- Crosshatch your passes to minimize swirl visibility.
- Add moderate weight, but avoid “leaning” on the handle.
- Use a light water mist to manage dust and heat; vacuum slurry promptly.
- Prefill cracks and chips that could snag the resin.
- Rinse the pad face periodically to clear loading.
The bottom line
The DNA resin pad at 400 grit is a solid refinement tool for low-speed buffers. It shines as a bridge between coarse opening and higher-polish stages, and it doubles as an effective cleaner for the haze and chatter left behind after tile removal or light self-leveling. Wet or dry, it’s predictable as long as you respect its limits: keep the speed in check, avoid sharp edges, and use it for refinement rather than demolition.
Recommendation: I recommend this pad for operators who need to refine and prep concrete with a 175 rpm buffer—particularly for residential garages before epoxy, interior slabs after adhesive cleanup, and as a mid-step in a polishing progression. It offers good finish quality and workable lifespan when used correctly. I would not recommend it as a substitute for metal-bond grinding on uneven or heavily coated slabs, or for users who can’t manage dust or slurry. Used within its lane, it’s a dependable piece of kit.
Project Ideas
Business
Mobile One-Day Polishing Service
Offer a mobile polishing service for garages, patios, countertops and small retail floors using the 16" pad and low-speed buffers (ideal ~175 rpm) to perform fast, low-dust wet/dry refinishes in a single day. Market to homeowners and property managers as an affordable upgrading option—package by area and finish level (honed, satin, high-gloss) and upsell sealing and maintenance plans.
Countertop & Surface Restoration Niche
Specialize in resurfacing and upgrading existing concrete, cultured-stone and terrazzo countertops: remove stains and minor damage, re-profile edges, and repolish to a designer finish using the 400-grit pad as the mid-step. Differentiate by offering color correction, inlay work, and post-service care kits; target kitchen remodels and boutique hospitality projects that want premium finishes without full replacement.
Tool + Consumables Rental & Subscription
Build a rental business for low-speed buffers paired with 16" satellite pads and offer a consumables subscription (sets of pads across 30–1500 grit) for contractors and serious DIYers. Include training videos, quick-start guides on optimal speeds (175 rpm), wet vs dry best practices, and safety checklists to reduce user errors; provide delivery/pickup for local pros to increase convenience.
Hands-On Workshops and DIY Certification
Run paid workshops teaching homeowners and hobbyists how to cast, finish and polish concrete surfaces using the 16" pad and low-speed buffers. Offer tiered classes (introductory countertop, advanced inlay/medallion) and sell starter kits (pad, buffer rental voucher, abrasives, safety gear). Graduates can be listed as certified DIYers or referred to your services for larger jobs, building both community trust and recurring revenue.
Creative
Polished Concrete Countertop Art
Use the 16" 400-grit resin satellite pad to refine and blend concrete countertops after casting—smooth seams, remove trowel marks, and level embedded pigments or mica for a high-end satin finish. Work wet at ~175 rpm to reduce dust and reveal the aggregate and color depth; follow with finer grits (800–1500) for a glossy chef‑grade surface. Add simple inlays (metal, glass chips) before final polishing for custom, gallery-style pieces.
Revealed-Aggregate Coffee/Side Tables
Cast small round or square tabletops with exposed aggregate, then use the 16" 400-grit pad to carefully remove the cement matrix and expose stone for an industrial-chic look. The large diameter speeds up finish work on wide surfaces while the resin pad gives even cut and minimal chatter; finish edges and underside for a finished product ready for mounting on metal or wooden bases.
Polished Concrete Steps & Sculptural Risers
Create sculptural concrete stair treads or risers and use the pad to shape nosing and smooth walking surfaces to a safe, attractive sheen. Wet polishing at low speed keeps dust down and preserves sharp profiles while delivering a tactile, slip-resistant finish when combined with subtle honing. Combine colored aggregates or thin epoxy inlays in riser faces for decorative contrast.
Floor Medallions & Flush Resin Inlays
Cut decorative patterns into cured concrete floor panels, pour contrasting epoxy or metallic resin, then use the 16" 400-grit pad to level and blend the surface so the inlay is perfectly flush. The pad’s size makes quick work of large motifs; follow with progressive grits to achieve either a honed or polished look depending on design intent.