Features
- UNIVERSAL INSTALLATION: Our complete bathroom sink drain repair kit includes several replacement pipes and fittings to fit most sinks with drainage that connects to the wall or to the floor.
- COST-EFFECTIVE SOLUTION: Our bathroom sink drain assembly is a versatile and cost-effective option for making repairs to problem areas like J-bend and P-trap sink pipes and multiple installation options.
- EASY TO INSTALL: Our bathroom sink plumbing kit comes with a detailed instruction sheet that removes the guesswork from any repair task or modification. Plumbing parts are easy to use for homeowners and pros.
- STURDY DRAIN PIPES: Every piece of our bathroom sink repair kit is made of durable thermoplastic from the drainage pipes to the polyethylene washers. Get peace of mind working with reliable components.
- WE UNDERSTAND YOUR NEEDS: At Plumbcraft we pride ourselves on getting to know our customers to fully understand their needs. We offer practical advice and cost effective solutions for your home.
Specifications
| Color | White |
| Unit Count | 1 |

Related Articles

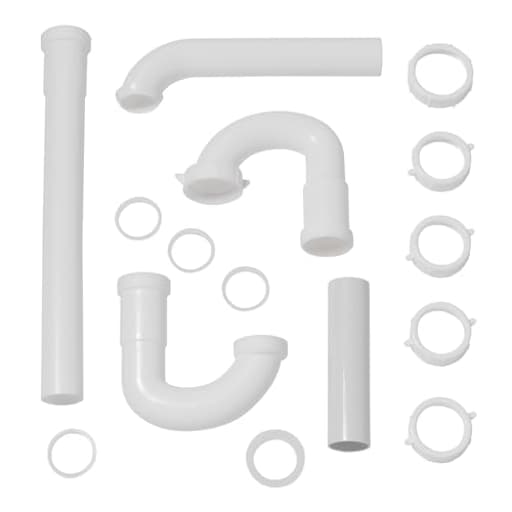
A 15-piece bathroom sink drain repair kit containing replacement pipes and fittings for repairing or modifying sink drain assemblies that connect to either wall or floor waste lines. Components are made of thermoplastic with polyethylene washers and include parts for J-bend and P-trap configurations; an instruction sheet is provided for installation.
Plumb Craft Waxman PlumbCraft 15-Piece Complete Bathroom Sink Drain Repair Kit 7027110N, Various Bathroom Sink Drain Pipes for Repairs to Problem Areas, Bathroom Sink Drain Assembly for Multiple Sink Pipe Options Review
Why I reached for this kit
A vanity swap in an older house rarely goes as smoothly as you hope. My project started with a nice, modern sink—and ended with a misaligned trap, a stub-out that sat lower than expected, and a timeline that didn’t allow for three hardware store runs. That’s precisely the situation where a 15-piece bathroom sink drain kit earns its keep. I picked up the PlumbCraft kit because it promised options: wall or floor connection, J-bend or P-trap configurations, and a pile of slip-joint fittings to make odd alignments workable.
What you actually get
This is a white thermoplastic tubular kit with polyethylene slip-joint washers and nuts. In the box, I had enough parts to assemble a standard P-trap with a couple of different trap arm lengths, plus bits to accommodate a floor waste line. The included instruction sheet is concise—more of a diagram and sequence than a tutorial—but accurate. If you’ve done a trap before, it’s enough. If you haven’t, it still helps, but I’d pair it with a quick how-to video.
The plastic is lightweight—lighter than some polypropylene kits I’ve used. That’s not inherently a problem, but it does change how you handle it. Alignment matters more, and overtightening less is key. The upside is that trimming and test-fitting are dead simple, and you don’t need glue or special tools.
Installation experience
I always start with two measurements:
- Tailpiece size from the sink drain (commonly 1-1/4 inch on bathroom sinks)
- Stub-out size and location (1-1/4 or 1-1/2 inch, wall or floor)
This kit is billed as “universal,” and for most common setups that’s true, but “universal” in plumbing still means “within standard diameters.” If your home has nonstandard tubing or an oddball stub, measure before you commit.
Dry-fitting gave me a good sense of which pieces I needed. I built a P-trap with a medium-length trap arm, then aligned it to my wall stub-out. A couple of small but important notes from the install:
- Don’t skimp on alignment. Thermoplastic traps seal well when everything is straight and lightly compressed. If you force misaligned parts together, you invite weeping at the slip joints.
- Use a dab of plumber’s grease on the washers. It reduces friction and helps the cone seat cleanly.
- Hand-tighten the slip nuts and add a gentle quarter turn with pliers at most. Overtightening will distort the washers and actually cause leaks.
- Keep your trap arm slope modest—about 1/4 inch per foot—so you don’t siphon the trap.
My connections sealed on the first fill-and-drain test. I ran a few hot-cold cycles to check for thermal expansion leaks and didn’t see any drips. The trap holds a proper water seal, drains quietly, and is easy to disassemble for cleaning—big advantages of slip-joint tubular systems.
Fit, finish, and feel
You won’t mistake this for chrome-plated brass, and that’s fine—this is meant to live inside a vanity cabinet, not in a pedestal sink with exposed plumbing. The white plastic keeps things tidy and easy to wipe clean. The washers are consistent and seated well. One elbow has a slightly tighter sweep than I prefer, but in normal bathroom duty (soap, toothpaste, shaving cream) it doesn’t hinder flow. Hair will still collect in the J-bend over time—being able to crack it open without cutting or heating is the point of kits like this.
If you’re rough with it, you’ll notice flex. That’s the trade-off for tool-free assembly and easy adjustability. Support the trap arm so the weight of the assembly isn’t hanging on a single nut. With decent alignment and light support, it behaves as it should.
Performance and durability
In a typical bathroom, thermoplastic tubular assemblies hold up well. They resist corrosion, shrug off household cleaners, and tolerate normal hot water. I wouldn’t pour boiling water directly into any plastic trap—bathroom scenarios rarely require that anyway—but everyday use isn’t an issue.
Over the first weeks after installation, I checked the nuts out of habit. They stayed tight with no creep. The beauty of a kit like this is serviceability: if toothpaste sludge builds up and slows the drain, loosening two nuts gets you into the trap for a quick cleanout without tools or solvent.
Where it shines—and where it doesn’t
Strengths:
- Options. If your drain and stub-out aren’t perfectly coaxial or your waste line exits through the floor, you have multiple ways to build a functional assembly.
- Speed. Dry-fit, align, tighten, test. No primer, no cement, minimal mess.
- Maintenance. Slip joints mean quick disassembly for cleaning or rework.
- Price. Assembling these parts piecemeal can add up, especially when you’re guessing. A kit like this saves a last-minute run.
Limitations:
- Not truly universal. If your stub-out is an unusual diameter, damaged, or way off location, you’ll still need additional adapters or extensions. Measure before you start.
- Lightweight thermoplastic. It’s perfectly serviceable but doesn’t inspire the confidence of heavy-gauge PP or brass. Over-tightening is a real risk.
- Basic instructions. The included sheet is a roadmap, not a class. First-timers may want supplemental guidance.
Practical tips for a cleaner install
- Match sizes smartly. Many bathroom sinks have a 1-1/4 inch tailpiece; some wall stubs are 1-1/2 inch. Have a reducing washer on hand if your stub is larger than your trap assembly.
- Cut square. If you need to shorten a trap arm, use a fine-tooth saw, deburr the cut, and keep the end square so the washer seats cleanly.
- Align before tightening. Set the pieces loosely, get the trap seal directly under the drain, and make sure the trap arm enters the stub straight. Then tighten in order from the sink down.
- Grease the washers. A tiny amount of plumber’s grease reduces binding and extends washer life.
- Don’t ignore code basics. Keep the trap close to the sink, avoid S-trap configurations, and ensure you have proper venting.
Alternatives and use cases
If you’re working on an exposed pedestal or console sink where appearance matters, chrome-plated brass tubular piping still looks best and feels more substantial. If you’re building a permanent, heavily used kitchen drain or need a disposal tie-in, choose components designed for that application. For rental turnovers, DIY bathroom remodels, or retrofits in older cabinets where the rough-in is unpredictable, this kit hits a sweet spot: fast, flexible, and forgiving.
Bottom line
The PlumbCraft kit does what a good tubular repair kit should do: it makes bathroom drain alignment issues routine instead of risky, and it does it without glue, special tools, or repeated store trips. The parts are on the lighter side, but with proper alignment and modest tightening, they seal reliably and are easy to service later. It’s not a magic bullet for every oddball bathroom, and it won’t replace the look or feel of brass in a visible installation. But for a typical vanity with a wall or floor stub-out and the usual assortment of “off by an inch” headaches, it’s a thoughtful, cost-effective solution.
Recommendation: I recommend this kit for homeowners and pros who want a flexible, budget-friendly way to tackle bathroom sink drain repairs inside a cabinet. It’s especially useful when you’re uncertain about exact offsets or need options for wall and floor connections. Measure your diameters first, handle the plastic with a light touch, and you’ll get a clean, leak-free install without multiple trips to the store. If you need premium aesthetics or maximum durability in a visible setup, look to chrome-plated brass instead.
Project Ideas
Business
Community 'Fix-It' Workshops
Host paid small-group workshops at local makerspaces, hardware stores, or community centers showing homeowners how to diagnose and repair common sink drain problems using the kit. Charge a ticket fee that includes a kit or discounted purchase, and offer follow-up one-on-one troubleshooting for an extra fee. This builds local brand recognition and repeat customers.
Curated DIY Repair Kits with Video Guides
Create branded, easy-to-follow repair kit bundles targeted to specific sink types (wall vs floor drain, common leak scenarios) and pair each with a short, polished video tutorial. Sell these bundles on marketplaces (Etsy, Amazon) and your own site. Include printable troubleshooting checklists and an upsell of a live coaching session or virtual repair call.
Subscription Replacement Parts for Landlords & Airbnbs
Offer a quarterly or semi-annual subscription service that ships common wear parts (washers, short pipe segments, connectors) to property managers, landlords and Airbnb hosts. Include quick repair guides and priority scheduling for on-site service if they want a pro dispatched. This reduces emergency callouts and creates recurring revenue.
Plumber/Handyman Reseller Packs
Supply trade professionals with bulk reseller packs of the 15-piece kit at a wholesale price, plus a short 'best practices' cheat sheet that helps them perform quick on-site repairs and upsell replacement kits to customers. Offer volume discounts and co-branded collateral so small businesses can appear professional while saving time.
Content Channel + Affiliate Sales
Build a content channel (YouTube, Instagram, short TikToks) demonstrating both straightforward repairs and creative upcycles using the kit. Monetize via affiliate links to the product, downloadable project plans, and sponsorships from tool or hardware brands. Use short how-to clips to drive traffic to longer paid guides or live workshops.
Creative
Modular Desk Cable Tidy
Cut straight pipe segments and J-bend pieces into short lengths and assemble a low-profile cable raceway that clips to the edge of your desk. Use the polyethylene washers as soft grommets where cords pass through, and secure pieces with silicone or small screws. Paint the thermoplastic to match decor. Result: a neat, modular cable organizer that can be reconfigured as devices change.
Mini Self-Watering Planters
Use short P-trap sections as stacked reservoirs for small succulents or herbs. The lower pipe section becomes the water reservoir; insert a cotton or hemp wick through a washer-sealed hole so it feeds moisture up into the soil in the upper section. Glue or press-fit pieces to form vertical planters for windowsills. Recommend using potting mix and plants that tolerate intermittent wicking; avoid edible plants if you repurpose parts previously used for drain water.
Low-Voltage Industrial Lamp Frame
Assemble pipe pieces into a decorative lamp arm or small pendant frame and thread low-heat LED strip lights or a low-wattage LED bulb through the center. Use washers as decorative collars and to hide cable entry points. Because the kit is thermoplastic, stick to low-temperature LED lighting and secure the electrical components in certified housings. This creates an industrial look without metalworking.
Modern Mobile or Wind Chime
Cut the longer pipes into graduated lengths, paint or finish them, and string them together using the washers as spacers and silent stoppers. Suspend from a wooden or metal ring to create a kinetic mobile for indoors or a gentle wind chime for a covered porch. The lightweight thermoplastic produces a soft sound and lets you experiment with color and rhythm.
Kids' STEM Plumbing Lab
Build a hands-on learning kit for kids: assemble J-bend and P-trap configurations to demonstrate how drains work, create leak-proof challenges using washers, and run safe, supervised water-flow experiments with clear containers. Include a simple worksheet (flow diagrams, common-sense fixes) to teach problem-solving and basic household plumbing safety.