Features
- Stainless steel blade
- Leading edge for cutting a sharp groove
- Ergonomic soft-grip handle
- Flat end for finishing
Specifications
| Concrete Tool Type | Hand Groover |
| Blade Material | Stainless Steel |
| Blade Length | 6 in |
| Blade Width | 3 in |
| Groove Depth | 0.5 in |
| Radius | 0.25 in |
| Handle Material | Rubber (soft-grip) |
| Product Length | 6 in |
| Product Width | 3 in |
| Product Height | 3.5 in |
| Product Weight | .793 lb |
| Manufacturer Warranty | 1 Year |
| Returnable | 90-Day |
| Country Of Origin | China |
Related Tools
Related Articles

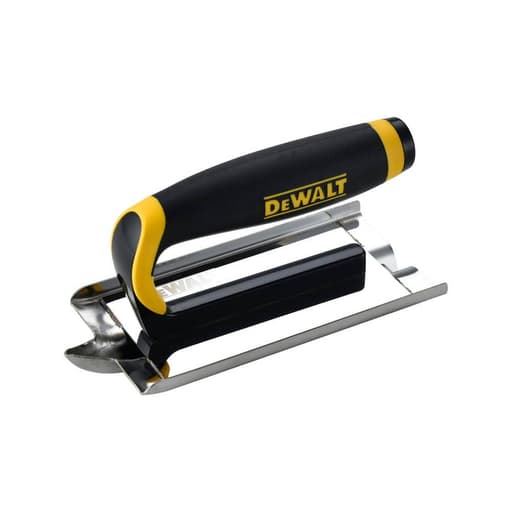
Hand groover for forming control joints and crisp edges in concrete. It has a stainless steel blade and an ergonomic soft-grip handle. The tool is sized for 6 in. length by 3 in. blade width and is designed to leave a smooth surface and defined groove.
DeWalt 6 in. x 3 in. Stainless Steel Hand Groover Review
First impressions and setup
I took the DeWalt hand groover straight to a small step and walkway pour to see how it handled real work, not just bench fondling. Out of the box, the stainless blade is flat and true, with no burrs on the base or the bit. The 6 x 3 footprint is compact, which matters more than you’d think—on tight forms, corners, and stairs, I could get the tool where a wider groover would fight the side rails. The soft-grip handle sits high enough (about 3.5 inches overall tool height) to keep knuckles out of the paste and offers a grippy, slightly tacky feel without being gummy.
Build quality and materials
Stainless steel is the right choice here. It resists rust and cleans up quickly, and the polished base glides well over the cream once the concrete hits the right window. Unlike heavier bronze groovers, this one doesn’t rely on mass to keep the bit buried; instead it’s nimble and controllable at under a pound (about 0.793 lb). The blade is stiff, with a cleanly formed groove bit. The base edges are slightly relieved so they don’t dig or lift paste when you’re working alongside a straightedge. The overall fit and finish are tidy. Nothing rattles, and after a couple sessions the edges stayed sharp with no visible deformation.
Groove geometry and what it means on the slab
This groover leaves a 0.5-inch-deep groove with a 0.25-inch radius. The profile is crisp and repeatable, which is what you want for control joints and decorative breaks. The leading edge on the bit helps the tool start cutting without tearing aggregate out of the surface. On mixes with larger stone, I still had to let the surface set up a touch before starting the first pass, but once in the window, the cut was clean and consistent.
A candid note on depth: industry practice generally aims for a control joint depth of about one-quarter of the slab thickness. That means a 0.5-inch groove is appropriate for thinner pours—steps, overlays, and some smaller pads—but it’s on the shallow side for a full 4-inch sidewalk or patio where a 1-inch joint is preferred. I’ve used this groover effectively in two scenarios on thicker slabs:
- For aesthetic joints where crack control is handled by saw-cutting later
- As a starter track to guide early-entry saw cuts
If your main work is sidewalks or driveway panels at standard thickness, you may want to pair this tool with a deeper-weld groover or rely on saw cutting for structural joints.
Control and ergonomics
The handle is a soft rubber overmold with just enough give to reduce hot spots. It doesn’t twist under load, and the ferrule-to-blade connection is tight. On long pulls the grip isn’t fatiguing, and the tool balances close to the center of the blade, so you can run it with fingertip pressure rather than bearing down. Because it’s relatively light, you’ll feel the surface more and get good feedback about when the slab is ready for grooving.
That said, the small footprint has pros and cons. In tight spaces and around forms, it’s a winner. On long, straight runs it takes more passes than a 6 x 6 or a walking groover would. I found the sweet spot was short panels, steps, and decorative breaks where precision matters more than speed.
On the concrete
I tested the groover at three different set stages:
- Just after bull floating: too wet, as expected. The bit smudged paste and showed pebbles. Not the tool’s fault; the slab simply wasn’t ready.
- Firm but still workable: the sweet spot. The leading edge dropped into the surface cleanly, with minimal paste buildup. Two light passes gave a sharp, well-rounded groove without ropey edges.
- Late window: the groove still formed, but it took a little more downforce, and the surface tended to crumble beside the bit if I rushed. A quick mist and a slower pass solved it.
The upturned base edges helped keep the tool from sliding under a straightedge. I could register the groover against a screed or a board and stay on line without catching. The bit rides true—no tendency to wander unless you try to muscle it.
Flat end for finishing
The flat end of the blade does more than you’d think. After grooving, I used the trailing section to knock down tiny ridges along the joint and to close up surface pores around corners. It’s not a replacement for a finish trowel, but having a fully usable flat section on the same tool saves time and reduces hand swaps during that critical finishing window.
Durability and maintenance
Stainless makes cleanup easy. A quick rinse and brush before the cement fully cures is all it takes. I didn’t see any staining or pitting after a few muddy days. The groove bit stayed square and uniform, which is key for repeatability. As always, avoid tossing it into a bucket with floats and rebar offcuts—nicks in the base will telegraph to the finish. The handle’s rubber seems resistant to solvents and UV; I left it in the sun during cleanup with no tackiness or peeling.
DeWalt backs it with a 1-year warranty and there’s a 90-day return policy from most sellers. Nothing felt fragile, and I’d expect normal life for a stainless groover—longer than steel, lighter than bronze, and with less maintenance than magnesium tools.
Where it fits in a concrete kit
- Best for: steps, small pads, decorative joints, overlays, and anywhere you want a neat, consistent 0.5-inch-deep joint with a 1/4-inch radius.
- Works with: hand trowels, edgers, magnesium floats, and a straightedge. It also pairs well with early-entry saws if you’re using the groove as a visual guide line.
- Not ideal for: large panels where a walking groover or deeper joint is required for crack control.
If you already carry a standard walking groover, this fills the gap for detail work. If this is your only groover and you pour a lot of 4-inch slabs, plan to supplement with saw cuts or a deeper-profile jointer.
Strengths
- Clean, predictable groove with a helpful leading edge that reduces surface tearing
- Stainless steel base resists corrosion and glides well; easy cleanup
- Comfortable soft-grip handle with good height and knuckle clearance
- Compact 6 x 3 size excels in tight spots and along forms
- Flat blade section doubles as a quick touch-up surface
Trade-offs
- 0.5-inch groove depth is not sufficient for structural control joints in thicker slabs; consider saw cutting or a deeper groover for 4-inch pours
- Smaller footprint means more passes on long runs
- Light weight offers feel but less self-seating than bronze groovers in sticky mixes
Bottom line and recommendation
I recommend the DeWalt hand groover for anyone who needs a reliable, stainless, compact jointer for steps, small pours, overlays, and decorative work. It cuts a crisp 0.5-inch groove with a quarter-inch radius, cleans up quickly, and the ergonomics are dialed for all-day comfort. Just be clear about what you need it to do: for standard 4-inch slabs where joint depth is critical, pair it with saw cuts or a deeper-profile groover. Used in its wheelhouse, it’s a precise, well-built tool that earns a spot in the bucket.
Project Ideas
Business
Small-Slab Control-Joint Specialist
Offer a productized service for AC pads, generator pads, shed bases, and walkway sections that includes proper joint layout and hand-grooved control joints. Market the benefit—clean lines and fewer random cracks—backed by before/after photos and a simple flat-rate menu.
Decorative Border Groove Upsell
Partner with local concrete finishers to add grooved banding that mimics brick/tile grout lines around patios and sidewalks. Provide layout templates and color-stain options; charge per linear foot for the decorative groove package.
Custom Address/Logo Slabs
Create entry pads, front walk insets, or curb markers with grooved house numbers or simple logos. Offer design proofs, then hand-groove during finishing and stain the recessed lines for contrast. Ideal for builders, HOAs, and small businesses.
DIY Concrete Workshop + Tool Kit
Run weekend classes teaching forming, pouring, and finishing basics with emphasis on jointing. Rent or sell a starter kit (groover, edger, float, instructions). Revenue from tuition, kits, and follow-up on-site consulting.
Content + Affiliate Niche
Launch a short-form video series on control-joint spacing, finishing tips, and pattern ideas using the groover. Monetize via affiliate links to tools and materials, local sponsor shout-outs, and downloadable pattern packs.
Creative
Geometric Patio Mural
Pour a small patio or landing and lay out a chevron/diamond grid with chalk. Use the groover’s leading edge to score crisp 0.5 in deep lines that break the slab into facets. After cure, stain alternating panels for a mosaic effect; the 0.25 in radius leaves soft, clean transitions.
Monogrammed Entry Pad
Form and pour a welcome pad, then outline a large initial or house number with the groover while the concrete is plastic. The stainless blade leaves smooth, defined lettering that can be color-filled with concrete stain for a custom entry statement.
Tic-Tac-Toe or Hopscotch Slab
Create a play zone by grooving a 3x3 grid (tic-tac-toe) or numbered hopscotch pattern into a small slab. After curing, paint inside the cells. The ergonomic handle helps keep steady pressure for straight, consistent joints that also function as crack-control.
Garden Stepping Stones with Channels
Cast 12x12 stepping stones and groove spiral or arc channels about 0.5 in deep to encourage drainage and add texture. Press in pebbles along select grooves for contrast. The flat end of the tool doubles as a finisher to smooth areas between patterns.
Planter Perimeter Drip Lines
When pouring a concrete planter cap or surrounding curb, groove shallow perimeter lines on the top surface to guide runoff away from walkways and plant stems. The defined channels help manage water and add a subtle decorative band.