Features
- SDS-max shank compatible with SDS-max rotary hammers
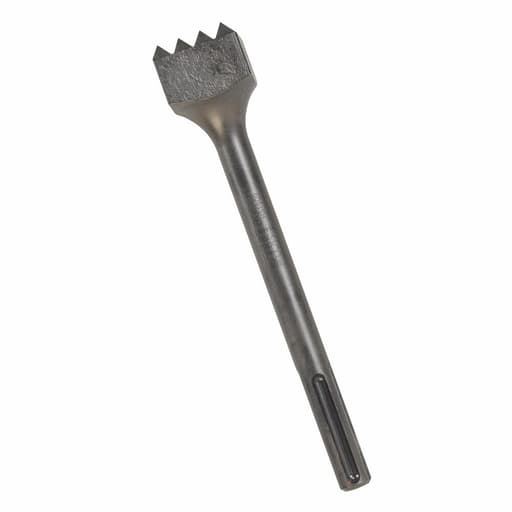
- 1-3/4 in. square cutting head
- 16-tooth head profile for bushing/chiseling
- Steel construction
- Total length 9-1/4 in.
- Pack quantity: 1
Specifications
| Total Length (Inch) | 9 1/4 |
| Chisel Cutting Edge (Inch) | 1.75 |
| Shank, Shape | SDS-max |
| Number Of Teeth | 16 |
| Pack Quantity | 1 |
Related Tools
Related Articles

Steel bushing tool with an SDS-max shank designed for use with SDS-max rotary hammers. It has a 1-3/4 inch square cutting head with 16 teeth and a total length of 9-1/4 inches, intended for bushing and chiseling tasks in masonry.
Bosch 1-3/4 in. square x 9-1/4 in. 16-tooth head bushing tool (SDS-max) Review
Why I reached for this bushing head
Surface prep on old concrete is where tools prove their worth. I needed to remove slick laitance, open up a profile for a bonded overlay, and add a light anti-slip texture to a few high-traffic steps. I also had some patch blending to do on a hard, well-cured slab. For all of that, I ran Bosch’s HS1909 bushing head on an SDS-max rotary hammer—and it did exactly what I needed: fast, repeatable texture without gouging, with enough control to work right up to lines and edges.
What it is and where it fits
This is a square bushing head with 16 teeth and a 1-3/4 in. face, matched to an SDS-max shank. Overall length is 9-1/4 in., which is a touch longer than many bushing accessories in this class. The footprint makes it a versatile middle-ground: wide enough to move across pad surfaces efficiently, but not so big that it fights you in corners or on narrow treads.
If you’re used to star chisels or pointed chisels for roughing, a bushing head is a different animal. It pecks a uniform pattern of shallow pits that’s ideal for exposing a bit of aggregate, knocking down high spots, or prepping for overlays and coatings where an even mechanical key is important.
Setup and compatibility
The SDS-max shank drops into any SDS-max rotary hammer; I used it on a mid-size hammer with adjustable impact energy and BPM. You’ll want a hammer with good vibration control and a lock-on trigger for longer runs. This is not an SDS-plus accessory—don’t try to adapt it. The impact energy of SDS-max is what makes a bushing head like this productive.
Dust is significant with any bush-hammering. A shroud can help on horizontal surfaces, but I typically pair the work with a high-CFM vac trailing behind and, when possible, a light mist to keep fines down. PPE is non-negotiable: eye, ear, respiratory protection, and gloves.
Performance on concrete and masonry
On hard, fully cured concrete, the 16-tooth pattern strikes a good balance between aggression and control. With the hammer set to lower BPM and moderate impact energy, I could generate a consistent, medium-profile texture quickly. The head’s square face keeps the tool from skittering, especially when starting a pass, and the weight of a mid-size SDS-max hammer provides enough downforce that you don’t have to lean on it.
A few performance notes from the field:
- Old, dense “blue” concrete: The head bites predictably. I could remove slick laitance in one slow pass and deepen the texture with a second pass at a 90-degree cross-hatch. Surface temperature stayed reasonable; no glazing or smearing.
- Softer or green concrete: It’s easy to overdo it. Back off the impact energy and keep the tool moving; otherwise, you’ll expose aggregate faster than intended.
- Masonry/stone: Works, but tooth wear accelerates on very hard stone. For heavy stone work, a dedicated bush hammer or pneumatic scabbler is more efficient.
Because the face is 1-3/4 in., you can work close to edges without chipping them out—so long as you keep the tool flat and reduce energy as you approach the edge. On stair treads, I could feather to the nosing without blowouts. For transition lines and layout-critical areas, that kind of control beats wider heads.
Control and ergonomics
The 9-1/4 in. length seems minor on paper, but it matters in practice. The slightly longer reach lets you keep a more upright stance on floor work, which reduces back fatigue over a long day. It also puts a bit more daylight between your hands and the surface, making it easier to read the texture as you go.
The flip side is that on verticals, particularly overhead, the longer posture can feel a touch nose-heavy. It’s manageable with two hands and a slow pace, but for extended overhead work I’d stick with shorter passes and frequent breaks.
Technique is key. I get the best results by:
- Running at lower BPM with steady, light contact—let the hammer do the work.
- Keeping the face flat; tilting corners in will cut grooves.
- Moving in overlapping passes like mowing a lawn, then cross-hatching if I need a deeper profile.
Durability and maintenance
The head is steel, and the teeth have held up well under typical concrete prep. Expect normal rounding of the tips over time, which actually can make the texture more uniform for finish work; it’s only when they get noticeably flattened that speed drops off. On very abrasive aggregate or when you catch edges aggressively, wear accelerates.
Care is simple:
- Clean dust off the shank and lightly oil it before storage.
- Keep the SDS-max chuck greased so the head doesn’t rattle itself loose under vibration.
- Avoid striking rebar or embedded metal—nothing kills teeth faster.
I saw no mushrooming at the shank or deformation at the neck. The interface tolerances are tight, and there was no wobble or chatter beyond what’s normal for impact tools.
What it’s not for
A few boundaries to keep in mind:
- Not a demolition tool: If you need to break out significant thickness, use a point or wide chisel first.
- Not a precision bush hammer for architectural finishes: The 16-tooth pattern is medium-coarse. For fine stipple or decorative stone textures, a higher-tooth-count head is better.
- Not ideal in tight recesses: The square head can’t reach into very narrow joints or sharp inside corners.
Comparisons and alternatives
- Versus a wider head (2 in.+): Wider heads cover more ground but are harder to control near edges and require more hammer oomph. The 1-3/4 in. face is a good general-purpose size for mixed tasks.
- Versus a higher tooth count: More teeth mean a finer texture and less bite per impact. The 16-tooth layout here is snappy and efficient on concrete prep; for delicate stone finishing, consider a denser pattern.
- Versus star or flat chisels: Chisels remove material faster in a line but leave uneven texture and risk gouging. For consistent surface profiling, the bushing head wins every time.
- Versus scabblers or grinders: Pneumatic scabblers excel at large, open areas with excellent profile control but require compressors and setup time. Grinders with PCD or abrasive tooling control depth and flatness but can smear paste and generate more silica dust. This bushing head is the nimble, plug-and-play option for spot work, edges, steps, and moderate area prep.
Tips for best results
- Map the surface into grids and work methodically. It’s easy to miss patches on light-colored slabs.
- Start at lower impact settings and only increase if productivity lags.
- Cross-hatch for deeper profiles rather than dwelling in one spot.
- Stay shy of edges, then feather in at reduced energy to prevent spalling.
- Pair with dust extraction or misting, especially indoors.
- For overlays, confirm the target profile (e.g., ICRI CSP level) and test a small area to verify the texture you’re producing.
Value
As a single, steel accessory, the value comes from productivity and lifespan. In my use, the HS1909 paid for itself quickly by cutting prep time and giving a uniform texture that reduced follow-up grinding. Tooth wear has been reasonable on standard slab work. If you regularly prep concrete, especially stairs and edges, it’s an easy addition to the kit.
Bottom line: my recommendation
I recommend this Bosch bushing head for anyone running an SDS-max hammer who needs reliable, uniform surface prep on concrete and masonry. The 1-3/4 in. face and 16-tooth layout hit a sweet spot between speed and control, the slightly longer length improves ergonomics on floor work, and the steel construction holds up well under typical jobsite abuse. It’s not a replacement for demolition chisels or a fine architectural bush hammer, and it won’t solve large-area prep as efficiently as a dedicated scabbler. But for everyday tasks—opening profile for overlays, knocking down high spots, adding slip resistance to treads, and cleaning up patches—it’s a dependable, productive tool that earns its place in the case.
Project Ideas
Business
Mobile Concrete Prep Service
Offer on-site surface profiling (CSP) for epoxy, overlays, and microtoppings, especially at edges, stairs, and tight spots grinders miss. Package with moisture testing and quick-turn scheduling for contractors.
Anti-Slip Stair & Ramp Texturing
Specialize in bush-hammering high-traffic stairs, ramps, and pool decks to improve traction and meet safety standards. Provide patterned textures (stripes, chevrons) and clear before/after slip-resistance metrics.
Historic Texture Matching & Facade Refresh
Restore stone/concrete facades by unifying patchy surfaces and replicating historic bush-hammer finishes. Market to architects, HOAs, and municipalities needing sensitive restoration work.
Artisan Bush-Hammered Products
Produce and sell textured planters, pavers, stair treads, firepit caps, and wall tiles with signature patterns. Sell online and through landscape yards; offer custom textures for designers and builders.
Custom Stone/Concrete Signage
Create branded exterior signs with bush-hammered fields and raised logos/lettering for cafes, wineries, and boutiques. Upsell installation, sealing, and night lighting integration.
Creative
Bush-Hammered Concrete Art Panels
Cast thin concrete panels and use the 16-tooth head to create bold textures, gradients, and patterns with stencils. Combine smooth and bush-hammered zones for high contrast wall art or architectural accents.
Stone Sculpture Finishes
Shape soapstone/limestone first, then apply a uniform stippled bush-hammer finish to make forms read clearly in light. Alternate polished highlights with textured fields for dynamic, tactile pieces.
Rustic Garden Pavers
Create stepping stones and pavers, then bush-hammer the surface for anti-slip texture and a hand-hewn look. Use simple templates to imprint motifs (leaves, compass roses) by leaving areas smooth.
Exposed-Aggregate Accent Bands
On green (young) concrete, selectively bush-hammer to reveal aggregate in bands or mosaics. Great for patio borders, table tops, or planter rims with a natural, sparkly stone reveal.
House Signs & Address Plaques
Carve or cast raised letters, then bush-hammer the background to make typography pop. Seal the plaque for contrast and durability, and mount on wood or metal backers.