Features
- Replace any lost or misplaced parts for your Ring Video Doorbell (2nd Generation).
- Spare parts help you setup your Ring Video Doorbell (2nd Generation) in just a few minutes.
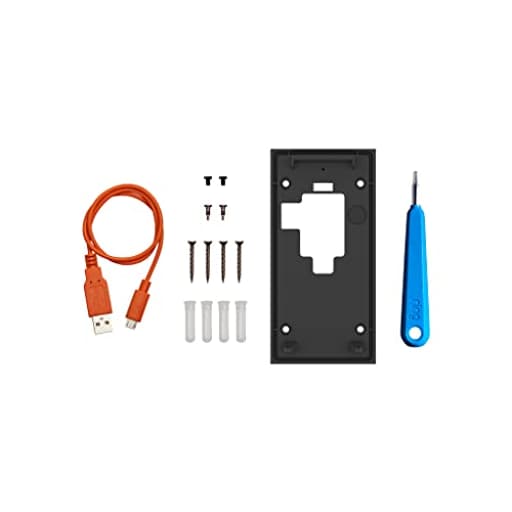
- Comes with a micro-USB charging cable, screwdriver, mounting screws, security screws, terminal screws, mounting bracket, and anchors.
- Compatible with Ring Video Doorbell (2nd Generation) only.
Specifications
| Release Date | 2022-11-09T00:00:01Z |
A spare parts kit that replaces lost or misplaced components for a video doorbell and provides the items needed for setup and charging. Includes a micro-USB charging cable, screwdriver, mounting screws, security screws, terminal screws, mounting bracket, and anchors; intended for use only with the corresponding compatible video doorbell.
Ring Spare Parts Kit for Video Doorbell Review
I didn’t expect a small bag of screws and a bracket to change my day, but the spare parts kit did exactly that. After moving the 2nd‑gen Ring doorbell from a stucco wall to a wood jamb, I realized I’d misplaced half the install hardware and nicked the original bracket. Rather than hunting for one‑off fasteners and a security bit, I used this kit to get the doorbell back up, powered, and secure in under 20 minutes.
What’s in the kit and why it matters
The kit is straightforward and complete for a fresh install or a tidy remount:
- Mounting bracket
- Mounting screws and plastic anchors
- Security screws
- Terminal screws for hardwiring
- Screwdriver
- Micro‑USB charging cable
For the 2nd‑gen unit, that list covers the full path from charge to mount. The micro‑USB cable let me top up the battery indoors before reinstalling; the bracket and hardware handled the wall side; the security screws locked the faceplate; and the terminal screws are there if you’re tying into a doorbell transformer.
Setup and fit
My reinstall took place on a painted wood doorframe. The bracket lined up with the standard hole pattern and seated flush without flexing. The included screws bit cleanly into pre‑drilled pilot holes; I didn’t experience stripping or cam‑outs using the included driver. On a test piece of masonry, the anchors expanded as expected in a properly sized hole and held the bracket without wobble. They’re generic nylon anchors—nothing fancy, but they do the job if you drill accurately.
Once the bracket was on, the doorbell slid into place with the same tolerance as the original mount. The security screws threaded smoothly and didn’t balk at being snugged down. I’ve had mixed luck with third‑party micro bits fitting Ring’s security screws, so it was a relief that the included driver matched the fasteners correctly and didn’t chew them up.
Charging is as simple as you’d expect: plug the micro‑USB cable into the doorbell’s port, wait for the battery indicator to go solid, and mount. It’s not a long cable, but it’s adequate for countertop charging. If you’re hardwiring, the included terminal screws replace lost ones cleanly and clamp the leads securely.
Build quality and design
Everything here feels like a faithful match to the originals:
- The bracket is rigid enough not to bow when you tighten the screws. It kept the device square against the frame, which helps avoid false motion events caused by vibration.
- The threads on the screws are clean, and the heads didn’t deform under normal torque. That’s more than I can say for a lot of generic replacements.
- The driver is a simple, light tool suited to a one‑off job. It’s not a shop‑grade screwdriver, but it grips the security screws properly and won’t round them if you use normal pressure.
The micro‑USB cable is basic. It’s not braided, not extra‑long, and not trying to be anything more than a way to get your battery charged. It worked reliably, which is all I needed.
Compatibility matters
This kit is intended for the 2nd‑gen Ring doorbell. Ring’s lineup is confusing—sizes, screw types, and brackets vary between generations and models. If you’re unsure, check the model in the app or on the back of your device before ordering. Using the wrong kit can mean almost‑fits that wobble or security screws that don’t match your faceplate. With the correct match, everything seats and tightens like the original hardware.
As a rule of thumb:
- If your device is the 2nd‑gen battery model with a built‑in (non‑removable) battery that charges via micro‑USB, you’re in the right place.
- If you have a different Ring doorbell (Pro, Wired, Doorbell 3/4, or peephole models), look for the kit specific to that model.
Day‑to‑day use after install
After a week back on the wall, the reinstall feels indistinguishable from the factory setup:
- The bracket holds firm; there’s no rattling when the door closes.
- The faceplate security screws remain snug and haven’t backed out.
- Hardwired test leads stayed tight on the terminals without slipping when gently tugged.
I also appreciate knowing I’ve got a few spare screws left in the drawer. Misplacing the tiny security screw is almost a rite of passage; having a matched replacement saves a trip to the hardware store and the frustration of trying to find a compatible head.
What could be better
- A clearer, printed quick‑start card would help. The hardware is simple, but a small diagram with hole spacing, recommended pilot sizes, and a reminder on polarity for transformer leads would cut down guesswork for first‑timers.
- Micro‑USB is functional, but it’s dated. You’re stuck keeping one legacy cable around just for this purpose. A USB‑C charge option on the device would be ideal, but since we’re talking spares, a slightly longer cable would make desktop charging more flexible.
- Small‑part labeling could be improved. The kit arrives organized, but labeling the baggies (mounting vs. terminal vs. security screws) would make it foolproof.
None of these are deal‑breakers; they’re quality‑of‑life tweaks that would turn a good kit into a great one.
Practical tips from install
- Take a photo of your old bracket before removal. It’s a quick reference for orientation and hole spacing.
- Pre‑drill pilot holes in wood. It prevents splitting and makes it easier to seat the bracket flush.
- If mounting to masonry, drill clean holes to the proper depth and blow out the dust so the anchors fully expand.
- Start both mounting screws loosely, check level, then snug them down. It keeps the bracket square.
- Keep one of the extra security screws taped inside a drawer near your door. It’s the one piece everyone loses.
Value
The appeal here is convenience and certainty. You can try to assemble a makeshift solution from a hardware aisle and an online driver bit, but the time cost adds up, and mismatched screws or an off‑spec bit can damage your faceplate or bracket. This kit gives you everything sized correctly for the 2nd‑gen unit, which means the remount feels like a factory install. For a modest price, you get the bracket, the right fasteners, the security bit via the included driver, and the charging cable—exactly what most users need to recover from a move, a lost screw, or a damaged bracket.
Who it’s for
- Owners of the 2nd‑gen Ring doorbell who are moving, remounting, or replacing a damaged bracket.
- Anyone who’s missing the security screw or mounting hardware and wants a one‑and‑done fix.
- Renters who inherited a device without the original parts and need a complete, matching kit to get up and running.
It’s not for users with different Ring models. If that’s you, you’ll want the kit matched to your specific device to avoid fit and screw‑head mismatches.
Final recommendation
I recommend the spare parts kit for any 2nd‑gen Ring doorbell owner who needs to replace lost or damaged mounting hardware, terminal screws, or the bracket, or who simply wants a clean reinstall with all the right pieces. It restores the out‑of‑box experience: proper fit, correct security screws, and a charging cable that just works. The build quality matches the originals, installation is straightforward, and the price is reasonable for the time and hassle it saves. I’d like to see better labeling and a brief printed guide, and I wish the charging ecosystem had moved beyond micro‑USB, but none of that undercuts the core value. If you need to get your doorbell back on the wall quickly and correctly, this is the kit to keep in your drawer.
Project Ideas
Business
Emergency Replacement Kit Retail
Create and sell curated spare-part kits targeted at specific doorbell models (start with Ring Video Doorbell 2nd Gen). Offer single-purchase kits on marketplaces (Amazon, Etsy) and a white‑label option for local hardware stores. Emphasize fast shipping and 'get back online in minutes' positioning to appeal to DIY homeowners and landlords.
Local Installation & Repair Service
Offer a mobile service that installs, troubleshoots, or replaces lost doorbell parts on-site. Bundle the spare parts kit as a carry kit so technicians can complete repairs in one visit. Charge a flat service fee plus parts, and partner with property managers and real-estate agents for recurring work.
Subscription Parts & Maintenance Plan
Launch a subscription for homeowners and small landlords that delivers a fresh spare-parts kit annually (or on-demand) and includes seasonal checks, simple maintenance guides, and priority scheduling for installs. Add tiered plans for multi-property managers with volume discounts.
How-To Content + Kit Bundles
Produce short video tutorials and downloadable guides showing creative uses, step-by-step installation, and quick fixes. Monetize via ad revenue, Patreon, or selling the physical kit bundled with exclusive video access. Use content to drive organic search traffic and position yourself as a niche expert.
Bulk Supply for Property Managers & Hosts
Sell bulk kits and discounted service packages to landlords, Airbnb hosts, and small building managers. Market the kits as part of a preventative maintenance checklist so properties can quickly replace missing or damaged parts between tenants, reducing downtime and support calls.
Creative
Upcycled Doorbell Key Rack
Turn the mounting bracket into a wall-mounted key rack: bend or mount the bracket as the backplate, use the longer mounting and security screws as decorative hooks, and anchor it to the wall with the supplied anchors. Use the micro‑USB cable coiled and tied as a decorative tassel or cord wrap. Finish with a coat of paint or patina for a custom rustic look.
Mini Gadget Charging Dock
Build a compact charging station for small devices. Fix the bracket to a small wooden block or reclaimed shelf with the included screws, route the micro‑USB cable through a notch, and hide excess cable behind the block. Use the terminal screws as cable clamps or decorative studs. This creates a tidy, wall-mounted dock for older phones, Bluetooth earbuds, or small rechargeable tools.
Wall-Mounted Cable Organizer
Use the bracket and anchors to create a versatile cable-hanger: mount the bracket horizontally and install a row of the supplied screws as pegs for wrapping charging cords and earbud cables. The screwdriver can be repurposed as a hanging tool or label stick. Paint or label each peg for different cable types to keep a workshop or charging station organized.
DIY Security Prop / Faux Doorbell
Assemble a convincing dummy doorbell unit to deter tampering: attach the bracket to a small board, mount a faux faceplate (made from scrap metal or painted wood) using the security screws, and route the micro‑USB cable to power a small LED behind the faceplate. Place by the entryway to simulate an active video doorbell without the cost of additional electronics.
Small Parts Organizer & Project Tray
Convert the kit into a tabletop kit for hobbyists: mount the bracket inside a shallow wooden tray to create compartments for screws, anchors, and small bits. The screwdriver acts as the built-in tool, and the micro‑USB cable can be stowed for charging small electronics used in projects. Label compartments for quick reuse in future builds.