Features
- 【Easy Installation】 - Just peel and stick our self-adhesive wood vinyl flooring onto the original flooring or wall. It's easy to cut with scissors or a knife, requiring no power tools, prior experience, glue, or accessories.
- 【 Not sticky residue left】 - Self adhesive and removable. No sticky residue left, not damage the floor. Durable thin wood vinyl flooring peel and stick tiles for floor. peel and stick waterproof floor tiles feature WPU Pressure Sensitive Adhesive for strong bonding with minimal gaps Crafted from durable PVC, they've passed rigorous wear tests for long-lasting quality.
- 【Consistent Color】 - When purchasing our vinyl flooring, there's no need to worry about noticeable color differences between batches. Colors will be as consistent as possible in all batches.【Multi-Scene 】-The vinyl flooring tiles are attached to any flat, clean and dry floor. The stick and peel floor tiles ideal for kitchens, bathrooms, corridors,laundry, living rooms, RV, entryway, bedrooms.
- 【Superior Properties】 - Our peel and stick floor tile offer exceptional waterproofing,durability, and easy to clean and care. With a wear-resistant, heatresistant, and non-slip design, they ensure long-lasting strength and safety.
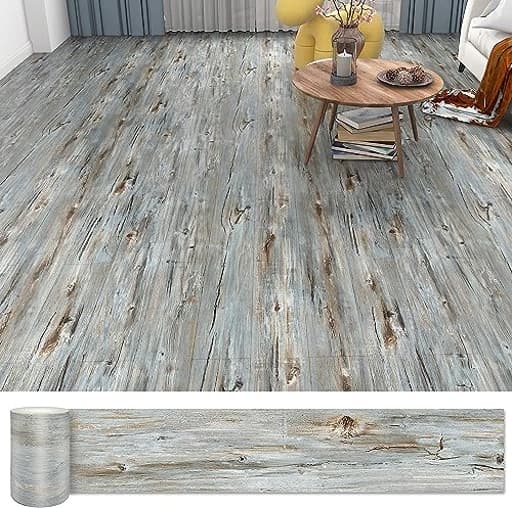
- 【Size & Coverage Area】 - Each floor tile measures 36 x 6 inches, with a thicknessof 0.6mm. A set of 36 pcs covers an area of 54 Sq.Ft, while 12 pcs cover 18 Sq.Ft. lf you're unsure about the product, you can start by purchasing just 22 pcs to assessthe results without disrupting your daily life.
Specifications
| Color | Dustgray |
| Size | 36 Tiles |
| Unit Count | 36 |
Related Tools
Peel-and-stick vinyl floor tiles (36 pieces, each 36 × 6 in, 0.6 mm thick) provide a waterproof, self-adhesive covering that installs over flat, clean, dry floors and can be trimmed with scissors or a utility knife without power tools. Made from PVC with a WPU pressure-sensitive adhesive, the tiles are removable without leaving sticky residue, are wear‑resistant, heat‑resistant and non‑slip, and one 36‑tile set covers 54 sq ft with consistent color across batches.
Lareko Waterproof Peel and Stick Floor Tile, 36 Pack 54 Sq.Ft(NO Sticky Residue Left) Wood Plank Vinyl Tile Stickers, Self-Adhesive DIY Flooring Tiles for Bedroom, Living Room, Bathroom (36" x 6",Dustgray) Review
Why I tried these peel-and-stick planks
I’m a big believer in projects you can knock out in an afternoon with a knife, a straightedge, and a little patience. I tested the Lareko peel-and-stick planks in a small bathroom and a pantry, both over existing, intact flooring. I wanted to see if a thin, budget-friendly vinyl could deliver a visual refresh without the hassle of power tools or the commitment of fully glued LVP.
Short version: they’re impressively easy to install, forgiving to work with, and transform a room’s look quickly. They’re also very thin, which is both their superpower and their limitation.
What you’re getting
- Format: 36-inch by 6-inch planks
- Thickness: 0.6 mm
- Coverage: 36 planks cover 54 sq ft
- Adhesive: WPU pressure-sensitive backing (peel and stick)
- Surface: PVC with a wood-look print, labeled “Dustgray”
- Rated as waterproof, wear-resistant, heat-resistant, and non-slip
The Dustgray shade reads as a cool, neutral gray in real life—less blue than some product photos suggest. Color consistency plank-to-plank was solid in my boxes, which matters if you’re buying multiple sets over time.
Installation: approachable even for first-timers
I prepped the floors by vacuuming, mopping, and letting them dry completely. Any peel-and-stick product lives or dies by its substrate: flat, clean, and dry is the rule. Because these planks are only 0.6 mm thick, expect texture to telegraph. On my bathroom floor, faint grout lines from the old sheet vinyl showed through at raking light. If your existing floor has bold texture or deep grout lines, either skim-coat or set your expectations.
Layout is straightforward. I chalked a reference line, then started with a staggered pattern (randomizing end joints by at least 6 inches). The adhesive is a sweet spot: tacky enough to grab, yet you can lift and reposition a plank during installation without shredding the backing. Pressing edges together carefully prevents gaps; if you overlap slightly, the thinness makes it mostly invisible, but it’s cleaner to butt the edges and keep your seams straight.
Cutting is easy with a utility knife and a metal straightedge—score, snap, and trim the back. Scissors work for small notches, though a knife yields cleaner edges. Around the toilet flange and door trim, I made templates from painter’s tape and transferred those to a plank. If you’re new to cutouts, making a quick paper or tape template saves wasted planks.
I rolled the finished floor with a hand roller. Even a paint roller wrapped in a towel helps; pressure improves bond. I also used gentle heat (a hair dryer) to soften the adhesive when coaxing a plank to settle over a slight depression—very handy along thresholds or over minor imperfections.
A few notes:
- There were small red stickers on some planks that weren’t explained. I removed them; they appear to be packing markers.
- The backing has no printed grid. Mark your own cut lines with a square to keep everything true.
- Doors cleared fine—no trimming required—because the material is so thin.
Fit and finish
Visually, the wood pattern is convincing at a glance and cohesive across the floor. The matte finish reads clean and modern, and the Dustgray tone pairs easily with white trim and brushed nickel hardware. Seams are discreet if you take time to align the edges. Because the planks are thin, they lay close to the subfloor and don’t create a proud edge at transitions.
Two caveats:
- Texture telegraphing is real. If your existing floor has noticeable patterning, you may see it.
- The material’s thinness minimizes trip edges but also reduces the sense of “plank” substance compared to thicker LVP.
Adhesion and removability
The WPU pressure-sensitive adhesive bites more firmly after 24 hours. On clean, dry vinyl, adhesion was strong; on a painted pantry floor (lightly sanded), also solid. I tested removability on an offcut pressed to a painted board for a week. It peeled away without leaving glue clumps or tearing paint, though that will vary by paint quality and surface prep. Over sealed surfaces or older vinyl, it’s likely to come up cleanly; over raw porous substrates, expect more resistance.
Waterproof and slip resistance
I spilled water near the tub and let it sit briefly; puddles didn’t penetrate seams during casual use, and the surface stayed grippy underfoot. This is “waterproof” in the sense that the material doesn’t absorb water and daily splashes aren’t an issue. It’s not a watertight floating floor—seams aren’t sealed—so don’t treat it like a shower pan. Wipe standing water promptly and consider a bead of caulk at tub edges if you’re splash-prone.
Durability and wear
After a few weeks, the bathroom shows no lifting at corners and cleans easily with a damp microfiber mop. The pantry—shoes on, light traffic—looks the same as install day. That said, at 0.6 mm, this is closer to a decorative surface than a heavy-duty plank. I wouldn’t choose it for a busy mudroom, a dog-run kitchen, or anywhere that sees grit and rolling loads. For bedrooms, offices, guest rooms, and low-to-moderate traffic spaces, it’s a sensible upgrade. If you need multi-year resilience in high-traffic zones, a thicker click-LVP is the safer bet.
Where it shines—and where it doesn’t
Shines:
- Quick refreshes: rentals, guest rooms, playrooms, offices, RVs
- Small bathrooms and closets where door trimming is a concern
- Temporary or semi-permanent installs where removability matters
- Accent wall or backsplash applications (it sticks well to smooth, painted drywall)
Less ideal:
- High-traffic entries or kitchens with pets and sand
- Subfloors with heavy texture or unevenness
- Wet rooms that see chronic standing water
Tips for best results
- Prep painstakingly: vacuum, damp mop, and fully dry. Degrease kitchens.
- Address telegraphing: skim shallow grout lines if you want a glass-smooth finish.
- Acclimate planks in-room for 24 hours.
- Snap a square starting line; stagger end joints by 6 inches or more.
- Dry-fit tricky cuts; use tape or paper templates for door trim and toilet bases.
- Roll the floor after install to seat the adhesive.
- Use gentle heat to relax planks over slight irregularities.
- Remove baseboards first or plan to cover edges with quarter-round for a clean perimeter.
- Order enough at once to avoid mix-ups and verify piece counts on arrival.
The drawbacks
- Thin construction: great for clearances and forgiving overlaps, but not built for punishment.
- No printed grid on the backing and no detailed instructions; first-time installers may wish for more guidance.
- Color naming can be confusing compared to photos; Dustgray leans neutral gray in person.
- Because it’s peel-and-stick, substrate prep is everything—skimp there and you’ll see imperfections.
Value
Cost-per-square-foot is competitive, and the tooling is minimal—no saws, no adhesives, just a knife and a straightedge. For spaces where you want a clean look without a remodel’s overhead, the value equation is strong. If you factor in longevity for heavy-use rooms, the calculus shifts toward thicker floating LVP.
Recommendation
I recommend the Lareko peel-and-stick planks for quick, low-commitment upgrades in low-to-moderate traffic areas where ease of installation, removability, and thin profile are priorities. They install fast, look cohesive, and handle everyday splashes without drama. Just be realistic about the substrate and intended use: prep thoroughly, avoid heavy-textured floors unless you’re willing to skim, and steer high-wear rooms toward more robust flooring. For renters, DIYers tackling small baths or bedrooms, and anyone refreshing a space on a budget, these planks are a practical, good-looking choice.
Project Ideas
Business
Quick Refresh Service for Renters & Airbnb Hosts
Offer an on-demand service to install and later remove peel-and-stick flooring accents for rental units and Airbnbs. Package options: entryway makeover, kitchenette update, full-studio refresh. Low material cost and fast install times yield healthy margins; market via local property managers, Airbnb host groups, and social ads showcasing before/after photos.
Pre-Cut Kits and Pattern Templates Shop
Sell curated, pre-cut tile kits for common use-cases (stair risers, shower base liners, closet floors, RV step kits) along with printed installation templates and video guides. Offer digital templates designers can download and a physical kit option for DIYers—an upsell to the raw tile set that saves customers time and reduces waste.
Pop-up & Event Flooring Rental
Provide short-term branded flooring solutions for pop-up shops, trade shows and events. Supply removable, damage-free floor coverings that can be installed quickly and swapped between events. Offer design layout services to create brand patterns or logos using tile arrangements—charge rental + design + install fees.
Workshops & Online Courses
Host hands-on local workshops (community centers, makerspaces) teaching creative uses: accent walls, furniture wraps, and geometric floors. Complement with online video courses and sell starter packs (a small tile set plus tools). Monetize through ticket sales, product bundles, and a membership for seasonal project ideas.
B2B Supply & Subscription for Short-Term Housing
Create a B2B offering that supplies property managers, staging companies and RV renovators with bulk tile shipments and a subscription for seasonal swaps. Include sample boards, quick-ship kits for urgent turnovers, and white-glove support. Recurring revenue from subscriptions and bulk discounts will stabilize cash flow.
Creative
Removable Accent Wall Planks
Create a faux wood plank accent wall by installing the 36×6 tiles vertically or horizontally. Trim to fit around outlets and corners with a utility knife or scissors. Because the tiles are removable with no sticky residue, this is perfect for renters who want a temporary, high-impact focal wall in a bedroom or living room.
Geometric Floor 'Rug' or Mural
Cut tiles into triangles, hexagons or other shapes and lay them as a floor 'rug' or geometric mural in an entryway or under a dining table. Use contrasting layouts (herringbone, chevron, checkerboard) to mimic expensive floors without permanent change. The waterproof surface makes it easy to clean and ideal for high-traffic zones.
Stair Riser Makeover
Refresh plain stairs by applying patterned or solid tiles to the risers only. Trim each tile to riser height and apply—no power tools required. This adds visual interest while keeping treads unchanged for traction and safety; removable adhesive lets you update looks seasonally.
Furniture & Cabinet Wraps
Refinish tabletops, cabinet faces, drawer fronts or shelving by wrapping them with the vinyl tiles. The thin PVC conforms to flat surfaces and can be trimmed for seamless edges. Use for quick kitchen cabinet refreshes, thrifted furniture makeovers, or to create coordinated sets.
Portable RV/Boat Flooring Zones
Make custom-fit, removable waterproof floor zones for RVs, campers or boats—cover high-use areas like entryways, kitchenette floors, or kids’ play corners. The tiles’ water and heat resistance plus easy trimming make them ideal for irregular spaces where a permanent renovation isn’t practical.