Features
- Part OE Number: 11617544805;11617502275
- Intake Manifolds Valve Repair Kit fit for BMW M54 3.0 LTR
- Replace faulty parts instead of the entire equipment
- Valve repair kit is material, can last long time
- Make sure this is the correct application type of valve repair kit before placing order.
Related Tools


An aluminum intake manifold valve repair kit that provides replacement internal valve components for rebuilding faulty intake manifold valve assemblies. It lets you repair the manifold instead of replacing the entire unit using OEM‑compatible parts; verify vehicle compatibility before ordering.
X AUTOHAUX Intake Manifolds Valve Repair Kit Aluminium Rebuild Fix Overhaul for M54 3.0 LTR Review
Why I tried this kit on my M54
My E39 530i (M54 3.0) started developing the classic symptoms of a worn DISA valve: a hollow rattle at idle, a slight stumble coming off throttle, and a noticeable soft spot in midrange torque. The DISA (intake manifold adjuster) on these engines wears at the flapper and shaft, and when it loosens up you get noise, vacuum leaks, and lazy response. Replacing the entire unit gets expensive, so I took the budget-friendlier route: an aluminum intake manifold valve repair kit. I wanted something that would outlast the factory plastic bits and restore the sealing and actuation without replacing the whole assembly.
What’s in the box and build quality
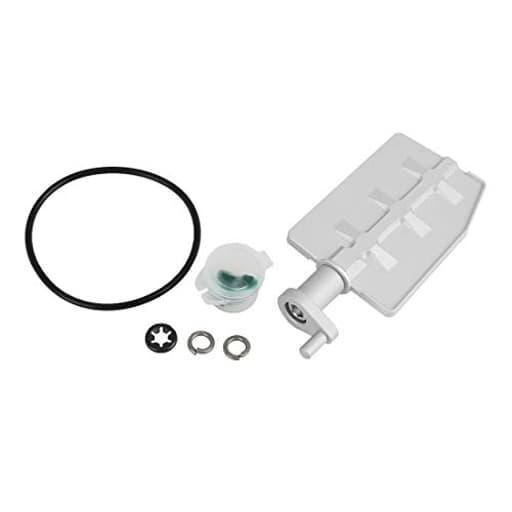
The repair kit I used is an aluminum rebuild set intended for the M54B30 and cross-references OE part numbers 11617544805 and 11617502275. The core pieces are:
- An aluminum flapper plate
- A metal shaft and lever arm
- Fasteners and a return spring
- Sealing elements (O-rings)
The metal components feel robust and well machined, with sharp edges broken and a uniform finish. The flapper is notably heavier than the original plastic, which can be a good thing for durability, but it makes proper fit and smooth pivoting even more important. The spring tension felt close to stock; not overly stiff, which matters for the actuator’s lifespan.
The included O-ring for the manifold seat was slightly thicker than the tired factory seal I removed. That helped with sealing, but it also meant the assembly needed even, gentle tightening to seat correctly. There were no instructions in my kit—worth noting—so you’ll want to be familiar with the DISA layout before you start.
Fitment and compatibility checks
This kit is specifically for the M54 3.0-liter variant. Before ordering, verify the number on your existing DISA housing and the engine code—this won’t fit the 2.5 or 2.2 without the corresponding version. The easiest way is to pull the unit, clean the label, and compare to the OE numbers above.
Just as important: inspect your plastic DISA housing. If the pivot bore is ovalized, cracked, or the actuator’s diaphragm is torn, a rebuild kit won’t save it. The kit replaces the internal moving bits; it does not fix a damaged housing or a failed vacuum actuator.
Installation notes from the garage
Plan on an hour if you’ve done one before, two if it’s your first time. Here’s what I used and what stood out:
Tools and supplies:
- Torx drivers (T40 for the DISA screws on my car), small picks
- A fine file or Scotch-Brite for deburring
- Blue threadlocker (Loctite 242/243)
- Light lubricant (silicone or a drop of engine oil)
- Torque wrench that reads 8–10 Nm
Steps and tips:
1. Remove the DISA from the manifold and clean it thoroughly. Any grit will chew up the new shaft and seal.
2. Disassemble the original unit carefully, noting spring orientation and the lever’s position relative to the actuator arm. Take a few pictures—saves guesswork.
3. Test-fit the new shaft and flapper in the housing dry. On my unit, the fit was snug but smooth. If you feel binding, do not force it—inspect for burrs on the shaft or inside the housing and correct them. A burr you ignore becomes accelerated wear later.
4. Lightly lubricate the shaft and O-rings. Install the spring and lever; make sure the flapper sits flush in both open and closed positions with no side-loading.
5. Use a small amount of blue threadlocker on fasteners. You do not want these backing out into your intake.
6. Seat the new perimeter O-ring evenly. As you tighten the DISA back to the manifold, go in stages and cross-pattern to avoid pinching the seal. I torqued the mounting screws to approximately 9–10 Nm.
7. Before starting the car, manually cycle the lever and confirm the actuator moves the flap smoothly. Listen for any scrape or click that would suggest interference.
8. After installation, clear any stored mixture codes and let the ECU adapt over a short drive.
One caution: if the kit uses a retaining pin or circlip to secure the lever, ensure it is fully seated. A loose pin is a recipe for engine damage.
Results on the road
The change was immediate. The metallic rattle at idle vanished, and my idle quality stabilized. On the first drive, tip-in throttle felt crisper and the midrange (around 3,000–4,500 rpm) regained the pull I expect from a healthy M54. The intermittent lean code I’d been chasing disappeared, suggesting the new O-ring and tighter flapper-to-bore interface closed up a small vacuum leak.
I didn’t pick up any fuel economy miracle, but the car returned to baseline MPG once the trims settled. More important, the drivability felt OEM again—no fluttering note from the intake, and clean transitions as the DISA switches states.
Durability so far
After a few months and a couple thousand miles, the assembly remains quiet with no signs of loosening. I pulled it once to inspect: the shaft still rotated smoothly, and the O-ring hadn’t flattened excessively. Aluminum on plastic can be a tricky pairing depending on tolerances and lubrication; so far, wear appears normal. I intend to recheck annually during basic intake maintenance.
Long-term, the win here is replacing the plastic flapper and worn pivot with metal. The weak link becomes the plastic housing itself and the vacuum actuator diaphragm—both beyond the scope of any internal kit.
Shortcomings and cautions
A few realities to keep in mind:
- Instructions: Mine came without guidance. If you’re new to DISA repairs, that adds learning curve and increases the chance of misassembly.
- Tolerances: These kits depend on close machining and consistent plastic housings. If your housing has wear or variance, you may experience either binding (too tight) or persistent play (too loose). Either scenario undermines the benefit.
- Fit specificity: This version is intended for the 3.0-liter M54. Getting the wrong size is an easy mistake; always verify against 11617544805/11617502275.
- No fix for failed actuators: If the vacuum pod or external lever seal is shot, a rebuild kit won’t restore function. Test the actuator with a hand vacuum pump before committing.
- Heavier flapper: The added mass is fine if everything is aligned and the return spring is calibrated. If not, the actuator works harder and could fatigue earlier. I didn’t observe this, but it’s something to consider.
Value
Price-wise, a rebuild kit undercuts a full replacement DISA by a wide margin. If your housing and actuator are sound, this is a cost-effective way to eliminate rattle, restore sealing, and extend service life with metal components. If you end up needing a new housing later, you’ll wish you had gone straight to a complete unit—so the value equation depends on the condition of your existing parts and your appetite for DIY.
Who it’s for
- DIY owners comfortable with light precision work who want to keep costs down
- M54 3.0 drivers chasing rattle, minor vacuum leaks, and lazy midrange response
- Folks who inspect and confirm a good housing and actuator before ordering
Who should consider alternatives:
- Those who want a plug-and-play solution with zero tinkering or fit assessment
- Cars with cracked or worn housings or failed actuators (buy a complete DISA)
- Anyone uncomfortable with testing, deburring, or rechecking clearances
Final recommendation
I recommend this aluminum DISA repair kit for M54 3.0 owners who are willing to inspect their existing housing, verify compatibility, and take care during assembly. In my car, it eliminated the rattle, tightened up the intake’s sealing, and brought back the expected midrange punch—all for a fraction of the cost of a complete unit. The build quality is solid, and early durability has been encouraging.
That said, it is not a universal cure. If your plastic housing is worn or your actuator is failing, a kit won’t help—spring for a full replacement. And because tolerances matter, expect to spend a little time on test-fitting and careful assembly. For a capable DIYer, the payoff is worth it; for someone seeking set-and-forget simplicity, a new OEM or high-quality complete DISA may be the better route.
Project Ideas
Business
Specialized Valve Rebuild Service
Offer a niche repair service focused on BMW M54 intake manifold valve rebuilds using these OEM-compatible kits. Market to BMW clubs, independent shops, and owners as a lower-cost alternative to full manifold replacement; provide diagnostics, rebuilds, and a parts-and-labor warranty to build trust.
Refurbish-and-Resell Manifolds
Buy faulty intake manifolds cheaply, rebuild the valve internals with the kit, perform a pressure test and cosmetic refresh, then resell the refurbished manifolds on eBay, niche forums, and Facebook Marketplace. Include before/after photos, test reports, and a short guarantee to command higher resale prices.
DIY Kit + Video Course Package
Create a step-by-step video course that walks through inspecting, disassembling, rebuilding, and testing the intake valve assemblies. Sell the course bundled with the repair kit and a printed checklist on a Shopify store or Etsy, and offer tiered pricing with remote troubleshooting support for DIYers.
Hands-On Workshop for Mechanics/Enthusiasts
Host paid workshops teaching manifold valve rebuilds to local mechanics, shop owners, and enthusiasts. Provide a kit for each attendee, instructor guidance, and troubleshooting tips. Workshops can be run at a garage, community maker space, or at car-club events and serve as both revenue and marketing for repair services.
Upcycled Automotive Decor Line
Start a small product line of upcycled items (lamps, clocks, planters) made from rebuilt valve components and market them to car enthusiasts via Etsy, Instagram, and local car shows. Differentiate with quality finishes, limited runs, and story-driven product listings that highlight the part's BMW M54 provenance.
Creative
Mechanic's Desk Lamp
Use the aluminum valve body as the lamp base: clean and polish the part, route wiring through the intake port, mount an LED puck or adjustable bulb holder on top, and add a braided textile cord and switch. The finished lamp is a compact, automotive-themed desk light perfect for a garage office or car-lover gift.
Industrial Wall Clock
Turn the valve assembly into a wall clock by mounting a quartz clock movement through the valve bore and adding clock hands that contrast with the aluminum finish. Leave the surface raw or powder-coat it, then add engraved or stencil hour markers on an attached backing plate for a rugged, automotive statement piece.
Car-Parts Planter / Terrarium
Convert the valve housing into a small planter or terrarium: seal any unwanted openings, add a drainage layer and soil, and plant succulents or air plants. The aluminum shell makes a durable, low-profile planter that fits neatly on a windowsill or shelf and highlights the part's industrial aesthetics.
Teaching Cutaway Demonstration
Use the repair kit to rebuild a valve and then mount it in a small clear-acrylic cutaway assembly to show internal components and motion. This creates a hands-on demo for automotive classes, maker spaces, or trade-school open days—students can see spring action, seals, and movement without a full engine.
Automotive Sculpture / Coffee Table Centerpiece
Combine several rebuilt valve components and intake hardware into a sculptural assembly, weld or bolt them into a balanced arrangement, and top with a round glass disc to make a coffee table or centerpiece. Finishes like brushed aluminum, clear-coat, or selective patina turn salvaged parts into high-end industrial decor.