
Features
- You Will Get: Includes 1 pieces of clear acrylic sheet, each measuring 24 x 36 in and 1/2 in thick, with double-sided protective films to ensure clarity. Remove films before use for optimal transparency in your projects
- Durable and Sturdy Material: Crafted from premium thick acrylic glass sheet with a transparent, smooth surface, no burrs, and no odor. Strong and reliable for long-term indoor and outdoor applications
- Easy to Cut: Each clear acrylic sheet can be easily cut into desired shapes with saws or hand tools. Remove the protective film before processing; for table saws, use low speed to prevent cracking
- Weather-Resistant and Long Lasting: The cast acrylic sheet withstands temperatures from -40°F to 190°F and resists tearing or wearing, making it ideal for both indoor and outdoor creative or functional projects
- Versatile Applications: These acrylic sheet panels and acrylic board are great for signage, crafts, photo frames, menu boards, poster frames, DIY displays, and more—offering endless possibilities for creative use
Specifications
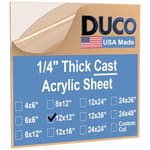
| Color | Transparent |
| Size | 24 x 36 Inch, 1/2 Inch |
| Unit Count | 1 |
Related Tools
A 24 x 36 inch, 1/2‑inch thick clear cast acrylic sheet with double-sided protective film, providing a smooth, burr‑free transparent panel for indoor and outdoor use. It withstands temperatures from −40°F to 190°F, can be cut with saws or hand tools (use low speed on table saws), and is suitable for signage, frames, displays, and other DIY projects.
Roowest 1 Pcs 24 x 36 Inch, 1/2 Inch Thick Clear Acrylic Sheets Transparent Plastic Panels Sheets Cut to Size Cast Acrylic Board Panel with Protective Film for Craft DIY Project Sign Frame Review
Why I picked up this sheet
I bought the Roowest acrylic sheet as a multi-purpose panel for two projects: a protective desktop overlay and a set of clear window inserts for a workshop door. The size (24 x 36 inches) and the substantial 1/2-inch thickness made it a candidate for both tasks without needing a custom order. After a few weeks of cutting, fitting, and living with it, I have a good sense of where this sheet shines and where to be cautious.
Build and clarity
Out of the box, the sheet is protected on both sides with a peel-off film. The acrylic itself is optically clear with no tint and minimal distortion, which matters for both displays and window use. On a black surface, I noticed a clean, mirror-like reflection at shallow angles—an easy way to check how flat and uniform the surface is. It’s not “glass-hard” (no acrylic is), but the surface finish is smooth and free of burrs.
At 1/2 inch thick, this is a heavy, rigid slab. For context, a panel this size weighs close to 18–19 pounds. The weight helps it sit flat as a desktop cover and adds a confidence-inspiring feel for signage or display panels that might get handled often.
Rigidity and load-bearing
One reason to choose 1/2-inch acrylic is stiffness. Spanning 24 inches across a desk riser, the sheet barely deflected under normal work loads. Used as a desktop protector, it stayed flat with monitors and a keyboard on top. For shelving or bench-top use, I’d still recommend support along the edges or stringers every 16–18 inches if you’re adding significant weight, but for typical desk and display applications it’s impressively rigid.
Cutting and machining
I experimented with a few methods and would rank them like this for 1/2-inch material:
Table saw: Best for straight, clean cuts. I used an 80-tooth non-ferrous/plastics blade, set the blade just proud of the sheet, and fed slowly. Lower blade speed and a steady feed minimized chipping and heat buildup. Removing the protective film reduced friction and gumming on the blade, but it leaves the face exposed—so I applied painter’s tape along the cut line for surface protection.
Circular saw with a guide: Also workable for straight cuts if you don’t have a table saw. Use a fine-tooth blade, tape both faces, clamp firmly, and support the offcut to prevent chipping at the end of the cut.
Scoring and snapping: Possible but demanding at this thickness. On a test strip, multiple deep scores on both sides and a careful, controlled break over a sharp edge did work. That said, for 1/2 inch, it’s not my first choice; saws offer far more predictable results.
Jigsaw/router: A jigsaw with a fine plastic blade will cut, but it generates more chatter and heat, and it’s harder to keep edges square. A router with a flush-trim bit is great for finishing edges against a straight template after a rough cut.
Laser: I tested a small offcut on a CO2 laser and didn’t love the result. The edge showed micro-bubbling and variable polish. At 1/2 inch, most hobby lasers will struggle or require multiple passes, which increases the likelihood of heat-affected edges. I wouldn’t recommend laser cutting this sheet.
Drilling went smoothly using a step bit and a backer board at slow speed. A standard twist bit can grab and crack at breakthrough; a step bit or brad-point bit is much safer. Always clamp the work and support it underneath.
Edge finishing
Fresh off the saw, edges were square but naturally showed fine saw marks. For a clean, touchable edge:
1) Start with 220-grit sandpaper to knock down tool marks.
2) Progress to 400, then 800/1000 wet to refine.
3) Finish with plastic polish (or a buffing wheel with plastic compound) for a glassy edge.
You can flame polish acrylic, but it’s easy to overheat the surface and induce stress crazing down the line. I prefer sand and buff for a more forgiving finish.
Fit, squareness, and tolerances
My panel arrived flat and largely square, though one long edge had a subtle saw wander—nothing dramatic, but visible against a machinist’s square. I took a quarter inch off that side and everything lined up. Expect to do at least some edge cleanup if your project demands precise squareness. Thickness measured consistently at 0.50 inches with calipers across multiple points.
Surface durability and care
This acrylic scratches more easily than glass, which is par for the material. For a desk cover, felt pads on accessories and a microfiber mat under a mouse keep it looking fresh. For cleaning, avoid ammonia-based products; a dedicated plastic cleaner or a dilute dish soap solution with a soft cloth is ideal. Minor scuffs buff out with plastic polish (Novus or similar). Static attracts dust once you peel the film—an anti-static cleaner or a quick wipe with a damp microfiber cloth helps.
Weather and outdoor use
The sheet is marketed as weather-resistant, and acrylic in general has good UV stability. I used a cut panel as a clear insert for an exterior workshop door for several weeks through hot afternoons and chilly nights. No warping, clouding, or stress marks appeared. The rated temperature range of −40°F to 190°F is more than sufficient for most climates. For long-term outdoor installations, ensure the sheet is well-supported and not locked into a frame too tightly—acrylic expands and contracts with temperature changes.
What it’s good for
- Desktop protector or workbench splash guard
- Signage and menu boards where impact resistance and clarity matter
- Picture/poster frames that benefit from lighter weight than glass
- Window or cabinet inserts that need shatter resistance with good transparency
- DIY displays, risers, and enclosures where thickness adds stability
The 1/2-inch thickness is overkill for some of these tasks, but it buys you rigidity, a premium feel, and a forgiving margin for drilling and mounting hardware.
What to watch out for
Shipping and handling: The protective film hides minor blemishes. Inspect under good light before you cut. Plan your layout to trim away any edge scuffs if present.
Scratch sensitivity: It’s acrylic. Treat it accordingly; use soft pads, avoid abrasive cleaners, and polish out scuffs as needed.
Laser cutting: Not recommended at this thickness. Sawing with proper blades is more reliable.
Heat during machining: Acrylic softens with heat. Use sharp tools, modest blade speed, steady feed, and avoid lingering in one spot. Chips should be well-formed, not melty.
Weight: At nearly 19 pounds, support it properly and mind your fingers during handling.
Tips that made my project easier
- Keep the film on for layout and scoring; peel it back only near the cut line for table-saw work if you’re seeing heat issues.
- Use a zero-clearance insert on the table saw and a fence or guide rail to prevent chatter.
- Tape both faces along the cut line to minimize chipping, and support the offcut to avoid a “hinge” crack at the end.
- For through-holes, clamp between sacrificial boards and use a step bit at low speed.
- Deburr edges with a cabinet scraper before sanding—quicker and cleaner.
The bottom line
The Roowest acrylic sheet is a solid, no-drama panel for DIYers and light commercial use who need a thick, clear, and sturdy sheet without ordering a custom cut from a plastics shop. It’s optically clear, rigid, and workable with common tools if you respect acrylic’s sensitivities to heat and scratching. I did have to true an edge and finish the sides to my standards, but that’s expected for stock panels.
Recommendation: I recommend this sheet for anyone who needs a thicker, more robust acrylic panel for desktops, signage, clear covers, or window inserts and who plans to cut and finish it with saws and hand tools. If your workflow depends on laser cutting or you need museum-grade surface hardness, look elsewhere. For everything else, this is a dependable, versatile piece of material that rewards careful handling with clean results.
Project Ideas
Business
Custom Acrylic Signage Service
Produce high‑end desktop and wall signs for offices, boutiques, salons and realtors. Offer options: clear with vinyl graphics, edge‑lit engraved signs, or printed/backpainted panels. Use the 24x36 sheets to make standard sizes and offer custom cutting. Pricing: premium for backlit/engraved pieces; volume discounts for businesses. Sales channels: local business outreach, LinkedIn, Etsy, Shopify and Google Local Services. Production tips: keep protective film on during cutting, polish edges, and package with corner protectors.
Retail Display & Visual Merchandising Kits
Create modular riser sets, necklace stands, and product pedestals to sell to small retailers and craft fair vendors. Sell as kits (three risers + non‑slip pads) or custom logo‑branded displays. Market to boutique owners, craft shows, and Etsy sellers. Manufacturing: batch cut multiple identical pieces from each 24x36 sheet to maximize yield; label and assemble kits for higher perceived value.
Personalized Awards & Nameplates
Offer small‑run personalized awards, desk nameplates, and corporate recognition plaques. Use engraving, UV printing, or vinyl application. The 1/2" thickness conveys gravitas for awards. Upsell presentation boxes and engraving services. Channels: corporate gifting, schools, community organizations, event planners. Keep a few common sizes pre‑cut to enable fast turnaround.
Restaurant/Menu & Point‑of‑Sale Solutions
Make durable menu holders, countertop menu stands, and portable table signage for cafes and restaurants. The weather resistance helps with outdoor patios; the clear surface is easy to wipe and sanitize. Offer bundled services: custom printed menu inserts + acrylic frames. Sell via direct outreach to local hospitality businesses and online marketplaces. Offer white‑labeling to sign shops and printers.
Protective Barriers & Sneeze Guards
Produce countertop shields, register guards, and portable folding barriers for small businesses, salons, and offices. The thickness is sturdy enough for freestanding units and pass‑through cutouts. Offer standard sizes cut from 24x36 sheets and a bespoke option with logo cutouts or printed branding. Margins are good for fast turnarounds; market through local business networks, community Facebook groups, and B2B email outreach.
Creative
Edge‑Lit Photo/Quote Panel
Cut the 24x36 sheet down to a rectangular panel, sand or bevel the edges, and rout or engrave a photo, illustration or quote on the face or edge. Mount a thin LED strip to one or more edges; the light will travel through the clear acrylic and make engraved lines glow. Use the double‑sided film while cutting to protect the surface, remove before polishing. Great as nightlights, desk art, or personalized gifts. Tools: jigsaw/table saw (low speed), small end mill or rotary tool for engraving, edge polisher. Finish: frosted back or vinyl backing to increase contrast.
Floating Photo Sandwich Frames
Make modern floating frames by cutting two matching panels and sandwiching a photo, pressed botanical, or textile between them. Use small aluminum or acrylic standoffs at the corners to hold the two panels apart and mount on the wall for a frameless look. The thickness gives a premium feel and supports hardware securely. Keep protective film on while drilling mounting holes; remove before final cleaning.
Layered 3‑D Wall Art
Design a multi‑layer artwork (3–6 layers) and cut shapes from the sheet to stack with spacers between layers, creating depth and shadows. Paint or adhere colored vinyl to the reverse of some layers for contrast. The 1/2" thickness reads as solid sculptural pieces and can be combined with wood backboards or LED backlighting. Use a jigsaw, band saw, or CNC router for precise repeatable parts.
Modular Display Risers & Pedestals
Cut the sheet into stepped risers, cubes, or L‑shaped pedestals for showcasing collectibles, candles, or baked goods. The clear look highlights the product and the sturdy 1/2" thickness supports weight. Add rubber bumpers or felt pads to prevent slipping and scratching. Make sets of three sizes as giftable retail items or personal studio organizers.
Small Clear Display Case / Terrarium
Use multiple sheets (or cut from the 24x36) to create a dust‑proof display box with a hinged lid or removable top for plants, figurines, or cake stands. The clarity showcases items while offering protection; the weather resistance makes it suitable for humid environments like terrariums. Bond seams with acrylic solvent cement for seamless joins or use discrete brackets for a reversible build.