
Features
- Battery-powered; no gas, compressor, or hose required
- Brushless motor for improved runtime and durability
- Tool-free selectable trigger for sequential or contact actuation
- Tool-free depth adjustment for countersinking staples
- Low nail/staple lockout to prevent dry firing
- Multi-functional LED lights for work illumination and basic diagnostics
- Integrated tool-free stall release lever to reset the driver blade after a stall
- Adjustable, reversible belt hook (left or right attachment)
- Bottom-load magazine for easier loading and jam removal
- Compatible with 20V MAX lithium-ion batteries
Specifications
| Battery Chemistry | Lithium Ion |
| Battery Type | Lithium Ion |
| Battery Voltage (V) | 20 |
| Battery/Charger | Tool Only (battery and charger sold separately) |
| Power Source | Cordless |
| Motor Type | Brushless |
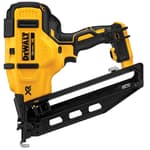
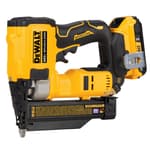
| Fastener Type / Gauge | 18 GA Crown Staples |
| Staple Crown Type | Narrow (1/4 in.) |
| Minimum Fastener Length | 1/2 in |
| Maximum Fastener Length | 1-1/2 in |
| Magazine Capacity | 100 |
| Magazine Loading | Bottom Load |
| Magazine Angle (Deg) | Straight |
| Firing / Actuation Mode | Tool-free selectable (sequential or contact) |
| Collation Type | Strip |
| Color | Yellow |
| Tool Weight | 6.55 lb |
| Dimensions (H × W × D) | 4.49 in × 11.97 in × 12.615 in |
| Included Items | (1) Narrow crown stapler (tool only) |
| Warranty | 3 Year Limited Warranty; 1 Year Free Service; 90 Days Satisfaction Guaranteed |
| Compatible Batteries | DEWALT 20V MAX batteries |
Related Tools

Related Articles

Cordless narrow crown stapler that drives 18-gauge (1/4 in. crown) staples from 1/2 in. to 1-1/2 in. Designed for finish work such as cabinetry, furniture, paneling and flooring underlayment. Uses a brushless motor and a 20V lithium-ion battery (battery and charger sold separately), providing cordless operation without the need for gas or an air compressor.
DeWalt 18ga Cordless Narrow Crown Stapler (Tool Only) Review
Why I reached for a cordless stapler
I left the compressor in the van. That was the whole point. For trim, cabinet backs, paneling, and underlayment, dragging a hose around a finished space is my least favorite part of the job. The DeWalt 18ga cordless narrow crown stapler promised hose-free convenience with pro-level results, so I put it through a few weeks of mixed work: cabinet carcasses, garage molding, some MDF panel backs, and a handful of field repairs where portability mattered.
Setup and first impressions
My sample was the tool-only version, so I paired it with a 4.0Ah 20V MAX battery. Out of the box, setup is straightforward: choose your staples (18-gauge, 1/4-inch crown, from 1/2 to 1-1/2 inches), slide open the bottom-load magazine, drop in a strip, click it shut, and you’re ready. There’s a depth adjustment dial on the nose that’s easy to thumb without looking, and a mode selector to choose sequential or contact actuation. The LEDs are positioned to wash the work area, and there’s a stall release lever if you manage to bind the driver.
The stapler is heavier than a compact pneumatic—about 6.5 pounds bare—which you notice on a ladder or in awkward reaches. Balance is decent with a 2–5Ah pack, and the rubber overmold and grip angle make it comfortable to hold for long stretches. The belt hook flips left or right and is sturdy enough to trust on a rung.
Power, speed, and drive consistency
Depth consistency is this tool’s calling card. I ran 1-inch staples into cabinet plywood and 1-1/4-inch into softwood cleats; once the depth was set, every shot sat right where I wanted it—flush or a hair below the surface. The brushless motor spools quickly and recovers fast enough to keep pace with a steady workflow. You’ll hear a brief whir before and after firing, but there’s no gas cartridge to worry about, no compressor refilling, and—importantly—no dry firing once the magazine runs low. The low-fastener lockout prevents empty shots and the slight “window” on the magazine helps you plan reloads.
It isn’t the absolute fastest tool for high-volume production compared with a lightweight pneumatic, but for typical finish and carpentry tasks, it’s more than fast enough. In sequential mode, I could place precise shots at a comfortable rhythm; in bump mode, I could walk along an edge and staple at a near-continuous pace with predictable results.
Trigger modes and control
I prefer sequential mode for trim and cabinets, where placement matters. The contact trip is deliberate: press the nose, squeeze, move on. For underlayment and paneling where speed matters more, I switched to contact actuation, held the trigger, and let the nose trip the shots. Both modes work well, and swapping between them is tool-free and obvious.
The safety tip has just enough spring to give good feedback. It’s not overly stiff, but it prevents accidental firing if you’re just grazing the surface at an angle. That translates to fewer “skids” and cleaner work on delicate faces.
Loading, jams, and maintenance
Loading is as simple as dropping a strip into the bottom-load magazine. The path is wide and smooth, so staples don’t snag. I had no jams with quality, straight strips. On purpose, I tried a slightly bent end-of-strip once and triggered a stall. Clearing it took seconds: pop the battery, flip the stall release lever to reset the driver, pull the strip, and go. No tools, no disassembly, no cursing.
The LEDs double as basic diagnostics; low battery and stall conditions trigger an obvious blink pattern. It’s a small touch, but it beats guessing why the trigger just locked out.
Ergonomics and usability
There’s no getting around the fact that cordless staplers carry their own power plant. Compared to an air stapler, the nose is a bit bulkier and the overall tool is heavier. The upside is you don’t have a hose tugging at your hand or telegraphing every movement. In confined spaces, the balance and hose-free feel let me get into spots where a pneumatic hose would fight me.
The LEDs illuminate the general work area rather than a precise aiming spot. For staples, that’s fine; I’m looking at the crown location more than a pinpoint. The overmold is grippy without being tacky, and the belt hook is a real advantage when you’re moving up and down a ladder.
Where it shines
- Cabinet backs and drawer bottoms: 3/4 plywood to carcasses with 1-inch staples seated perfectly flush.
- Paneling and MDF backs: consistent hold with fewer fasteners, and no compressor noise in finished spaces.
- Flooring underlayment: predictable depth across long runs, especially in contact mode.
- Light fence and trellis repairs: portability is the win; I walked the property with a pouch of staples and no hose.
Staples hold differently than brads. For painted trim, I like the extra holding power and can live with a slightly wider divot that gets filled before paint. For stained, furniture-grade faces, a brad nailer remains the cleaner choice.
Limitations and trade-offs
- Nose size in tight channels: the safety shoe is broader than a pneumatic finish stapler’s. In narrow channels or tight inside corners, you might not fully depress the tip to fire. If your work frequently requires shooting inside J-channels or narrow profiles, a smaller-nose pneumatic may still be necessary.
- Weight over long sessions: overhead or repetitive high-angle work will fatigue your wrist more quickly than with a featherweight air tool. The trade is you’re not wrangling a hose. I mitigate this with a lighter 2Ah battery for overhead and a 4–5Ah pack on bench work.
- Finish footprints: staples leave a wider mark than brads. For high-visibility, stain-grade trim, a brad nailer remains preferable.
Battery life and platform fit
With a 4Ah pack, I completed multiple small projects in a day and still had charge left. A 2Ah battery is fine for punch lists and trim touch-ups; for extended paneling or underlayment, I prefer a 4 or 5Ah pack to avoid swaps. The compatibility with the broader 20V MAX platform is the real value: if you’re already invested, this slots right in without extra chargers. If you’re not, remember the tool-only price doesn’t include a battery or charger, which affects the overall cost of entry.
The stapler’s standby behavior is efficient—no constant cycling, no idle noise. It’s blissfully quiet between shots. On active use, wear hearing protection; it’s still a nailer at heart.
Value and warranty
The price sits above an entry-level pneumatic but below the hassle of adding a compressor, hose, fittings, and ongoing setup time—especially for mobile or in-home work. You’re paying for portability, consistent results, and less mess in finished spaces. DeWalt backs it with a 3-year limited warranty, 1-year free service, and a 90-day satisfaction guarantee. In my experience, the build quality matches the warranty term: solid shell, tight magazine tolerances, and a driver system that inspires confidence.
What I’d change
- Slim down the nose assembly for better access in narrow channels and tight corners.
- Add a more focused LED option aimed closer to the crown line for precise work on narrow stock.
- Include a small starter pack of staples with the tool to get users firing out of the box.
None of these are deal-breakers, but they’d move the experience from excellent to nearly ideal.
Recommendation
I recommend this stapler to pros and serious DIYers who value portability and consistent results, especially if you’re already on the 20V MAX battery platform. It excels at cabinetry, paneling, underlayment, and general trim where a narrow crown staple is the right fastener. Depth is predictable, jams are rare and easy to clear, and the freedom from a compressor and hose meaningfully improves jobsite workflow.
If your work lives in extremely tight channels or you require an ultra-light tool for full days of overhead fastening, keep a compact pneumatic stapler in the kit as well. For everything else, this cordless stapler earns its place on my belt and in the truck, one consistent, hose-free staple at a time.
Project Ideas
Business
Mobile Trim & Punch List Service
Offer on-site repairs for baseboards, quarter-round, casing, paneling, and loose underlayment. The cordless stapler speeds attachment in tight spaces and occupied homes—no compressor noise or hoses. Market to realtors, property managers, and GC punch lists with bundle pricing per room or per visit.
Accent Wall & Paneling Installations
Specialize in installing beadboard, shiplap, beadless MDF panels, and fluted or reeded wall treatments. Use staples to secure thin panels and trim efficiently with clean, consistent depth. Provide design consults, material sourcing, and package tiers (half-wall wainscot, full wall, multi-room) for homeowners and boutique offices.
Chair and Headboard Reupholstery
Run a pickup/drop-off or in-home service re-covering dining chairs, benches, ottomans, and custom headboards. The 18ga stapler is ideal for fabric and vinyl over plywood frames. Upsell foam/batting upgrades, double-welting, and fabric sourcing. Offer 48-hour turnarounds for small batches to attract Airbnb hosts and stagers.
Flooring Underlayment & Stair Runner Installs
Provide fast underlayment stapling for vinyl/laminate installs and secure stair runners with precise, consistent fastener placement. The brushless, cordless tool makes apartment and condo jobs efficient and quiet. Price by square foot or stair, and partner with flooring retailers for referrals.
Event & Retail Display Fabrication
Build and re-skin booth walls, fabric-wrapped backdrops, signage panels, and product risers. Staples make rapid assembly and teardown easy without visible hardware. Offer modular rentals with branded fabric covers and charge for setup, customization, and storage between events.
Creative
Upholstered Headboard
Build a plywood headboard and wrap it with 1–2 inches of foam and batting, then stretch your choice of fabric over the front and staple it to the back perimeter with 1/2–3/4 in. staples. Add decorative channels or tufting by stapling fabric from the rear into cleats. The cordless stapler makes quick, clean work without hoses, and depth control helps avoid punch-through on thinner frames.
Cane-Webbed Cabinet Doors
Refresh tired cabinet doors by routing out the panel and replacing it with natural cane webbing. Soak the cane, stretch it over the opening, and staple the edges to the back of the door using 1/2–5/8 in. staples. Finish with a thin trim/spline to cover staples. Great for credenzas, media consoles, or kitchen uppers—lightweight and airy with a modern-boho look.
Mid-Century Webbed Bench
Make a simple hardwood bench frame and weave cotton or nylon webbing across the seat. Secure each strap end with two rows of 3/4–1 in. staples for strength, then add a cushion or leave it exposed for a classic MCM aesthetic. The stapler’s sequential mode lets you place fasteners precisely while maintaining even tension on each strap.
Fabric-Wrapped Acoustic Panels
Build frames from 1x2s, add mineral wool or acoustic foam inside, and wrap with acoustically transparent fabric. Use 1/2–3/4 in. staples on the back side to secure the fabric, pulling taut to avoid wrinkles. Install as wall art or a full accent wall to reduce echo in studios, offices, or living rooms. Integrated LED helps in low-light rooms and corners.
Slatted Acoustic Art Wall
Create a plywood backer wrapped in black felt (stapled along the perimeter), then glue and pin narrow wood slats on top for an upscale acoustic feature. Use staples to attach felt, French cleats, and hidden edge banding from the backside. The low fastener lockout prevents dry firing while you work across large panels.