Features
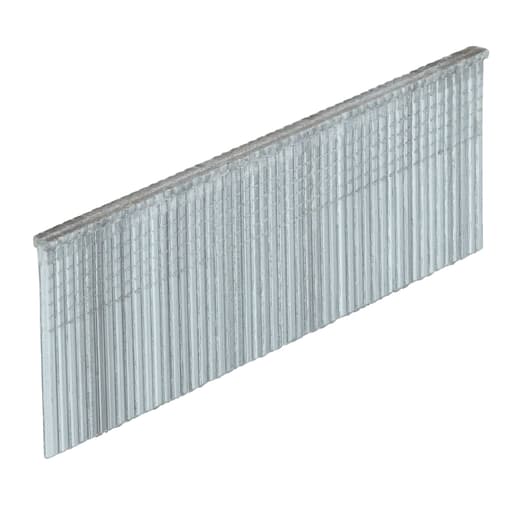
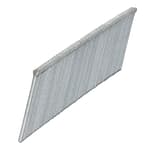
- Glue‑collated strips for use in compatible finish nailers
- Suitable for interior finishing (baseboards, casing, paneling, crown molding)
- Chisel point to reduce splitting
- T‑head (finish) style
- Smooth shank for standard fastening performance
Specifications
| Nail Length | 1 in. |
| Nail Gauge | 16 gauge |
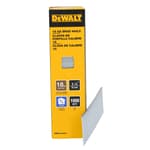
| Package Quantity | 1000 |
| Collation Material | Glue |
| Fastener Material | Metal |
| Fastener Type | Collated finishing/casing nail |
| Nail Angle | Straight |
| Nail Head Style | T Head |
| Shank Type | Smooth Shank |
| Fastener Head Width | .0642 in |
| Fastener Length | 1 in. |
| Fastener Callout Size | 1 in. x 16 Gauge |
| Loading Type | Strip |
| Assembled Depth | 3.875 in |
| Assembled Height | 1.406 in |
| Assembled Width | 1.875 in |
| Product Weight | .86 lb |
| Nail Penny Size (D) | 2d |
| Returnable | 90‑Day |
16‑gauge straight finish nails supplied in glue‑collated strips. Intended for use with most 16‑gauge straight finish nailers for interior finishing tasks such as baseboards, door and window casing, paneling, and crown molding. Chisel point helps reduce splitting of workpieces.
DeWalt 1 in. x 16 Gauge Glue Collated Straight Finish Nails (1000-Pack) Review
A compact, dependable consumable for light interior trim
Finishing nails aren’t glamorous, but they can make or break a smooth trim day. With the DeWalt 1-inch 16-gauge finish nails, I was looking for three things: clean driving, consistent collation, and a small, predictable hole that fills easily. These tick those boxes and slot neatly into the situations where a short, stiffer fastener is the right call—think light trim, returns, paneling, and delicate edges where a 16-gauge profile helps avoid deflection without tearing out the surface.
What they are and where they fit
These are straight, glue-collated, 16-gauge T-head finish nails in a 1-inch length, packaged in strips for most straight-mag 16-gauge finish nailers. The T-head is small enough to disappear under a dab of filler, but it’s still a 16-gauge nail—larger than an 18-gauge brad—so you get noticeably more holding power and a stiffer shaft that tracks straighter in wood. The chisel point is designed to reduce splitting by encouraging the nail to follow the grain rather than wedge it apart, and the smooth shank gives you standard withdrawal resistance, ideal when you’re pairing mechanical fastening with construction adhesive.
If you run an angled 16-gauge nailer, these won’t fit; they’re straight collation only. And because they’re a standard metal finish (not stainless or heavily coated), they’re intended for interior work. Keep them out of high-moisture or exterior applications.
Setup and compatibility
These fed cleanly in two straight 16-gauge finish nailers I keep on the bench—no fussing with strip length, no fighting a proud shoulder in the magazine, and no issues with the angle at the nose. Glue-collated strips can vary from brand to brand; these held together well enough to load with one hand yet separated cleanly without chunking or shattering a neighboring fastener. I didn’t have to slow down to baby the feed or re-stack partial strips.
If you’re used to paper-collated or plastic-collated strips, glue-collated nails behave very similarly in most finish nailers. The only caveat I watch for with adhesive collation is heat: working in a hot attic or sun-soaked room can make some adhesives a little tacky over time. With these, I saw minimal residue and no gumming in the nosepiece after a typical trim session.
Driving performance and consistency
Depth of drive was steady across pine, poplar, and MDF at typical finish pressures. I look for nails to set about a sixteenth below the surface without crushing fibers around the hole. These seated cleanly, leaving a tidy, circular impression that took filler easily. I didn’t run into bent shafts or “fishhooking” in softer stock, and I didn’t see the driver blade dragging adhesive into the hole—something that can happen with lower-quality glue-collated strips.
With 1-inch fasteners, you’re not trying to hit studs behind baseboard; you’re securing thin material to a stable substrate or pinning a mitered return. In beadboard paneling over plywood, these had enough bite to keep panels flat while adhesive cured. In shoe molding, they anchored well into MDF base without splitting either piece. For door and window casing, 1 inch is short unless you’re pinning returns or attaching trim to a solid jamb; for typical casing-to-stud fastening, step up to 2–2.5 inches.
Splitting, blowouts, and hole quality
The chisel point matters most near edges and in brittle stock. Driving close to the end of poplar cap molding, I didn’t see the telltale hairline splits that diamond-point nails can cause. The usual best practice still applies: orient the chisel so the long axis is perpendicular to the grain when possible, and angle the tool slightly to encourage the point to track away from an edge, not toward it. That technique, combined with the chisel tip, yielded clean results in softwoods and MDF.
The hole size is what you expect from 16 gauge—bigger than an 18-gauge brad, smaller than 15 gauge. If the smallest possible hole is your top priority (crown in stain-grade trim, for example), use 18 gauge. If you need stiffer fasteners that still finish cleanly, 16 gauge is the sweet spot, and these leave a hole that fills quickly and sands flush without “cratering” around the perimeter.
Holding power and practical applications
With a smooth shank and 1-inch length, holding power is modest but appropriate for their intended use. I like them for:
- Pinning mitered returns on base and crown before glue sets
- Securing shoe molding to baseboards without risking splits
- Tacking panel mold and wainscot cap while adhesive does the heavy lifting
- Scribe molding on cabinets and light rail where you don’t want fasteners telegraphing through
- Inside cabinet work where a longer nail risks poking through the back
In hardwoods like oak, they’ll drive fine, but keep expectations reasonable: if the joint will see racking or seasonal movement, add adhesive or choose a longer, ring-shank option where appropriate. For structural bite into studs or thick assemblies, these aren’t the tool for the job.
Feed reliability and cleanliness
Collation quality shows up in magazine behavior and at the nose. The strips stayed intact in the pouch and didn’t shed chips into the tool. During steady production pacing—think 20–30 nails per minute—I didn’t experience misfeeds or partial shears at the strip. After a few hundred nails, the magazine had a light dusting of adhesive flake, nothing that affected function. I’ve used some finish nails that leave a film on the driver blade, which then translates into ragged holes; that didn’t happen here.
Build and manufacturing consistency
Wire diameter and head sizing appeared uniform, and the T-heads tracked square to the shank. That sounds nitpicky, but oddball heads or slight bends can translate into angled entries or partial seating, forcing you to pull a piece and rework a surface. These had the dimensional consistency you want when you’re chasing clean lines and tight reveals. The head is small enough to set below the surface without mushrooming even in dense material.
Limitations to consider
- Length: 1 inch limits these to surface trims, paneling, and returns. For baseboard to studs or casing installs, reach for 2 inches or more.
- Shank: smooth shank is standard for finish work but offers less withdrawal resistance than ring-shank or screw-shank fasteners. Pair with adhesive when strength matters.
- Environment: interior use only. For bathrooms with persistent humidity or any exterior application, use galvanized or stainless fasteners.
- Compatibility: straight collation only—not for angled magazines. Always check your nailer’s specs before stocking up.
Tips for best results
- Keep your nailer’s depth-of-drive tuned so the T-head just disappears below the surface; too much depth crushes fibers and makes filling harder.
- Orient the chisel point to cut across grain, not along it, to reduce the chance of splitting and blowouts.
- Combine with a quality construction adhesive on larger trims; use these nails as clamps while the adhesive cures.
- In hot conditions, give the magazine a quick brush-out during breaks to keep any adhesive dust from accumulating.
The bottom line
These DeWalt 1-inch 16-gauge finish nails are a solid, no-drama consumable for interior trim tasks where a short, stiff fastener is the right choice. They feed reliably, set cleanly, and the chisel point helps keep edges intact in softwoods and MDF. You’ll still need longer nails for most base and casing installs, and you’ll want coated or stainless options for damp spaces or exterior work, but within their lane, they perform exactly as they should.
Recommendation: I recommend these for anyone who does interior trim and needs a dependable 1-inch 16-gauge option for paneling, returns, and light moldings. They offer consistent driving, a clean finish, and hassle-free feeding at a reasonable cost. Keep a box on the shelf for the many times when 18 gauge is too flimsy and a longer fastener is unnecessary.
Project Ideas
Business
Trim Refresh Micro-Service
Offer a fast, low-mess service: install/replace shoe molding and small trim returns, tighten loose casing, fill nail holes, and caulk/paint touch-ups. Market to homeowners pre-listing or post-flooring install. The 1 in., 16‑ga nails let you work efficiently on delicate profiles with minimal splitting and clean holes.
Picture-Frame Wall Packages
Sell fixed-price room packages for applied molding panels (e.g., entry, dining room, hallway). Provide design layout, materials, and installation using adhesive plus these finish nails to speed workflow. Upsell paint and crown/rail accents. Great before-and-after visuals for social media marketing.
Slat Feature Walls for Content Creators
Install stylish wood slat backdrops in home offices, studios, salons, and boutiques. Use a plywood or furring backer, adhesive, and 1 in. nails to rapidly tack slats with crisp alignment. Offer prefinished options, acoustic felt backing, LED edge lighting, and bundled photo/video packages.
Cabinet Door Facelift Service
Transform dated flat-panel cabinets by adding applied moldings, then paint or enamel. These nails make on-site assembly quick with minimal clamping and small, fillable holes. Pitch as a budget alternative to full refacing; price per door/drawer with volume discounts for kitchens and rentals.
Market Pop-Up: Custom Frames on Demand
Run a mobile booth at farmers markets and craft fairs. Cut simple wood profiles to size, glue, and nail frames on the spot for prints and canvases. Offer stain/paint finishes, matting, and hanging kits. The 1 in., 16‑ga nails speed assembly while keeping clean, professional joints.
Creative
Picture-Frame Molding Accent Wall
Create classic wall panels by applying 1/2–3/4 in. wide MDF or wood trim directly to drywall. Use construction adhesive plus these 1 in., 16‑ga finish nails to tack each piece while the glue cures. The chisel point reduces splitting on delicate profiles and the T‑head leaves tiny, easy-to-fill holes. Prime and paint for a high-impact, low-cost transformation.
Slatted Wood Headboard/Art Panel
Laminate thin wood slats onto a plywood backer to form a modern slat feature. The 1 in., 16‑ga nails are ideal for pinning slats through 1/4–3/8 in. stock into the backer with minimal telegraphing. Space consistently with a spacer block, glue each slat, then nail to hold alignment until cured. Finish with a clear coat or stain.
Applied Molding Cabinet/Door Makeover
Upgrade flat cabinet doors or interior hollow-core doors by adding thin picture-frame moldings to the face. Glue the molding and tack in place with these finish nails to avoid clamps and keep alignment. Caulk, sand, and paint for a custom shaker-style look without replacing doors.
Custom Picture Frames and Shadow Boxes
Assemble slim wood frames and shallow shadow boxes with glued miters, then secure with 1 in. finish nails through a backer strip or nailer blocks. The chisel point helps prevent splitting on narrow moldings. Add hanging hardware and finish to match your decor.
Shoe Molding and Trim Details
Install base shoe, quarter-round, and small cap moldings for clean floor-to-wall transitions. The 1 in., 16‑ga nails provide solid hold without over-penetrating thin profiles. Cope corners, tack to baseboards (or into studs where possible), then fill holes and caulk for a seamless finish.