Features
- 1. High-quality air nozzle: Our air nozzle is made of high-quality natural rubber, soft and durable, black and white can be matched with different sports balls.
- 3. Determine the air leakage: In long-term use and extreme conditions, the inflation valve will start to leak, you need to inflate frequently, or you will discard it. Before you buy, confirm whether your basketball, football or volleyball air valve is leaking. Just drop a drop of water on the air valve to generate bubbles to confirm the air leak.
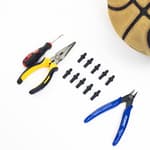
- 4. Wide application: Our products can not only repair basketball, but also apply to football and volleyball. The needle-nose pliers, crochet hook and diagonal pliers in the package can also be used as other repair tools.
- 5. The continuation of love: We all have feelings, and the same is true for the objects we use, especially the commemorative gifts, which will have feelings after a long time. Therefore, this set of repair tools can keep the baby with you for longer and let it rejoin Training and competition.
Specifications
| Color | Package 2 |
| Unit Count | 6 |
Related Tools
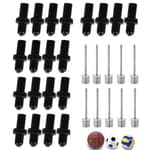
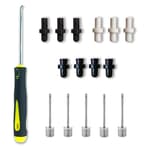
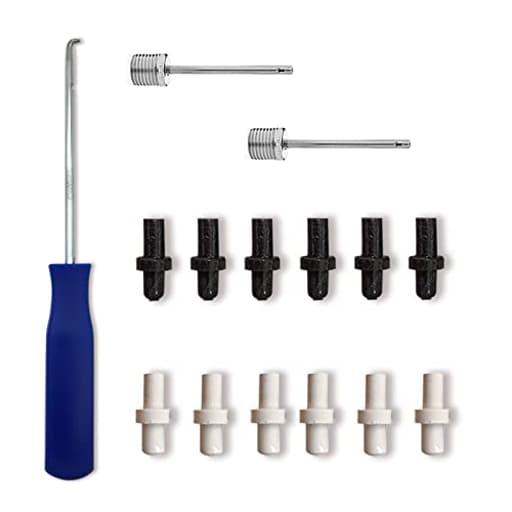
A sports ball valve replacement and repair kit for basketballs, footballs, and volleyballs that provides replacement air nozzles and basic hand tools. The kit includes soft, durable natural rubber valves in black and white plus tools (needle-nose pliers, a crochet hook, and diagonal pliers) to remove/install valves and locate leaks using a drop-of-water bubble test.
MINDCOLLISION Basketball Valve Replacement Valve, Sports Ball Leak Repair Kit, Sports Ball Doctor, White and Black Valve, Suitable for Basketball, Football, Volleyball,Package 2 Review
Why I reached for this kit
A slow-leaking valve is the most common reason a good ball ends up forgotten in a garage bin. I had a Wilson indoor basketball that needed a pump every afternoon and a composite volleyball with a valve that hissed the moment I pulled the needle. Rather than replace both, I tried the MINDCOLLISION valve repair kit to see if I could get them back in rotation.
What you actually get
My “Package 2” set included a small assortment of rubber replacement valves in black and white, plus three basic hand tools: a pair of needle‑nose pliers, diagonal cutters, and a blunt crochet‑style hook for snagging the old valve. The valves themselves are soft natural rubber and arrived with a light film of lubricant, which makes installation far easier and helps them seat. The black/white mix is a nice touch if you care about matching the look of the ball.
Build quality is adequate for a home repair kit. The hand tools are light-duty and not something I’d choose for daily shop work, but they’ll do the job for a few valves. The hook is intentionally not sharp, which matters—you don’t want to shred the old valve or gouge the bladder when you’re digging around.
One thing missing: printed instructions. If you’ve never replaced a ball valve, the process isn’t self-explanatory. I ended up relying on the typical approach used by ball techs and the quick diagrams on the product page.
The process I used
I ran the classic drop-of-water test to confirm both leaks were actually the valve and not a panel seam or bladder issue. A single drop on the valve inlet will bubble if air is escaping; both of my balls showed steady bubbles.
From there, my workflow:
1) Deflate the ball more than you think you need. That extra slack lets you push from behind while pulling with the hook.
2) Remove the old valve. I inserted the blunt hook into the valve, twisted to find some purchase, and pulled while pushing the rubber from inside with my fingers. On the basketball, this worked on the second try. On the volleyball, the hook slipped a few times; using the included needle-nose pliers to pinch the valve lip once it started to emerge made the difference. If you have a long, thin needle-nose at home, it’ll make removal easier than the short-nose included here.
3) Prep the hole. I wiped away any debris and added a tiny smear of water‑based lube (diluted dish soap or shaving cream both work). The replacement valves in this kit are lightly lubricated already, which helps.
4) Insert the new valve. I found it easiest to place the flanged end at the hole, then press evenly around the perimeter. A handy trick: the empty bit holder from a multi‑bit screwdriver fits over the valve and gives you a flat surface to push. You can also use the rounded back of the included hook. Once seated, I rotated the valve a half turn to ensure it wasn’t twisted.
5) Inflate and check. I pumped to playing pressure and did the water test again—no bubbles on the basketball, and the volleyball went quiet too.
The basketball fix took about three minutes start to finish. The volleyball was fussier at removal but still done inside ten minutes.
Results after play
I kept both balls in regular rotation for several weeks. The basketball has held pressure without any midweek top-ups. The valve feels snug, and the needle inserts smoothly without grabbing. The volleyball also held air well; I checked with the bubble test again after a few practices, still clean.
I did attempt a third repair on an older outdoor ball with a chewed-up valve seat. Even with a fresh valve, it leaked around the circumference. That’s a good reminder: a valve replacement won’t cure a torn bladder or a deformed seat. If you can see cracking around the valve hole or you hear air around the panel seams, no kit will save that ball.
Fit and finish of the valves
The valves in this kit are slightly softer than some OEM parts. That softness helps with sealing and needle feel, but I noticed minor molding variation on a couple (a bit of flash on the lip). In practice, it didn’t affect performance, though you may want to trim any obvious rubber whiskers before installation. The bore size matched standard basketball/volleyball/football needles perfectly.
Having both black and white options is thoughtful if you’re picky about aesthetics. Functionally, they’re identical.
Thoughts on the included tools
Hook: The blunt hook is the right call for safety, and it won’t shred the old valve. However, on slick, worn valves, it can struggle to get a bite. Twisting as you pull helps. If you own a longer, narrower hook or scribe, you might prefer your own.
Needle‑nose pliers: They’re serviceable. I used them to grab the valve lip once it peeked out. Two sets of pliers (one to hold, one to pull) makes removal nearly foolproof; if you only have the included pair, you can improvise by pushing from inside with a finger while pulling with the pliers.
Diagonal cutters: I didn’t need them. Some techs snip the exposed portion of a torn valve to get a better grip, but you can get by without cutting.
If you expect to repair a lot of balls, you’ll appreciate a better set of long needle‑nose and a small driver sleeve to press the new valve in. For a couple of repairs a season, what’s in the kit is enough.
Usability and learning curve
The lack of printed instructions adds a small learning curve, but the process is straightforward with a few practical pointers:
Confirm the leak first. Use the water drop test right on the valve.
Deflate fully. It makes removal safer and installation easier.
Lubricate lightly. Shaving cream or glycerin helps the new valve seat and reduces tearing risk.
Seat by rotation. A small twist after insertion ensures the flange is fully settled.
Re-test at pressure. Add a drop of water and look for bubbles.
Give yourself patience on the first attempt. By the second valve, the process feels routine.
Durability and longevity
Natural rubber is sensitive to drying. If you store balls in hot, dry conditions, any valve can harden over time. After installing these, I wiped a little protectant onto the valve area to slow drying and have had no issues through several weeks of use. Time will tell, but early signs are positive—no seepage, easy needle insertion, and stable pressure.
Value
One new midrange basketball can cost several times the price of this kit. If you have a couple of leakers at home or manage gear for a team, the math is easy: reviving even one good ball justifies the purchase. If you only have a single beater ball and you’re not comfortable with small repairs, replacing the ball may be simpler. For anyone willing to try a 10‑minute repair, this kit pays for itself quickly.
Where it falls short
No printed instructions. A simple one‑pager would help first-timers.
Light-duty tools. They work, but a longer hook and longer needle‑nose would make removal smoother.
Minor molding variation. Cosmetic, but worth noting if you expect OEM‑perfect parts.
Not a cure-all. If the leak is from the bladder or panel seam, no valve will fix it.
Practical tips for best results
Use a multi‑bit screwdriver’s empty bit holder as a press tool.
Keep a tissue at the valve during removal to catch any debris.
Mark the valve location with a tiny dot before removal; it helps you find the hole if the panel color hides it.
Store balls slightly inflated and away from heat to extend valve life.
Recommendation
I recommend the MINDCOLLISION valve repair kit to anyone comfortable with basic hand work who wants to save good balls from the trash. The replacement valves seal well, install with modest effort, and have held pressure in my basketball and volleyball over weeks of regular use. The included tools are functional but minimalist; if you already own better needle‑nose pliers, you’ll have an easier time. It’s not the right solution for damaged bladders or seam leaks, and the lack of instructions means you should be willing to follow a few common-sense steps. For teams, coaches, or households with multiple balls, this kit is a cost-effective way to keep your gear in play.
Project Ideas
Business
Mobile Ball Repair Service
Launch a mobile repair service that visits schools, community centers, gyms, and youth leagues to replace leaking valves and re-inflate equipment on-site. Offer per-ball repairs, bulk pricing for teams, and periodic maintenance contracts. Use the compact kit (needlenose pliers, crochet hook, diagonal pliers, multiple valves) to service dozens of balls per visit.
Curated Repair Kits & Branded Merch
Create and sell branded repair kits (premium valves in team colors, improved tools, step-by-step cards) on Etsy/Shopify. Offer themed bundles (youth leagues, coaches, parents) and small-batch upgrades like colored rubber valves, engraved pliers, and boxed presentation for gifts. Include tutorial videos and the bubble-test method to reduce returns.
Workshops & After-School Classes
Host paid workshops teaching equipment maintenance, basic hand-tool skills, and upcycling (e.g., making planters or lamps). Market to schools, rec centers, and maker spaces. Revenue streams: ticket sales, kit add-ons for students, and follow-up repair subscriptions for institutions that want scheduled maintenance.
Subscription Maintenance Program for Clubs
Offer a subscription where sports clubs and gyms receive scheduled visits (monthly/quarterly) to check ball inflation, replace worn valves, and swap in fresh valves from bulk stock. Add an online portal for booking, usage logs (how many balls repaired), and a warranty on replaced valves. This reduces equipment downtime and builds recurring revenue.
Creative
Commemorative Ball Restoration
Restore old or damaged commemorative basketballs/footballs by replacing brittle valves with the kit's soft natural rubber valves, re-inflating, and sealing. Add a leather- or fabric-repair patch, clean and condition the surface, then display on a small stand or shadow box. Great for preserving game-signed or milestone balls.
Inflatable Planter & Mini Terrarium
Turn an old basketball or volleyball into a removable planter: remove the top panel, replace/repair the valve so you can inflate/deflate for transport, line with a waterproof insert, and plant succulents or a small terrarium. Use the crochet hook and pliers to carefully remove the valve and any inner bladder remnants for a clean planting cavity.
Ball Chandelier / Cluster Light Fixture
Recover a set of old sports balls (same or mixed) and repair each valve so they can be inflated uniformly. Fit each ball with a small LED puck light and hang in a clustered chandelier. Use the valve kit tools to remove and replace valves cleanly and to test inflation. The finished piece is a striking sports-themed fixture for rec rooms or cafes.
DIY Refillable Stress & Training Balls
Make custom-weight or textured stress/training balls by cutting open old balls, inserting foam or rice bags, and installing a new valve so you can tweak inflation for firmness. The diagonal pliers and needle-nose pliers help access and seat the valve; the drop-of-water bubble test verifies a tight seal. Produce sets in different firmness levels for therapy or coaching drills.