Features
- For use with TrackSaw cutting system
- Replaces the inboard glide/friction strip on TrackSaw tracks
- Mounted on the underside/inboard edge of TrackSaw tracks
- Compatible with DWS520CK, DWS520K, DWS520LK and DWS520SK Track Saw models
Specifications
| Color | Black |
| Number Of Pieces | 1 |
| Product Height (In) | 0.88 |
| Product Length (In) | 7.38 |
| Product Width (In) | 6.4 |
| Product Weight (Lbs) | 1 |
| Product Weight (Oz) | 16 |
| Size (Alternate Listing) | 118 in |
| Upc | 885911109420 |
| Warranty | 90 Day Limited Warranty |
Related Tools
Related Articles

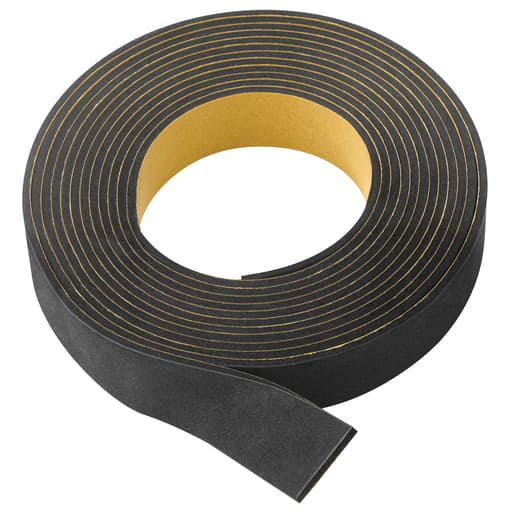
Replacement glide strip designed to replace the inboard friction strip on the underside of TrackSaw cutting tracks to restore smooth movement along the track.
DeWalt TrackSaw Replacement Friction Strip Review
Why I needed a new friction strip
After a few years of steady use, my DeWalt track started to feel scratchy under the saw. The glide that once felt silky had turned into a subtle stick-slip that made long rips require more effort and occasional mid-cut corrections. A quick inspection showed what I expected: the inboard glide strip—the one the saw base rides along—had become scuffed and embedded with fine dust and resin. Cleaning helped, but only briefly. It was time to replace it.
Enter the DeWalt friction strip. It’s a simple part with an outsized effect: a peel-and-stick, low-friction strip that runs the inboard edge of the track and restores that effortless push you expect from a good tracksaw system.
What this strip is (and isn’t)
DeWalt tracks have a few consumables: the splinter guard on the cutting edge, the grippy anti-slip strips on the underside, and the glide strip that the saw base rides on. This piece is that inboard glide strip. It’s not the anti-slip rubber on the bottom of the track, and it’s not the splinter guard. If your saw is dragging or chattering across the track—especially near the inner edge—this is the part that fixes it.
A quick note on specs: the strip is black, comes as a single piece, and is adhesive-backed. Depending on where you buy it, the listed dimensions can be confusing. My replacement arrived long enough to cover a standard track (with a little room for trimming). If you have multiple tracks or the long guide, verify length before ordering so you’re not caught short.
Installation: easy if you don’t rush
Replacing the strip took me about 20 minutes, with most of that spent on prep. Here’s what worked well:
- Remove the old strip cleanly. I lifted one end with a plastic scraper and peeled slowly to avoid tearing. Heat from a hair dryer made stubborn adhesive release more easily.
- Clean the channel. I wiped the track surface with mineral spirits, then followed with isopropyl alcohol to remove any residue. You want this area squeaky clean and dry before sticking anything down.
- Dry-fit first. Without removing the backing, I laid the new strip along the inboard channel to check alignment and length. I cut it 1/2 inch long on both ends to allow final trimming.
- Peel and place in stages. I peeled 8–12 inches of backing at a time, lightly positioning the strip so it hugged the inboard edge without stretching. Once aligned, I pressed it down with firm, even pressure.
- Roll it in. A J-roller or a hardwood block wrapped in a clean rag helps set the adhesive and eliminates bubbles.
- Trim flush. A sharp utility knife made quick, straight end cuts.
The adhesive is strong—more than adequate for the task—but it’s not especially tolerant of re-positioning. Get your alignment right as you go rather than lifting and resetting large sections. I let the track sit for an hour before cutting, and the bond felt rock solid.
On-track performance
The difference was obvious on the first pass. The saw glided smoothly with uniform resistance along the whole track, and the faint chatter I’d been compensating for disappeared. Two things stood out:
- Feed control improved. With the old strip, I had to vary my push slightly to maintain a steady pace. The new strip made it easy to keep my feed rate consistent, which in turn produced a cleaner cut face.
- Start/stop smoother. On long rips in sheet goods, transitions across seams or minor high spots used to create a little grab. The fresh surface let the base skate past those without transmitting a hitch to the blade.
I tested on plywood, MDF, and prefinished veneer panels. On all three, the strip resisted loading up with dust and resin better than my worn piece. When it did feel a little draggy, a quick wipe with a clean rag brought it back.
Durability and maintenance
So far, the strip has held up well. A few practical notes from use:
- It stays put. No peeling at the ends, even after repeatedly sliding the track in and out of a case and leaning it against walls on job sites.
- It resists gumming. Resin from softwoods and adhesives from plywood will inevitably polish and contaminate any glide surface over time. This strip cleans easily with isopropyl alcohol or a citrus-based cleaner. I avoid acetone and lacquer thinner to keep the adhesive safe.
- It doesn’t swell with humidity. I used it in a warm, dusty shop and on a cool, damp morning outside; the feel remained consistent.
- Expect gradual polishing. Like any low-friction surface, it will get slicker with use. That’s a good thing here—just keep it clean.
DeWalt backs it with a 90-day limited warranty. For a consumable part, that’s reasonable, though in practice you’ll know within the first few uses if the application was successful.
Compatibility and fit
The friction strip fits DeWalt’s track system and pairs well with the DWS520-series saws I use. It aligns with the inboard edge where the saw’s base plate rides, and it doesn’t interfere with the splinter guard or the anti-slip strips on the underside. If you run multiple tracks, install the new strip on each to keep the ride consistent when you join them end-to-end.
One caution: don’t mix and match glide materials between different track brands. Even small differences in thickness or friction can change how the saw behaves, and consistency is more important than squeezing out theoretical performance gains.
Value and why it matters
This is a small part that restores a big part of the tracksaw experience. If your saw feels labored on the track or you’re seeing minor surface scuffs on the underside of the base, you’ll immediately appreciate the improvement. Compared to replacing a track or living with degraded performance, a fresh friction strip is the smart, low-cost fix.
Because this strip is a single piece, you’ll want to plan your cuts if you have multiple tracks. If you run one standard track, it’s straightforward. With a long guide or a pair joined for sheet ripping, check the listed length before you assume one piece will cover everything.
Where it could be better
A couple of minor criticisms:
- Packaging and specs can be unclear. Some listings emphasize length; others provide box dimensions that don’t translate to the actual strip. Clear, consistent length info would prevent surprises.
- No re-positioning forgiveness. The adhesive is strong, which is good, but don’t expect to lift and reset more than once without compromising the bond. Take your time on alignment.
Neither of these are deal breakers, but they’re worth knowing before you start.
Practical tips from installation and use
- Mark the inboard edge with painter’s tape along the track to guide the placement as you peel the backing.
- Avoid stretching the strip. Let it lie naturally; tension can cause shrink-back at the ends later.
- Use a roller. Even pressure across the full length improves bond strength and feel.
- Recalibrate if needed. If you’ve made any other track service changes (like replacing a splinter guard), confirm your offset and depth settings after the first cuts.
- Keep a short offcut. It’s handy for testing cleaners or solving a small nick without replacing the whole run down the road.
Who benefits most
- Pros and serious hobbyists who use their tracksaw regularly. You’ll notice the improvement immediately on long rips and finish cuts.
- Anyone who cuts prefinished panels. A smoother ride reduces micro-scratches on delicate surfaces from trapped dust under the base.
- Users who’ve cleaned and waxed their track but still feel drag. If maintenance doesn’t restore glide, this is the next step.
Recommendation
I recommend the DeWalt friction strip without hesitation. It’s easy to install, restores the smooth, controlled glide that makes a tracksaw so precise, and it holds up under regular use. The only real caveat is to verify the length against your track setup before ordering. If your saw has started to feel gritty or inconsistent on the track, this simple replacement brings the system back to form with minimal cost and effort.
Project Ideas
Business
Mobile Track Saw Tune-Up
Offer an on-site calibration and maintenance service for contractors and shops: replace friction and splinter strips, clean/de-gunk tracks, verify track straightness, re-square saws, and apply track wax. Bill per saw/track set; upsell blades and dust bags.
Pro Maintenance Kit Subscription
Sell quarterly kits including a replacement friction strip, splinter guard, adhesive promoter, cleaning wipes, track wax, and a blade cleaner. Provide QR-code guides for quick install. Target trim carpenters, installers, and cabinetmakers.
Rental Fleet Refurb Program
Partner with tool rental houses to schedule bulk refurbishments: replace worn strips, inspect tracks, swap splinter guards, and document service for compliance. Charge a per-unit rate and reduce their downtime and user complaints.
On-Site Panel Breakdown
Offer precise sheet-good cutting at client sites for remodelers and designers who lack panel saws. Arrive with tuned tracks and deliver labeled, ready-to-assemble parts from cut lists. Price per sheet plus setup and complexity add-ons.
Content + Courses Monetization
Build a niche channel around track saw precision: tutorials on friction strip replacement, track care, feed control, and advanced cuts. Monetize via affiliate links to consumables, paid mini-courses, sponsors, and downloadable cut calculators.
Creative
Waterfall-Edge Coffee Table
Use the freshly gliding track to cut long, clean 45° miters on plywood or hardwood-veneered panels so the grain wraps over the edges. The smooth feed from the new friction strip helps maintain a steady pace for burn-free, tear-out-free cuts and tight glue lines.
Built-In Bookcase with Scribed Panels
Break down sheet goods into carcass parts, then scribe tall side panels to uneven walls using the track saw. The restored glide lets you make micro-adjusted, controlled passes for perfect wall-to-cabinet fits and crisp edges on face frames and fillers.
Herringbone Feature Wall
Rip consistent-width plywood strips and cut precise angles for a herringbone or chevron wall. The consistent friction and feed reduce width variation across hundreds of repetitive rips, ensuring tight patterns and minimal sanding/filling.
Kerf-Bent Light Shade
Create a curved lampshade or console front by making evenly spaced kerfs in thin plywood. The smooth, predictable glide helps keep kerf spacing and depth consistent across long runs, producing a clean, flexible bend without weak spots.
French Cleat Storage Wall
Produce dozens of identical 45° cleats from sheet goods. The track’s steady movement improves safety and accuracy on repetitive cuts, so tool holders and cabinets hang straight and interlock firmly across the shop wall.