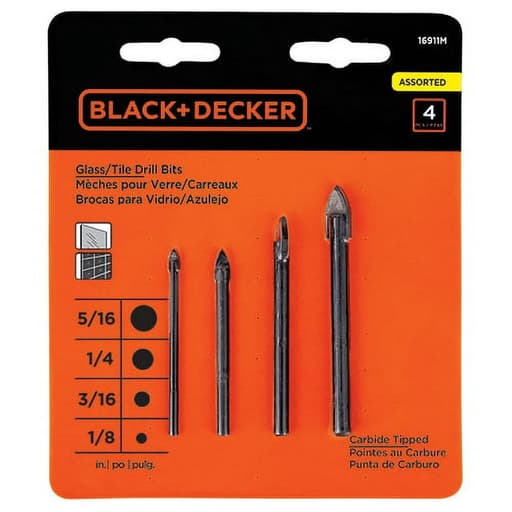
Features
- Carbide-tipped for durability
- Includes four drill bit sizes: 5/16", 1/4", 3/16", 1/8"
- Intended for drilling tile and glass materials
- Compact, multi-size set for common small drilling tasks
Specifications
| Gtin | 00885911443937 |
| Model | 16911M |
| Product Application | Drilling |
| Best For | Tile / Glass |
| Includes | 5/16", 1/4", 3/16", 1/8" (4 pieces) |
| Height | 5.8 in |
| Length | 4.9 in |
| Width | 0.3 in |
| Weight | 0.1 lb |
| Image Url | https://www.blackanddecker.com/cdn/shop/files/Ecomm_Small-16911M_1.jpg?v=1697573035 |
Related Tools

Related Articles

A four-piece set of drill bits designed for drilling glass and tile. Each bit has a carbide tip for improved durability and is intended for use on tile and glass materials.
Black & Decker 4 Piece Glass / Tile Drill Bit Set Review
Why I reached for this glass/tile bit set
Small anchoring jobs in tiled bathrooms have a way of becoming big headaches if you grab the wrong bit. I’ve cracked a tile or two over the years, so I’m cautious about what I use on glazed surfaces and glass. I picked up this four-piece glass/tile bit set specifically to mount a shower rod bracket on ceramic wall tile and to add a couple of discreet holes in a glass cabinet door for new pulls. After several real-world tasks, I have a clear sense of where this set shines and where it taps out.
What’s in the set
- Four carbide-tipped bits: 1/8", 3/16", 1/4", 5/16"
- Standard round shanks that fit any common drill chuck
- Spear-point geometry designed for brittle materials like tile and glass
The size spread covers common anchor and hardware needs: 1/8" for pilot holes, 3/16" for many wall anchors and screws, 1/4" for heavier anchors and some grommets, and 5/16" for larger through-holes. If you regularly need 3/8" or larger, this set won’t get you there.
Build and design
Each bit uses a carbide tip brazed to a steel shank. The spear-point profile is the right choice for glazed ceramic tile and non-tempered glass because it initiates a cut without skating too much, especially when paired with good technique. The grind on my set was consistent, with sharp, symmetrical cutting edges. The brazing looked tidy—no visible voids or excess solder—which matters for longevity when the bit heats and cools repeatedly.
I didn’t notice any anti-slip flats on the shanks, so a firm chucking is important, particularly when you’re feathering the trigger at low RPM. Markings are basic but readable, and the lengths are compact enough to work inside tight vanity or shower niches.
Performance on ceramic tile
I tested the 3/16" and 1/4" bits on standard glazed ceramic wall tile to set anchors for a shower rod and a hook. Technique matters here:
- No hammer mode.
- Low speed, gentle pressure.
- Start with a slight angle to establish a bite, then bring the drill upright.
- Keep the tip cool with a trickle of water or a damp sponge.
Using those basics, the bits performed predictably. The 3/16" started cleanly with minimal wandering after I placed a piece of painter’s tape over the mark. Chip-out on entry was negligible; on exit it was present but small—the typical crescent flake you get when you break through without backing. Taping the backside or drilling from both sides (when accessible) kept that in check.
Speed of cut was reasonable for carbide on glaze: not fast like a diamond core bit, but consistent. The bits didn’t squeal or burn, and after multiple holes the edges still felt crisp under a fingernail. For typical bathroom hardware on ceramic wall tile, the set did exactly what I needed.
Performance on glass
Glass is less forgiving than tile and demands patience. I used the 1/8" and 3/16" bits to put holes in a non-tempered glass cabinet door for new pulls. My approach:
- Confirmed the panel was not tempered (critical; tempered glass will shatter and should not be drilled).
- Laid the glass flat on a sacrificial MDF board with a thin cork pad.
- Crossed painter’s tape at the mark to prevent skating.
- Ran at a very low speed with almost no pressure, occasionally dipping the tip in water and letting the bit cool between passes.
The 1/8" bit established a pilot without drama. I then stepped up to 3/16". The holes were clean, with tiny flakes on the exit that polished away with a fine diamond file. The bit didn’t chip the entry edge, which speaks well of the grind. If you’re patient and keep the bit cool, this set will handle light glass work. But again, avoid tempered glass entirely; that’s a non-starter for drilling.
Heat management and technique tips
These bits are only as good as your technique on brittle materials. What worked best for me:
- Tape the surface: Painter’s tape reduces initial skating and surface chipping.
- Start at an angle: 10–15 degrees to “scratch” a seat, then rotate to perpendicular.
- Go slow: Think low RPM—around the slowest setting on your drill. Let the bit cut.
- Light pressure: If you see white dust and steady progress, you’re doing it right. If it’s squealing or discoloring, back off and cool the bit.
- Keep it cool: A spray bottle, damp sponge, or a putty dam with a dribble of water prevents overheating.
- Support the backside: Use wood or foam behind tiles or glass panels when possible to reduce blowout.
Durability
Carbide is hard and brittle; overheating is what kills these bits. With cooling and light pressure, edge retention held up. After multiple holes in ceramic tile and a couple in glass, I saw no rounding of the spear edges and no evidence of brazing fatigue. If you over-speed or run dry, you’ll shorten their life quickly. Used properly, they’re durable enough for a homeowner’s set and occasional pro punch lists.
Where it falls short
- Hard porcelain tile: These bits will struggle on dense porcelain floor tile, especially thicker or polished varieties. You’ll get slow progress, more heat, and a greater risk of chipping. A diamond-tipped bit or core drill is the better tool here.
- Limited size range: 5/16" tops out the set. For larger anchors or pass-throughs, you’ll need additional bits.
- No guide jig or depth stop: Expect a little wandering on slick glazes without tape or a jig. That’s normal, but worth noting.
None of these are deal-breakers for the intended use. They’re just reminders that the right tool is material- and size-dependent.
Comparisons and alternatives
- Carbide spear-point (this set): Affordable, simple, and effective on ceramic tile and non-tempered glass when used slowly with water. Good for occasional use.
- Diamond-tipped hole saws/cores: Faster, cooler cutting in hard porcelain and glass; more expensive and usually single-size. Best for large, clean holes in tough materials.
- Multipurpose masonry bits: Not appropriate for tile/glass; they chip glaze and crack glass and belong on brick or concrete with hammer mode.
If porcelain is your main target, I’d build a diamond bit kit instead. If you’re mostly tackling bathroom accessories on ceramic wall tile or occasional glass hardware, this set makes sense.
Who it’s for
- DIYers installing bathroom hardware, mirrors, or hooks on ceramic wall tile.
- Cabinet and furniture tinkerers adding pulls to non-tempered glass doors or shelves.
- Pros who want a compact backup for light tile/glass tasks on a punch list.
If you’re a tile setter drilling porcelain and stone daily, you’ll outgrow this quickly and should invest in diamond solutions and guides.
Practical workflow I recommend
- Mark and tape the hole location.
- Put the drill in low gear; no hammer mode.
- Start with the smallest bit (1/8") to create a pilot on glass or slick tile.
- Keep the tip wet and pressure light.
- Step up sizes as needed, keeping the hole cool.
- Support the backside to control breakout, or finish from the opposite face when feasible.
Following these steps with this set gave me clean, repeatable results.
Final recommendation
I recommend this glass/tile bit set for homeowners and light-duty users who need reliable, affordable bits for ceramic tile and non-tempered glass. The carbide spear-point geometry cuts cleanly when used at low speed with water, the size spread covers common hardware and anchor holes, and durability is solid if you avoid heat and excess pressure. It’s not the right choice for dense porcelain or frequent professional use—diamond bits will serve you better there—but for typical bathroom and cabinet projects, this compact four-piece set has earned a spot in my drill bag.
Project Ideas
Business
On-Site Tile Drilling Service
Offer a specialized service drilling precise holes in installed tile for towel bars, shower shelves, robe hooks, and grab bars without cracking finishes. Market to homeowners, remodelers, and property managers, and bundle with hardware installation and appropriate anchors.
Upcycled Bottle Lighting Studio
Build a product line of drilled-glass bottle lamps and pendant lights. Provide options for custom labels, etched monograms, and themed sets for bars and restaurants. Sell online and at craft fairs, with add-ons like dimmer switches and gift packaging.
Event Decor: Hanging Glass Installations
Produce and rent elegant hanging bottle and jar displays for weddings and corporate events. Drill clean holes for safe suspension and wiring, assemble modular rigs, and offer on-site setup and teardown. Upsell with LED fairy lights and floral collaborations.
DIY Workshop + Kit Sales
Host beginner-friendly classes on drilling glass and tile, with projects like sea-glass wind chimes or soap dishes. Sell take-home kits that include pre-marked materials, hardware, and safety guides. Partner with makerspaces, community centers, and craft stores.
Custom Address and Signage Plaques
Design and fabricate decorative tile or glass signage with predrilled mounting holes for homes, boutiques, and cafes. Offer standoff mounts, branding, and weather-resistant finishes. Provide local installation and ship-ready kits for online customers.
Creative
Illuminated Bottle Lamps
Transform wine and spirit bottles into ambient lamps. Use a 1/4"–5/16" bit to drill a clean side hole near the base for a string-light lead or cork light wiring, then add a rubber grommet and felt bottom. Personalize with labels, glass paint, or etched designs for unique gifts.
Sea Glass Wind Chimes
Drill 1/8" holes in sea glass pieces and small shells, then thread them with fishing line or fine wire to create a coastal wind chime or mobile. Vary lengths and colors for a cascading effect, and finish with a driftwood hanger for a polished look.
Custom Tile House-Number Plaque
Design a decorative tile plaque with your house number using paint pens or vinyl. Drill 3/16"–1/4" mounting holes in the tile corners to securely attach it to a wall, fence, or mailbox post. Add standoffs or spacers for a shadowed, gallery-style finish.
Self-Draining Tile Soap Dish
Turn a beautiful ceramic tile into a soap dish by drilling a pattern of 1/8"–3/16" drainage holes. Add silicone feet underneath to prevent slipping and protect countertops. Coordinate tiles to match bathroom or kitchen decor.
Hanging Mason Jar Herb Planters
Create window herb planters by drilling 3/16" drainage holes in the bottoms of mason jars and 1/8" holes in lids for hanging hardware. Suspend the jars from a reclaimed board or metal rail and plant small herbs for a compact, stylish kitchen garden.