
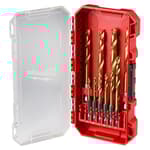
Features
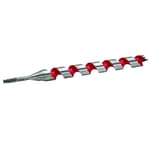
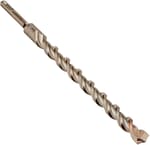
- Multi-grind carbide head with multiple cutting edges
- Specialized carbide tip for centering and reduced skate
- Flute-less design for tile drilling
- Cylindrical shank (three-flat shank on larger sizes) to suit standard three-jaw chucks
- Designed for use at low speeds without impact
Specifications
| Intended Materials | Natural stone tile, slate, granite and other hard tile materials |
| Bit Sizes | 1/8" (3.18 mm), 3/16" (4.76 mm), 1/4" (6.35 mm), 5/16" (7.94 mm) |
| Total Length | 2 in (50.8 mm) |
| Working Length | 1.5 in (38.1 mm) |
| Tip Material | Carbide |
| Head Type | Multi-grind (multiple cutting edges) |
| Shank | Cylindrical; three-flat on 3/8" (9.53 mm) and above |
| Pack Quantity | 4 pieces |
| Recommended Operation | Drill without impact at low speeds |
| Not Recommended For | Porcelain tiles |
| Compatible Tools | Rotary drills/drivers (fits three-jaw chucks); may be used with hammer drills if impact is disabled |
Related Tools
Related Articles

A 4-piece bit set intended for drilling natural stone tile, slate, granite and other hard tile materials. Bits have multi-grind carbide heads and are designed for drilling at low speeds without impact to reduce skating and extend bit life. Not recommended for porcelain tiles.
Bosch Natural stone tile bit set Review
Why I reached for this set
I had a small bathroom project that included mounting a grab bar and a couple of accessories through existing slate and granite tile. That’s the kind of job where the wrong bit can chip a tile or burn out in seconds. I picked up the Bosch tile bit set because it’s purpose-built for natural stone tile and similar hard tile materials, with a design that prefers slow, controlled drilling without hammer action. Over a weekend of test holes and real installs, I put all four sizes to work and learned where this set shines—and where it doesn’t.
Design and build
The bits use a multi-grind carbide head with multiple cutting edges. Instead of a spear point or a diamond core, you get a compact, faceted tip that centers well and resists skating better than standard masonry bits. There are no flutes; it’s a smooth body with a short overall length (about 2 inches, with 1.5 inches of working length). That short body is a double-edged sword: it’s great for control, especially starting a hole on a glossy surface, and it fits in tight spots around faucets and corners. But the shallow working depth means you’re really only getting through the tile. If you need to continue into the substrate for an anchor, you’ll switch to a standard masonry bit after you breach the tile face.
Shanks are cylindrical across this size range, so any standard three-jaw chuck will hold them. Since the technique is low speed and low pressure, I didn’t have issues with slipping, but if your chuck jaws are worn, give them an extra twist to tighten.
Technique matters with these bits
This set is explicitly intended for low-speed, no-impact drilling. That’s not just a suggestion—it’s the whole design philosophy. Used like a masonry bit with hammer mode, these will glaze and dull quickly. Used as designed, they’re precise and surprisingly gentle on brittle surfaces.
What worked best for me:
- Disable hammer mode completely.
- Start at low RPM and let the multi-grind tip establish a seat. I like to pulse the trigger to peck the surface until the bit is settled.
- Manage heat. Because the bit is flute-less, it grinds out fine powder that can pack in. I dip the tip in water or build a small clay dam around the hole and add a few drops to keep the area wet. Withdraw periodically to clear slurry.
- Step up. For larger anchors, I often start with the 1/8-inch bit, then go to 3/16, and finally to 1/4 or 5/16 as required. This extends bit life and reduces edge chipping.
- Lighten pressure at breakthrough to control the exit and avoid spalling.
A simple drill guide or a piece of painter’s tape helps with the first contact, though the tip’s geometry does a decent job staying put on its own.
Performance on common tile types
Slate: This set feels made for slate. I could start cleanly, maintain a controlled feed, and get through a typical wall tile in a minute or two with minimal chip-out. Cooling improved both speed and edge quality. I averaged a handful of holes per bit before I noticed a drop in bite, and I could still coax more with careful cooling.
Granite tile: Harder, slower, but still doable. Expect a grinding feel rather than a cutting one. Plan for a few minutes per hole with careful pecking and cooling. The exit quality was good with tape and light pressure at breakthrough.
Glazed ceramic: It will cut it, but the glaze is abrasive and can accelerate wear. If ceramic is your primary material, a spear-point glass/tile bit can be faster to start and slower to dull on heavy glaze. For small batches of holes, these still manage fine with the same wet, low-RPM approach.
Porcelain: I don’t use this set on porcelain, and I don’t recommend you try. Porcelain’s density and heat sensitivity call for diamond core bits or high-quality spear bits designed specifically for it.
Once I broke through the tile face, I often switched to a conventional masonry bit (or SDS-plus with impact) to complete depth in the backer or masonry—an efficient two-step method that reduces risk to the tile surface and prolongs the life of these bits.
Hole quality and chipping
The multi-grind head produces round, well-controlled holes with less tendency to “walk.” Compared to spade-style tile bits, I saw cleaner edges and fewer chips, especially on exits. Tape on both sides isn’t an option on installed tile, so the trick is to slow down and ease off right before breakthrough. If you’re mounting hardware with escutcheons, small cosmetic chips can be hidden, but in my tests, careful technique made them unnecessary.
Durability and what to expect per bit
Carbide edges dull from heat and abrasion. These bits don’t have flutes to carry dust away, so heat management is everything. With water and a step-drilling approach:
- In slate, I was comfortable expecting 8–12 clean holes per bit before noticeable slowdown.
- In granite, more like 5–8 holes per bit, depending on thickness and patience.
- In glazed ceramic, life varies widely with the glaze hardness and how well you keep the bit cool.
Once the edges glaze, performance falls off quickly. Don’t be tempted to hammer mode “just to finish”—that’s a shortcut to a ruined bit and a chipped tile.
Ergonomics and control
The short length and flute-less body damp vibration and make it easy to keep the bit square. The centering tip helps start exactly on your mark, which is useful when you don’t have a drill stand. Visibility is good; the compact head lets you watch the surface without the spiral of a flute flinging slurry. The trade-off is the need to periodically withdraw to clear dust. I set a small towel below the hole to catch slurry and keep the area clean.
Size selection and coverage
The included sizes—1/8, 3/16, 1/4, and 5/16 inch—cover most anchors used for bath accessories, shower doors, and grab bars. If you routinely install hardware that calls for 3/8-inch anchors, you’ll need to source that size separately, and note that this set’s shank design changes on 3/8-inch and larger in the wider line (not included here). For typical residential work, these four sizes hit the sweet spot.
Limitations
- Not for porcelain. Use diamond core or porcelain-rated bits instead.
- Shallow working length. You’ll pierce tile only and then switch bits for deeper holes.
- Requires good technique. Low speed, no impact, and cooling are mandatory if you want the edges to last.
- Cylindrical shank only in this set’s sizes. It’s fine at low torque, but a worn chuck can slip.
None of these are hidden flaws—they’re inherent to how this style of bit is meant to be used. If you understand the constraints, the results are consistent.
Who will appreciate this set
- Remodelers and DIYers mounting hardware through natural stone tile, slate, or granite.
- Anyone who values clean starts and low chip-out on brittle surfaces.
- Users comfortable with patient, methodical drilling and wet cooling.
If your day-to-day is drilling porcelain or you need deep bores through tile and substrate in a single pass, this isn’t the right tool. Look at diamond cores or a different workflow.
Tips for best results
- Mark and tape your hole, or use a drill guide.
- Start with the smallest bit and step up to final size.
- Keep the tip wet; clear slurry often.
- Light pressure, low RPM, no hammer.
- Ease off at breakthrough to protect the exit edge.
Recommendation
I recommend the Bosch tile bit set for its intended purpose: clean, controlled holes in natural stone tile, slate, granite, and similarly hard tile surfaces—especially when you only need to breach the tile face before switching to a masonry bit for the substrate. The multi-grind carbide head starts accurately with minimal skating, the short length improves control in tight spots, and with proper cooling and a step-up approach, edge life is reasonable. I would not choose it for porcelain or for deep, one-bit drilling through tile and substrate. If your project aligns with its design brief and you’re willing to use the right technique, this set delivers reliable, low-damage results.
Project Ideas
Business
No-impact accessory installation on stone tile
Offer on-site installation of towel bars, hooks, shower caddies, soap dispensers, and knife rails on stone tile, slate, or granite backsplashes. Use low-speed drilling and proper anchors to protect expensive finishes. Market to homeowners and property managers; clearly exclude porcelain jobs.
Custom slate address and signage shop
Sell personalized slate house numbers, door signs, and business plaques with precision-drilled standoff holes. Provide templates, hardware, and sealing as upsells. Sell online and at local markets; quick turnaround with consistent hole sizing from the bit set.
Stone-tile drilling specialist for contractors
Partner with remodelers, kitchen installers, and glass shower firms as the go-to for drilling holes in existing stone tile without damage. Charge per hole or fixture, bring water/dust control and templates, and carry insurance. This de-risks their projects and speeds timelines.
DIY rental kit and remote coaching
Rent a kit that includes a low-speed drill, the bit set, a guide jig, water spray bottle, PPE, and step-by-step templates. Add optional 15-minute video consults. Target handy homeowners who need a couple of holes in stone tile but don’t want to buy specialty gear.
Workshops and starter kits for makers
Host short classes on safely drilling natural stone tile for art and home projects. Sell starter kits (bit set, clamps, painter’s tape, sealant, small slate tiles) on-site. Partner with makerspaces and community colleges to build repeat business.
Creative
Slate house number plaque with standoffs
Use a large slate tile to make a modern address plaque. Drill four 1/4–5/16 in holes for standoff mounts and smaller pilot holes for hardware using low-speed, no-impact drilling to avoid cracks. Add painted or vinyl numbers and seal the stone. The specialized tip helps start holes cleanly without skating on the polished surface.
Stone tile wind chime or mobile
Repurpose slate chips or small granite offcuts into a wind chime. Drill 1/8 in holes near edges for jump rings and string with stainless wire or fishing line. Tape the exit side to reduce breakout and keep the bit cool with a mist of water. The multi-grind head is great for controlled starts on uneven stone.
Backlit perforated slate lantern
Create a starry-pattern lantern by drilling a field of 1/8–1/4 in holes in four slate tiles and assembling them into a cube around a battery LED candle. The short working length suits standard tile thickness, and the flute-less design keeps dust manageable. Space holes to maintain strength and avoid cracks.
Granite/slate coasters with brass inlays
Drill shallow 1/8–3/16 in pockets in slate or granite coasters and epoxy in brass rod slices or mosaic tesserae for a dotted or constellation motif. Finish by sanding and sealing. The centering tip minimizes wandering so patterns stay crisp.
Hanging garden markers and tags
Make durable plant markers or gift tags from small slate tiles. Drill a top hole for twine, then hand-letter or engrave names. The low-speed, no-impact approach reduces chipping on thin tiles.