Features
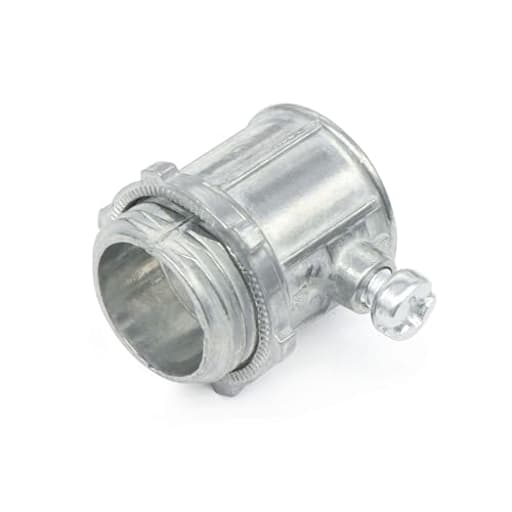
- Used to connect 1/2-inch electrical metal tubing (EMT) to load centers, steel outlet boxes, or other metal enclosures.
- Made of die cast zinc alloy, ensuring mechanical protection of the track.
- Three combination screws for easy installation.
- When fixed with tape, the concrete is tightly connected and suitable for applications above 600 volts.
- Package Include: The package includes 25 pieces of the EMT set screw connectors
Specifications
| Color | silvery |
| Size | 1/2 x 1.03 |
| Unit Count | 25 |
Related Tools
Pack of 25 1/2-inch EMT set‑screw connectors made from die‑cast zinc alloy for mechanically joining electrical metal tubing to load centers, steel outlet boxes, or other metal enclosures. Each connector uses three combination screws for installation; when properly taped the assembled connection is suitable for systems above 600 volts.
Qlvily 25 Packs EMT Set Screw Connectors, 1/2-Inch EMT Zinc Die Cast Electrical Conduit Fitting Review
Why these 1/2-inch set‑screw EMT connectors earned a spot in my kit
I keep a stash of 1/2-inch EMT fittings on hand because they’re the backbone of so many light commercial and workshop wiring jobs. The Qlvily EMT connectors (model LDLJQ-25PCS) slid into that rotation without drama—and that’s exactly what I want from a commodity fitting: consistent fit, clean threads, and screws that don’t strip when you’re on a ladder.
I put this 25-pack to work on a small shop refresh and a couple of junction box tie-ins, mixing them alongside connectors from two big-box brands. The short version: they blended right in. The zinc die-cast bodies were uniform, the locknuts spun on smoothly, and 1/2-inch EMT seated with the correct tolerance—snug enough to keep things aligned, not so tight you have to wrestle the conduit in.
Build quality and fit
- Material: Die-cast zinc, with a uniform silvery finish. They’re corrosion-resistant for typical indoor environments and won’t flash rust like steel. I wouldn’t use these outdoors or in wet areas; they’re not raintight, and die-cast zinc isn’t what you want for corrosive environments.
- Machining: Threads on the hubs and locknuts were clean and concentric in my set. I didn’t run into cross-threading or the “gritty” feel you sometimes get with lower-tier fittings. On one connector, the locknut felt a touch rough for the first quarter-turn, but it settled in and tightened properly.
- Edges: No nasty burrs. I still recommend deburring the conduit ends and adding plastic bushings at the box entry where needed—these aren’t insulated-throat fittings—but the internal edge on the fitting itself was smooth enough to not nick insulation during pulls.
The connectors also carry recognizable listing marks on the body, and they’re appropriate for circuits up to 600 V in dry locations, which is standard for this style.
Installation experience
If you’ve used set‑screw style EMT connectors before, the routine is the same:
- Pop the locknut and insert the hub through a 1/2-inch KO on your metal box or enclosure.
- Spin the locknut on from inside and tighten. I like to orient the serrated face toward the box to bite through paint for better bonding.
- Seat the EMT; there’s the right amount of lead-in to catch the conduit, and it bottoms predictably.
- Tighten the set screws. The combination heads accept flat or Phillips, and I had no cam-out or stripping. A nut driver or a square-drive bit grips even better if you’ve got one handy.
Torque guidance isn’t printed on the bag (not unusual), so I go to snug plus a quarter‑turn on the locknut and tighten the set screws firmly without leaning on them. Die‑cast zinc can crack if you overdo it; with a normal hand driver or a small impact on low setting, these held fine.
What stood out was the lack of thread fights. I’ve had cheaper locknuts “walk” or seize, especially on painted boxes. These engaged cleanly and didn’t spin out when I tightened from the outside. The face profile gives you decent tool purchase with lineman’s or a locknut wrench.
Electrical and code considerations
- Bonding and grounding: Set‑screw EMT connectors rely on the mechanical connection for equipment grounding continuity through the raceway. For painted or coated boxes, make sure the locknut’s bite is solid. For critical runs, I’ll scratch paint at the KO or use a bonding bushing if required by your AHJ.
- Conductor protection: These are standard (non‑insulated‑throat) connectors. For larger conductors or tight bends right at the box, add plastic bushings. It’s cheap insurance against insulation scuffs.
- Location: Dry, indoor use. If you need raintight or damp‑location connections, look for compression‑type, raintight‑rated EMT connectors instead.
- Conductor size and fill: The 1/2-inch EMT bore felt dead‑on. Standard THHN/THWN bundles for lighting and receptacle circuits fed through with no snagging.
Durability and long-term outlook
Zinc die-cast isn’t as tough as malleable iron or steel if you abuse it, but it’s more than adequate for typical EMT work. In handling, the bodies didn’t chip, and I could torque the screws confidently without deformation. I also appreciate zinc here because it stays presentable in exposed runs—no flaking finish or surface rust a year later inside a shop.
I wouldn’t choose these for environments with vibration or impact risk (think machinery frames). In those cases, compression fittings or steel-bodied connectors are a better match. For general shop wiring, garage circuits, and utility spaces, these are exactly what you expect.
Packaging and quantity
You get 25 connectors in a simple resealable bag. No individual boxes, no extras, just fittings and locknuts. For small projects, that quantity is the sweet spot: enough that you don’t run out mid‑run, but not so many that a half‑case sits on the shelf for years. If you’re building out an entire shop or garage, one bag will usually cover your boxes, switches, and a couple of pull points.
What I liked
- Clean threads and square faces. The fittings seat flush on boxes and don’t fight you on alignment.
- Combination-head screws that actually accept both drivers without cam‑out.
- Consistent EMT bore sizing; conduit enters cleanly and seats without wobble.
- Cost-effective in a 25-pack, with quality on par with big-box staples.
- Zinc finish that holds up visually in exposed runs indoors.
What could be better
- Not for wet locations. That’s expected for set‑screw style, but worth repeating.
- Locknut thickness is typical for the category, which means it can be annoying in tight can interiors. A deeper nut would be nice, though it would raise cost.
- No insulated throat. Not a dealbreaker, but I’d love an option with integrated bushings for sensitive pulls.
- Die‑cast bodies can crack if severely over‑torqued. Go firm, not gorilla.
I’ll also note that in big bags like this, an occasional rough locknut or slightly tight thread wouldn’t surprise me. In my set, everything functioned, with just one nut that felt a touch gritty on first engagement.
Who these connectors are for
- DIYers and pros wiring shops, garages, basements, and utility spaces where EMT is the preferred raceway.
- Anyone who wants a predictable, ready‑to‑go stock of 1/2-inch connectors instead of buying piecemeal.
- Users who prioritize clean installation and reliable bonding in dry locations.
If you’re doing outdoor work, food prep areas with washdown, or corrosive environments, skip these and go straight to raintight compression connectors or stainless/malleable options.
Tips for best results
- Deburr your EMT cuts. Even a quick spin with a reamer saves conductor insulation.
- Use plastic bushings at the box entry where the conductors make a tight turn or when pulling multiple conductors.
- Scratch paint at the KO under the locknut if bonding is critical, or use a bonding bushing per your AHJ.
- Tighten the set screws evenly. If there are two, alternate between them to keep the conduit square in the fitting.
Recommendation
I recommend the Qlvily 1/2-inch EMT connectors for dry-location EMT runs where you want dependable fit and straightforward installation at a fair price. They match the performance of common big-box connectors in my testing, with clean threads, properly sized bores, and combination-head screws that don’t strip. They’re not raintight and they don’t have insulated throats, so they’re not a one‑size‑fits‑all solution. But for the majority of indoor EMT work, this 25‑pack is an easy buy that keeps a job moving without surprises.
Project Ideas
Business
DIY Industrial Decor Kits
Assemble and sell kits that include a handful of connectors, short conduit pieces, mounting hardware, and step-by-step instructions to make a candle holder, wall hook or mini-shelf. Price for hobbyists on Etsy or local craft shops; offer tutorial videos and upgrade options (finishes, wood bases).
Upcycled Hardware Jewelry Line
Create a small product line of industrial-inspired jewelry and accessories using connectors as the focal element. Photograph professionally, list on marketplaces and at craft fairs, and highlight limited runs or custom patinas for higher margins.
Pop-up Maker Workshops
Host weekend classes teaching participants to make home goods (shelves, tiebacks, candle holders) from EMT connectors and conduit. Charge per seat including materials and offer a take-home kit option. Partner with makerspaces, hardware stores, or community centers.
Curated Hardware Supply Packs
Buy connectors in bulk, repackage into curated assortments (e.g., 'jewelry pack', 'mini-shelf pack', 'starter maker pack') and sell to hobbyists, schools, or small studios. Include simple instructions and finish samples to increase perceived value and repeat purchases.
Creative
Industrial Candle Holders
Use 1–3 connectors stacked or glued to a small wooden or metal base to create industrial-style tealight or pillar candle holders. Drill a shallow recess in the base to seat the connector, secure with epoxy, deburr/polish edges, and finish the base with stain or paint. (Do not reuse connectors taken from live electrical systems for wiring; these are decorative only.)
Modular Mini-Shelf Nodes
Make a small modular shelving system for plants or display by cutting 1/2" EMT or metal rods into short posts and using the set‑screw connectors as visible node joints. The connectors act as accent hardware where rods meet boxes or wooden panels—tighten screws to clamp rods in place and paint or patina for a cohesive look.
Steampunk Jewelry & Accessories
Transform connectors into pendants, earrings, cufflinks or belt charms: polish or patina, tap into the hollow to add rivets or tiny gears, and solder or glue on bails and backs. Their industrial texture makes unique statement pieces; seal with clear lacquer to prevent tarnish.
Custom Curtain Tiebacks & Rod Caps
Use connectors as decorative end caps or tieback hooks for lightweight curtain rods. Screw the connector onto a short rod stub or mount it to a small bracket; the set-screw detail reads as industrial hardware and can be finished to match room decor.