Features
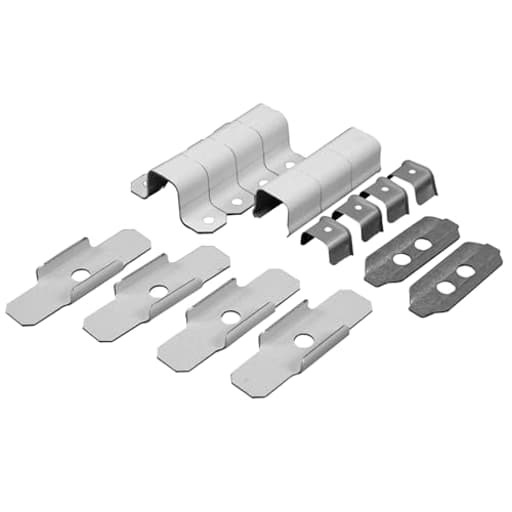
- EXTENDING POWER: The accessory pack allows you to add or extend power, communications and A/V on walls. Mounting components for wiring channel including metal clips straps and fittings.
- ENHANCED DESIGN: Accessory pack features a sleek profile and easy-to-install design, making it a perfect solution for do-it-yourself installations.
- PRO'S CHOICE: The preferred choice of the pros for 100 years.
- WIREMOLD QUALITY: Wiremold products work together seamlessly to save installation time, while providing enhanced flexibility and productivity in environments ranging from residential and educational buildings to meeting rooms and healthcare facilities.
- VALUE RACEWAY: Great for adding or extending power in heavy duty applications like brick or concrete walls. Paintable to match your walls. Made in USA.
Specifications
| Color | White |
| Size | Accessory Pack |
| Unit Count | 1 |
Related Tools
This metal raceway accessory pack contains mounting clips, straps, and fittings for adding or extending power, communications, and A/V wiring along walls. The components are designed for easy installation, are paintable to match walls, and are suitable for heavy-duty applications such as brick or concrete.
Wiremold Legrand Wiremold BWH-9-10-11 Metal Raceway for Extending Power, 700 Series, Accessory Pack with Mounting Clips, Straps, and Fittings, White Review
Why I reached for this kit
There are times when opening walls just isn’t worth the mess or the permit hassle—brick fireplaces, old plaster, finished basements, rental units. I pulled out the Wiremold 700 Series accessory pack for a recent project to get power and a low-profile raceway up a wall and over a few feet to a new device location behind a wall-mounted TV. I paired the kit with standard 700 Series metal channel and matching device boxes. The goal: keep it clean, code-compliant, and paint-ready without cutting into drywall.
This accessory pack is exactly that: a bundle of mounting clips, straps, and a selection of fittings for the 700 Series metal raceway. It’s not a complete raceway “system in a box”—you still need to buy the straight lengths of channel and whatever device boxes or starter boxes your layout calls for. But the kit covers the mounting and transition pieces you’ll use in most straight-forward runs, and that’s what makes it handy.
What stood out during installation
Layout and planning: This system rewards careful measuring. I mark centerlines with painter’s tape and a level, then dry-fit fittings to confirm clearances before drilling anything. With metal raceway, a 1/8-inch error can create a visible mismatch at corners and device boxes. Measure twice, cut once really does apply here.
Cutting and deburring: For the channel, I used a cut-off wheel for clean, square cuts; a fine-tooth hacksaw will do in a pinch. Either way, plan to file the edges. The steel is sturdy but can leave burrs that will slice fingertips or snag conductors. A few quick passes with a mill file made every joint safer and helped parts mate smoothly.
Mounting hardware: The clips and straps in the accessory pack are robust and hold the channel tight against the wall with a low profile. They don’t include wall screws or anchors, so pick hardware that suits your substrate. On drywall, I like coarse-thread screws into studs where possible; on masonry, I used Tapcons with a hammer drill. The mounting holes in the metal components will accept common #8 or #10 screws.
Fittings and alignment: The fittings are true to size and matched my channel well. I did need to tweak a tab or two with pliers to get perfect engagement on a couple of connections—nothing dramatic, just a nudge for a snug slide. Inside and outside corners snap together cleanly if your cuts are square and your layout is plumb.
Box transitions: If you’re tying into a starter box over an existing receptacle or popping a new device higher on the wall, account for the extra depth and the cover transitions. The 700 Series is relatively shallow, which keeps it discreet but means your device placement and conductor fill matter. I keep the conductor count modest and use compact devices where possible.
Fit, finish, and the “after” look
Once assembled, the whole run felt rock-solid. The steel channel and metal fittings create a continuous, rigid path that doesn’t flex or warp like some plastic alternatives. The stock white finish looks fine out of the box, and because it’s paintable, I scuffed it lightly with a Scotch-Brite pad and hit it with a bonding primer before painting to match the wall. After paint, the raceway visually recedes—especially when it’s aligned with existing lines like the edge of a TV or a baseboard.
The low-profile design is a strength indoors. It’s unobtrusive on living room walls and tidy in offices and workshops. If you’re looking to hide a power feed to a wall-mounted TV, a couple of surface switches, or runs across masonry, this keeps things neat without looking like an improvised cord cover.
Durability and safety notes
The reason I still reach for metal raceway is durability. It’s more forgiving of bumps, takes screws without stripping, and maintains grounding continuity when properly installed. That said, it’s metal—treat it with respect. Gloves during cutting and fitting are a must, and I deburr every cut. I also test continuity end-to-end after assembly to ensure the grounding path is solid.
Capacity is the tradeoff for the slim profile. The 700 Series isn’t deep, so plan your conductor count carefully and stay within fill limits. If you need to run both power and data, do it with separate runs or use a divider designed for the series (or step up to a multi-channel system). Don’t jam extra conductors into a single shallow raceway and hope for the best.
Documentation and learning curve
The system itself is straightforward, but the paper instructions that came with my pack were minimal. If you’ve installed surface raceway before, you’ll be fine. If this is your first go, budget a little time to dry-fit parts and understand how the tabs, clips, and fittings lock together. Once you’ve mounted a few clips and set your first straight run, the rest falls into place.
Where this kit shines
- Retrofits on hard surfaces: Brick, concrete, tile, and plaster where in-wall fishing is impractical.
- Clean upgrades: Moving a receptacle higher for a wall-mounted TV without opening large sections of drywall.
- Light commercial: Small offices or classrooms where you want a pro-grade, durable surface wiring solution.
- Mixed environments: Healthcare and education facilities where paintable, low-profile, and robust matter.
What I’d change
- Include a quick-start guide with part nomenclature and a couple of common layout diagrams (starter box to device box, inside corner to run, etc.). It would save first-timers some guesswork.
- Toss in a small deburring tool or at least a note about filing edges. It’s basic shop practice but worth calling out explicitly.
- Provide a short list of recommended screw sizes and anchor types for common substrates. Even pros appreciate an at-a-glance reference.
Practical tips from my install
- Use painter’s tape as a layout lane for your centerline. Mark clip locations right on the tape; peel it off when you’re done for a clean look.
- Pre-drill and dry-fit every fitting before committing the fasteners. That includes corners and transitions into device boxes.
- Cut once, deburr twice. File both the external edge and the internal lip; your fingers (and insulation) will thank you.
- Prime before painting. A bonding primer helps paint adhere to the factory finish so the color stays uniform over time.
- Separate power from low-voltage. Run data/A/V in a different channel or run to maintain signal integrity and code separation.
- Verify grounding continuity across joints and into boxes, especially if you’ve cut any lengths or adjusted tabs.
Alternatives and compatibility
The accessory pack works across the Wiremold 700 Series ecosystem, so you can confidently pair it with stock channel lengths and boxes. If you need more capacity or deeper devices, Wiremold’s larger series (e.g., 2300 or 4000) are better fits. For purely cosmetic cord covers with no line-voltage conductors, a plastic raceway can be quicker, but you lose the robustness and grounding continuity of steel.
The bottom line
The Wiremold 700 Series accessory pack hits the right balance of professional fit, durability, and homeowner-friendly installability. The clips and fittings hold tight, the steel construction feels substantial, and the paintable finish helps it blend into finished spaces. You’ll need to bring your own screws and anchors, plan your parts list (channel and boxes are separate), and protect your hands from sharp edges during cutting and assembly. The documentation could be clearer, and the shallow profile means you must respect conductor fill and device depth.
Recommendation: I recommend this accessory pack for anyone extending or adding surface-mounted power on finished or masonry walls who wants a clean, durable, paintable solution. If you plan carefully and take a few basic metalworking precautions—measure accurately, deburr cuts, and verify grounding—you’ll get a result that looks intentional, performs reliably, and saves you from tearing into walls. If your project demands higher capacity or combined power/data in one channel, step up to a larger series; otherwise, this kit does exactly what it should, and does it well.
Project Ideas
Business
Small-Business AV Retrofit Service
Offer a premium installation service to retrofit offices, conference rooms and retail spaces with concealed power and network runs for displays, cameras and audio. Use Wiremold accessory packs to provide neat, code-compliant surface raceway installs on brick or concrete where in-wall work is impractical.
Pop-up & Event Power Solutions
Provide temporary, paintable raceway installations for pop-up shops, galleries and events that need discreet power and A/V cabling without damaging leased walls. Package quick-install kits plus on-site mounting and teardown services to event planners and retail brands.
Real-Estate Staging Tech Add-on
Partner with real estate agents and stagers to add clean, reversible TV mounts, charging stations and smart-device wiring to listings. A neat, raceway-hidden tech setup can make staged homes appear modern and move-in-ready, increasing perceived value with minimal investment.
Precut Raceway Kits & How-To Workshops
Create and sell DIY kits (pre-cut raceway, clips, fittings and paint) for common projects like TV installs or charging stations, plus video instructions. Run weekend workshops teaching homeowners and landlords how to install and paint raceway safely—generate product revenue plus paid class fees.
Rental Maintenance & Temporary Install Service
Offer a subscription or one-off service for landlords and property managers to install temporary raceway for tenants (cable TV, internet, security cameras) and then remove it at move-out. The heavy-duty, paintable components are ideal for hard surfaces and minimize patching costs between tenants.
Creative
Floating Media Wall
Build a clean, wall-mounted TV/media wall by running the TV power, HDMI and speaker wires inside the metal raceway. Use the mounting clips and straps to route channels vertically and horizontally so all cords are hidden. Paint the raceway to match the wall for an integrated, built-in look—perfect for apartment installs or accent walls on brick or concrete.
Modular Family Charging Station
Create a wall-mounted charging hub with recessed USB outlets, phone docks and cable anchors. Use the fittings to run power and data down to a bench or entryway cubby. The raceway’s easy-install clips make it simple to rearrange or expand modules as devices change; paint it to match cabinetry or make it a contrasting pop of color.
Industrial Picture-and-Lighting Rail
Repurpose the metal raceway as a slim, industrial-looking rail above artwork or shelving to hide wiring for picture lights and gallery LEDs. Use the straps and clips to secure LED runs and low-voltage transformers, then paint the raceway a dark metal tone for a curated loft-style finish.
DIY LED Cove & Accent Lighting
Build continuous LED accent lines on ceilings, under cabinets or behind shelving using the raceway as both a mounting channel and wiring conduit. The heavy-duty fittings make installations easier on masonry walls, and the paintable surface lets you blend or contrast the cove with the room palette.
Workshop Power & Tool Rail
Install a modular power rail system on garage or shop walls: mount raceway runs to feed dedicated outlets, air tool lines or battery charging stations. The metal clips and straps handle heavy-duty applications and keep cords off the floor—making a safer, more organized workspace that can be reconfigured as tools change.